Seeing relationships
This area trains your eye for proportion and slope: how tall against how wide, and how slanted one line is against another. It has three practices.
Krenz · Learning map 1 · 00:37:32“While practising shape accuracy you develop a so-called sense of proportion. You become especially aware of changes in proportion and in slope.”
Large-to-small study
Copy an image by finding its big relationships first, then cutting smaller and smaller, until grouping shapes this way becomes a reflex.
Krenz · Shape lecture 01:27–02:04 · three demos: a pug, a couple, a creature
What it’s for
Krenz is clear that this is an observation drill, not a way to create. Its job is to make grouping a habit you can run quickly on any image.
Krenz · 01:49:31A student asks whether this creates dependence. His answer: it isn’t a creation tool. The point is to make grouping habitual, so you can do someone’s image in five or ten minutes as a reflex, like doodling in class.
The pug: measured, then freer, then five lines
He copies at the same size, right beside the reference. Scaling up makes proportions go wrong. On the reference he marks the top, bottom, left and right extremes, drops a vertical, and finds where a horizontal splits the height about 4 to 1. Then he uses one short segment as a unit for the widths.
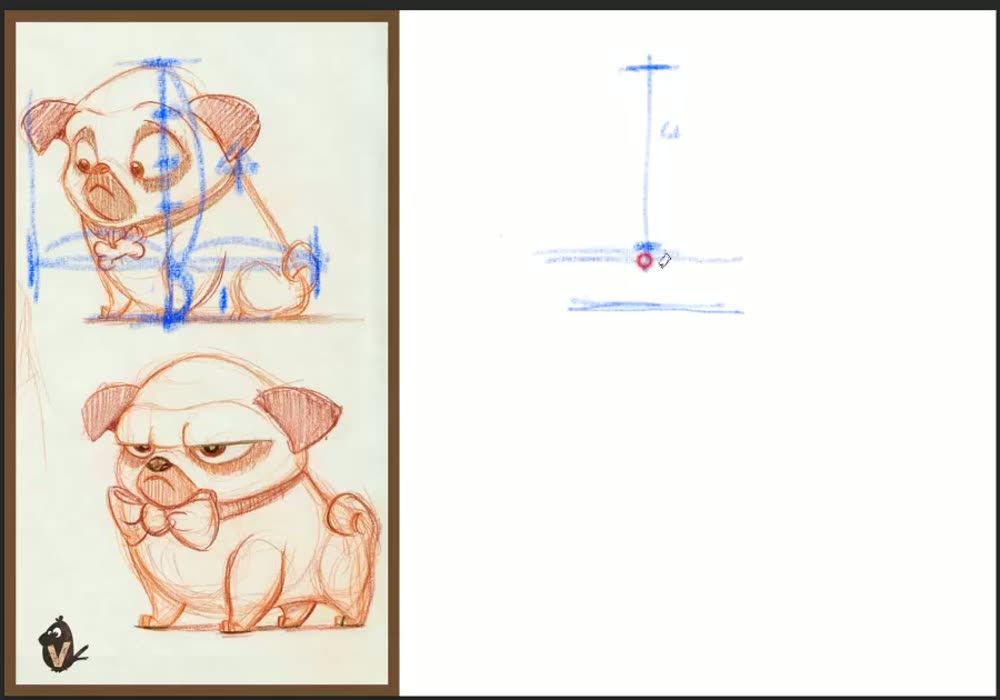
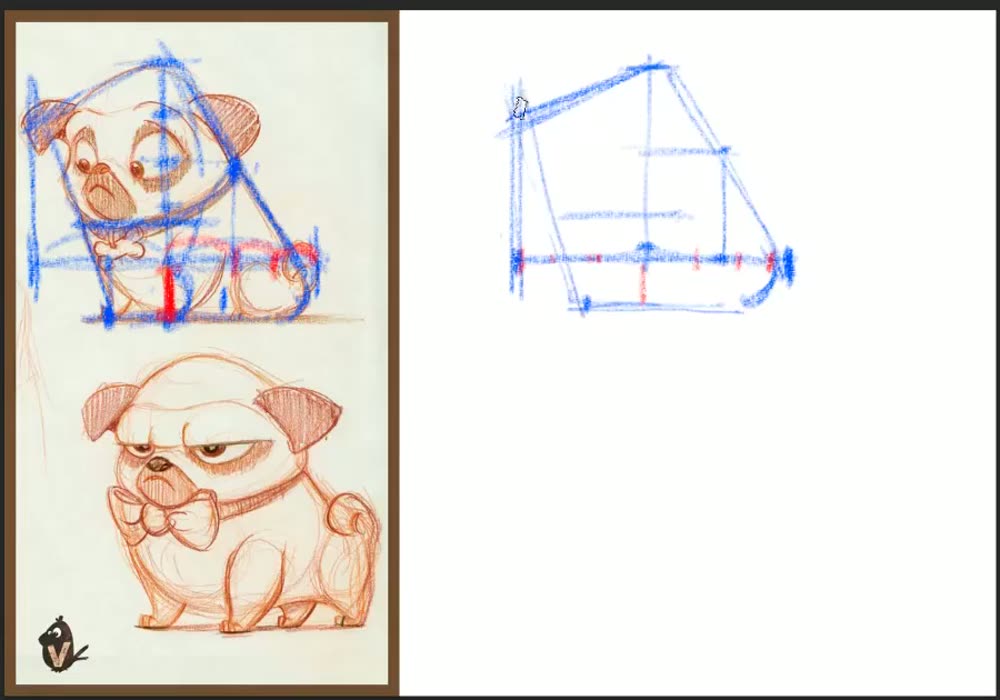
“Pull this vertical up, and isn’t this diagonal’s slope easy to observe? … Because you have a vertical axis and a horizontal axis, you can judge how slanted this diagonal is against the vertical.”
He says the measuring isn’t compulsory. It’s for people who can’t draw yet, and he drops it once fluent. He shows two freer versions: one by eye with fewer aids, then a fresh copy from about five long freehand lines.
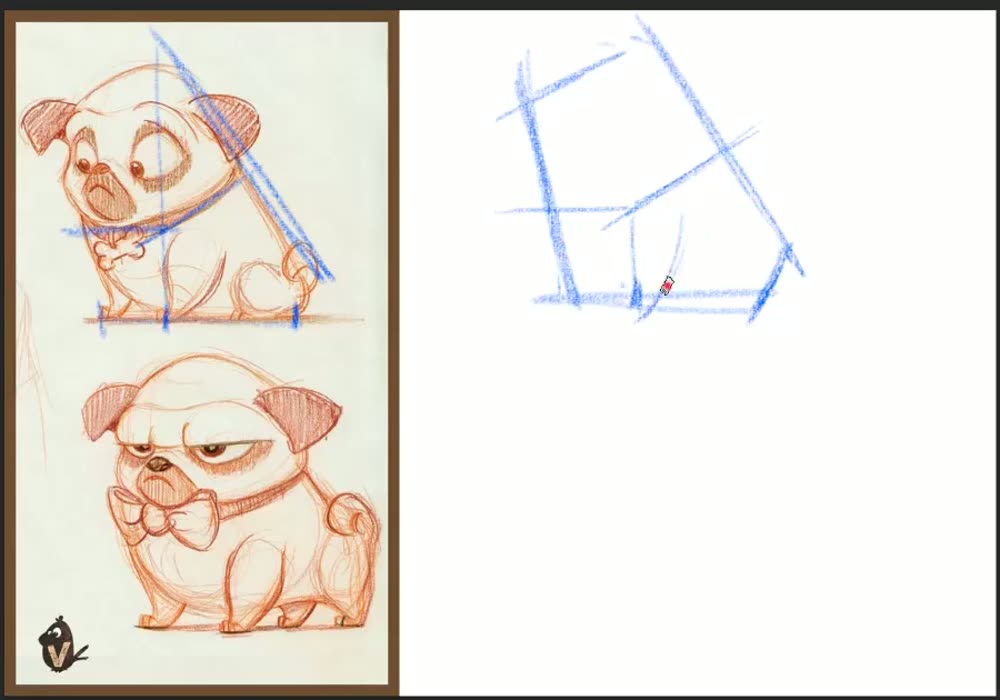
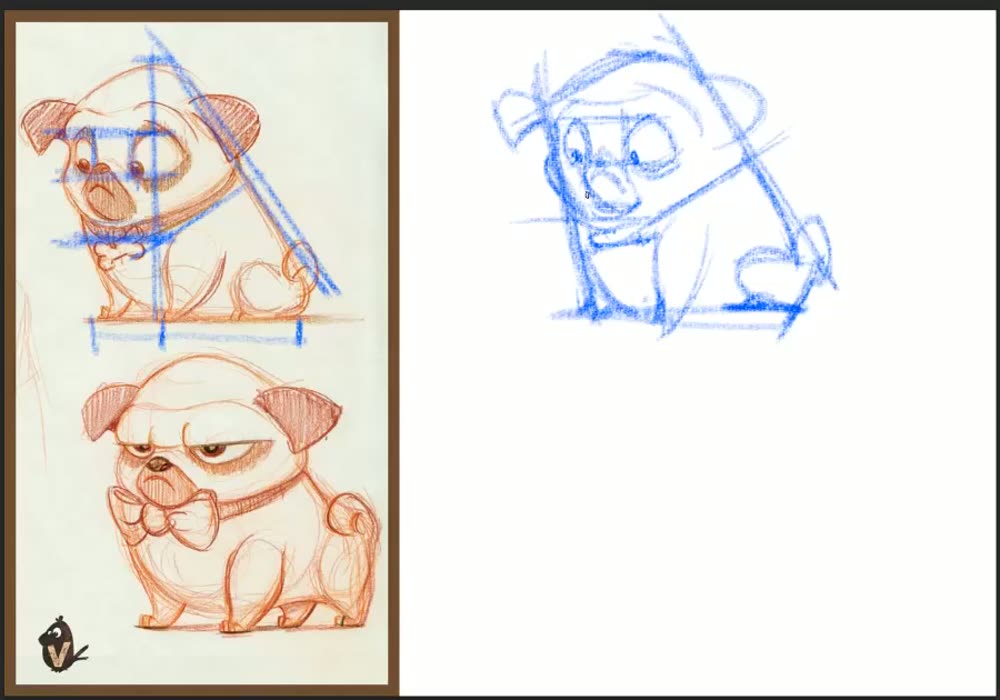
“If you’re fluent, you can draw these five lines freehand by observation. … You see how slanted this line is, and draw yours just as slanted. … Build the skeleton with straight lines first. Only once the branches are in place can you get the curves right.”
The couple: long lines that connect separate parts
A harder image. He sets the top and bottom first, then the width. He looks for “coincidences”: one long line that runs down through a thigh and a calf, and a line from one foot to the other. He marks them on the reference and repeats them beside it.
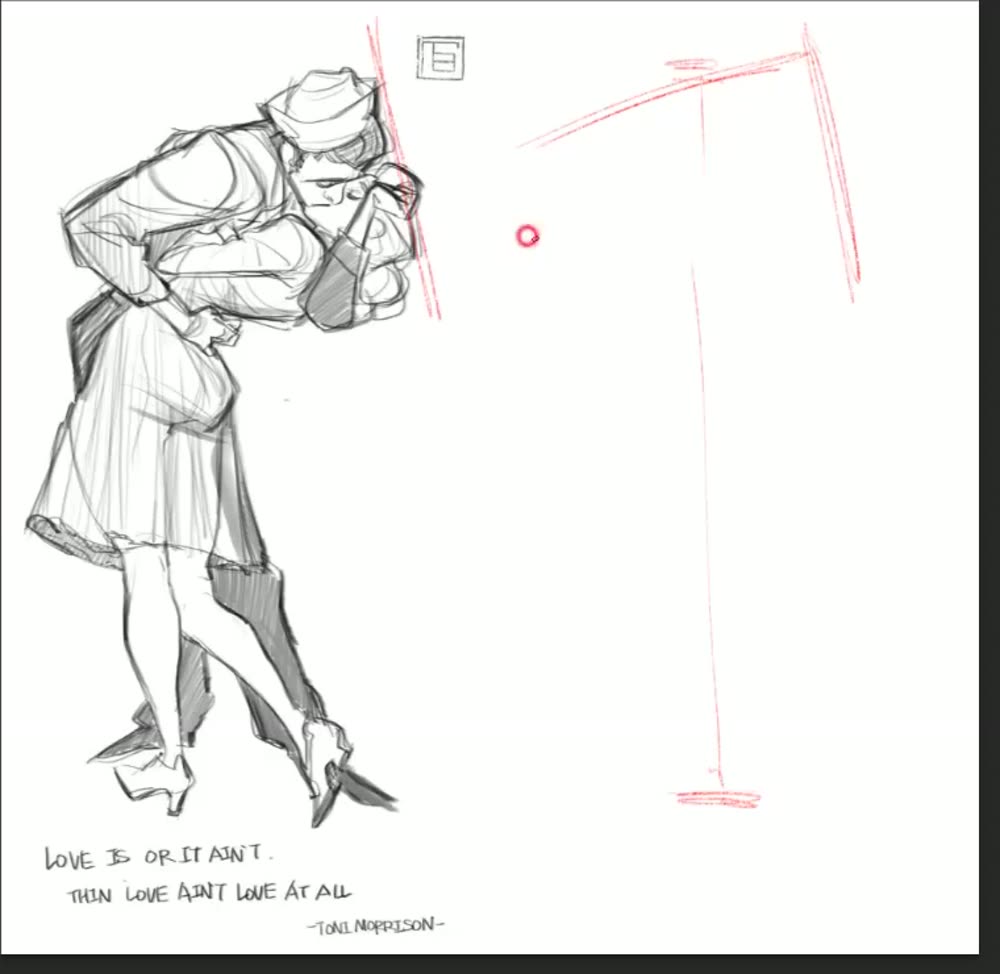
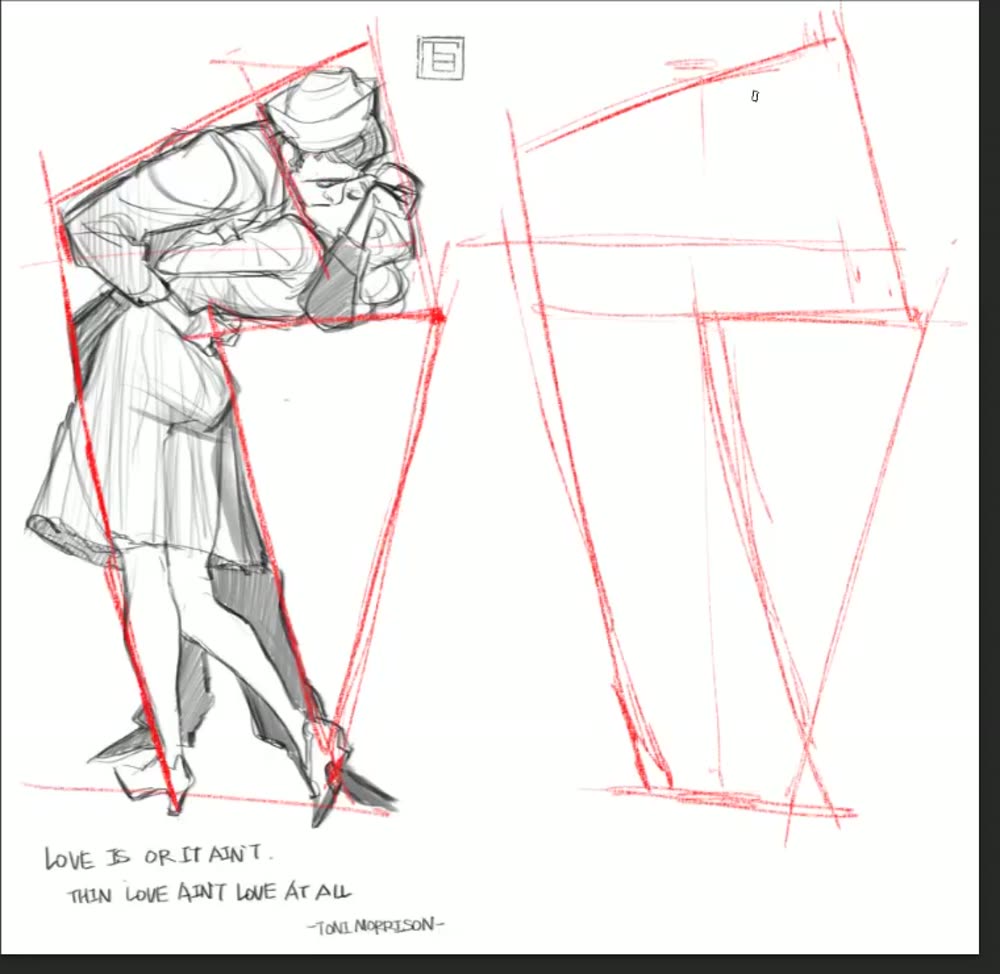
Then he cuts finer and finer, looking for small angle differences between neighbouring lines.
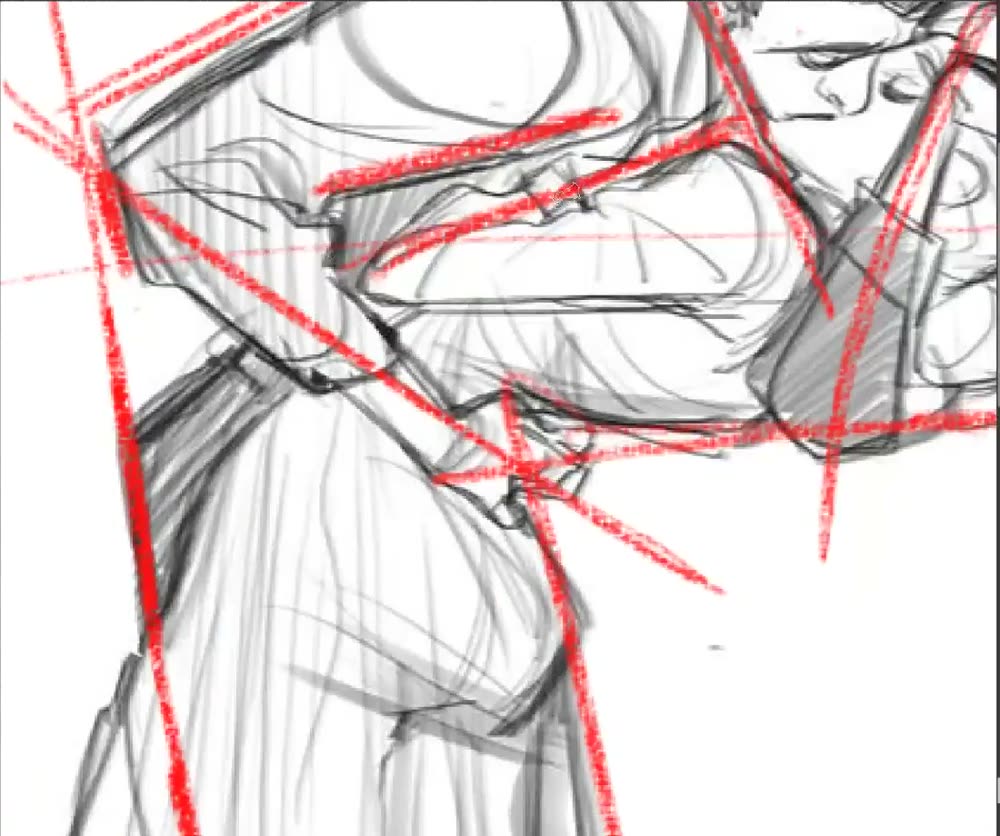
Krenz · 01:50:41“Look at this line and this one. Is there an angle difference? … That’s the key thing in straight-line observation: there are subtle angle differences.”
The scaffold took him under five minutes. He doesn’t lower its opacity. He switches to a black pen and pulls the actual contours out over the red lines.
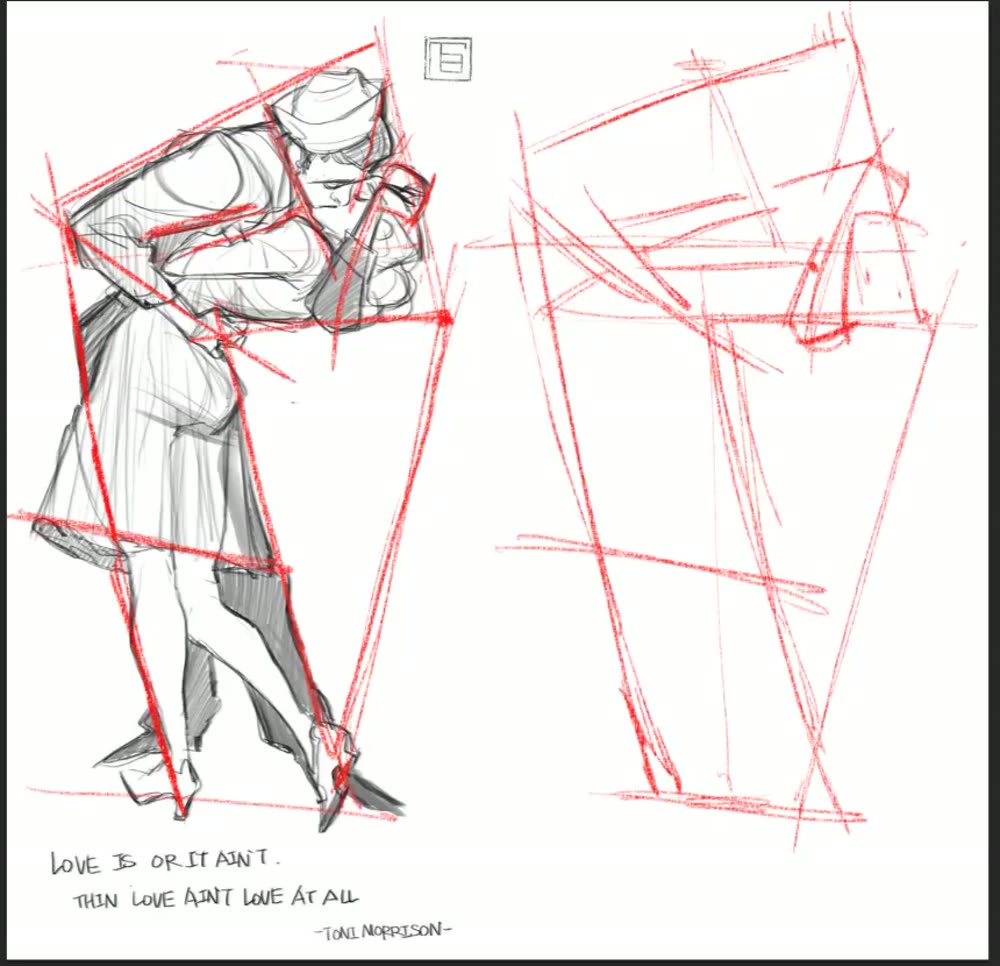
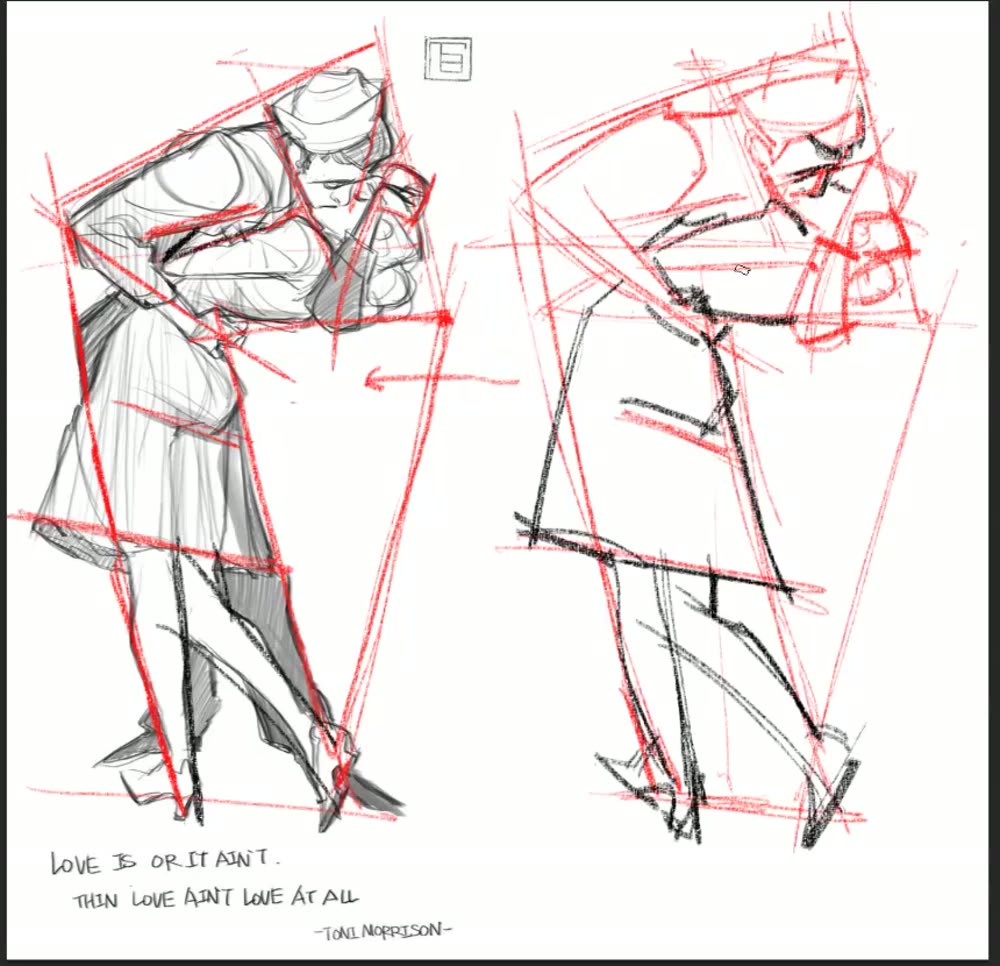
“If you don’t cut from large to small, and fixate on one part at the start, you lose hold of it later and the proportions go wrong. … Large to small, outside to inside. Starting with simpler images makes the order easier to find.”
The creature: finding the order is the exercise
A curvier image. He starts with a single vertical centre line, “only one, no other lines yet”, then a horizontal, then the big arcs. He treats it like a puzzle: which line do you cut first so it doesn’t get messy?
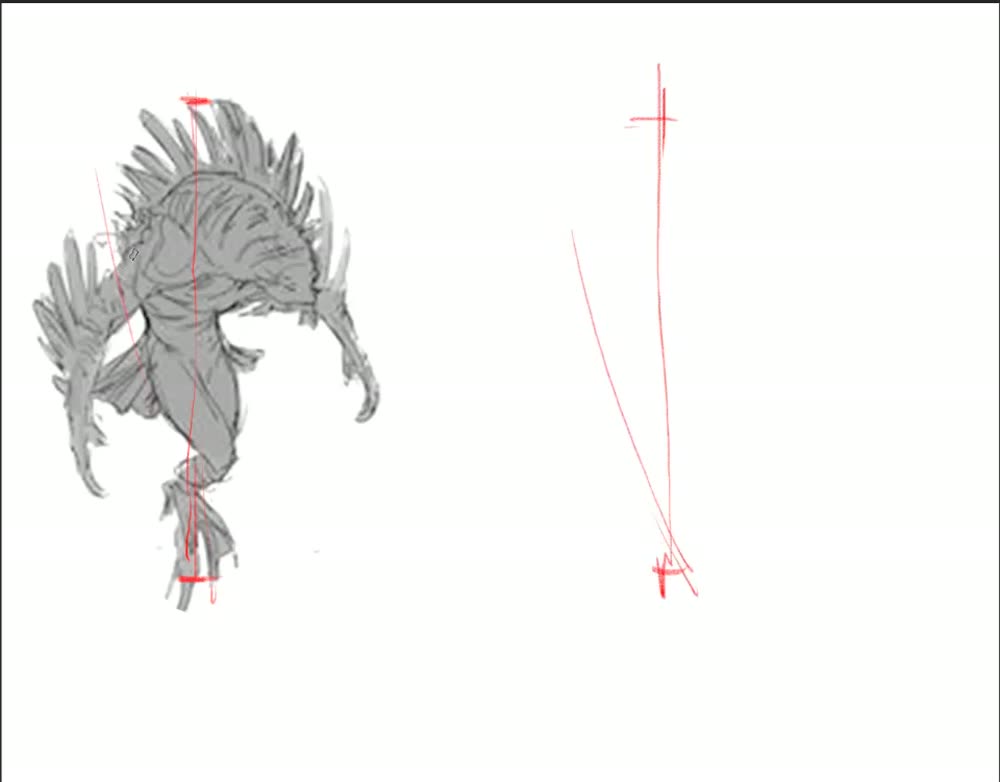
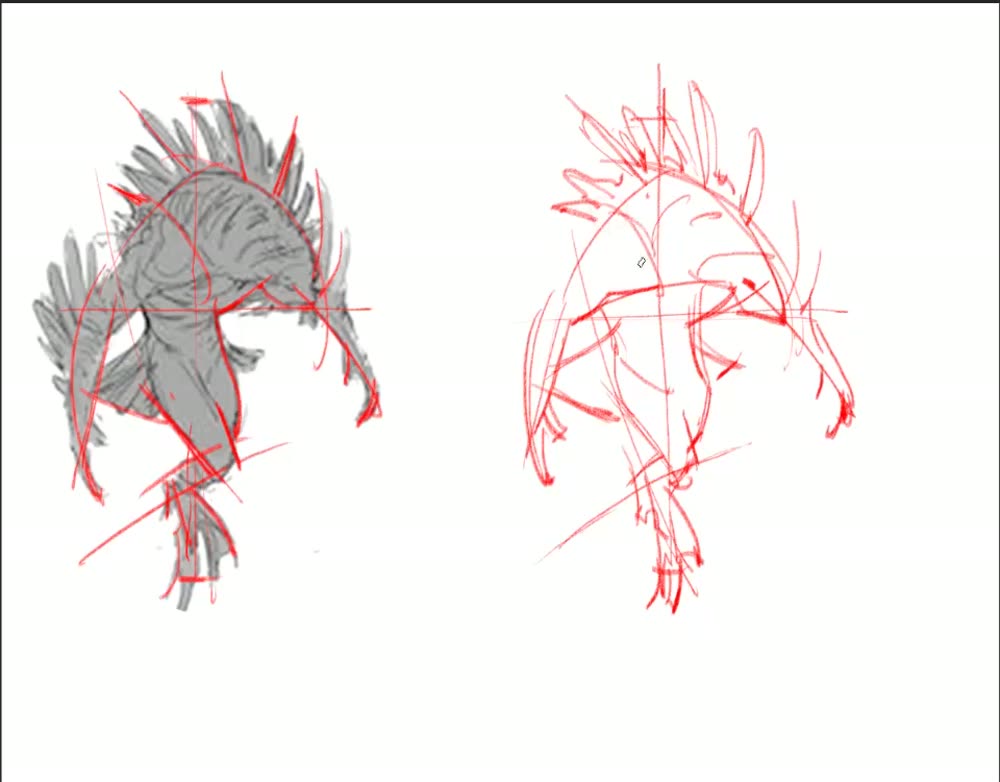
“I don’t demand an exact match here. Chasing identical for some things is unrealistic. … The big direction, the axis direction, has to be right. … You find their angles differ slightly. That’s the purpose of cutting with straight lines: discovering small differences in slope.”
When you practise
Read once. While drawing, hold his question instead of the list.
- Put the reference and a blank area side by side at the same size.
- Mark the top, bottom, left and right, on the reference too.
- Find a few long lines, including ones that connect separate parts. Judge each slope against a vertical or horizontal.
- Cut large to small, outside in. Straight lines before curves.
- Switch pen colour and pull the contours out over the scaffold.
Check“Roughly seventy or eighty percent: widths, proportions and relative positions shouldn’t differ much. If you drew it a bit big, shrink it and compare: are the relationships correct?” (Krenz, 01:41:38)
TimeFive or ten minutes an image, as a reflex. “Don’t spend too long on one image.” (01:49:38, 01:48:57)
Large-to-small study
Same size → extremes → long lines → cut smaller → contours.
Keep asking: how slanted is it?
Judge first, then overlay
Find out which relationships your eye misjudges, by committing to a judgement before you check, then looking again once you know the answer.
Erqiao (KK) · Overlay guide 00:00–07:08 · Practice guide 1 06:48–07:30
Why plain overlay doesn’t train anything
Copy, overlay, fix: that gives you an accurate copy and nothing else. Erqiao adds two observation steps around the overlay.
Erqiao · Overlay guide · 02:09“An important purpose of copying is to improve your eye’s observation. Drawing accurately is only the visible result of better observation. An accurate result doesn’t necessarily mean strong observation.”
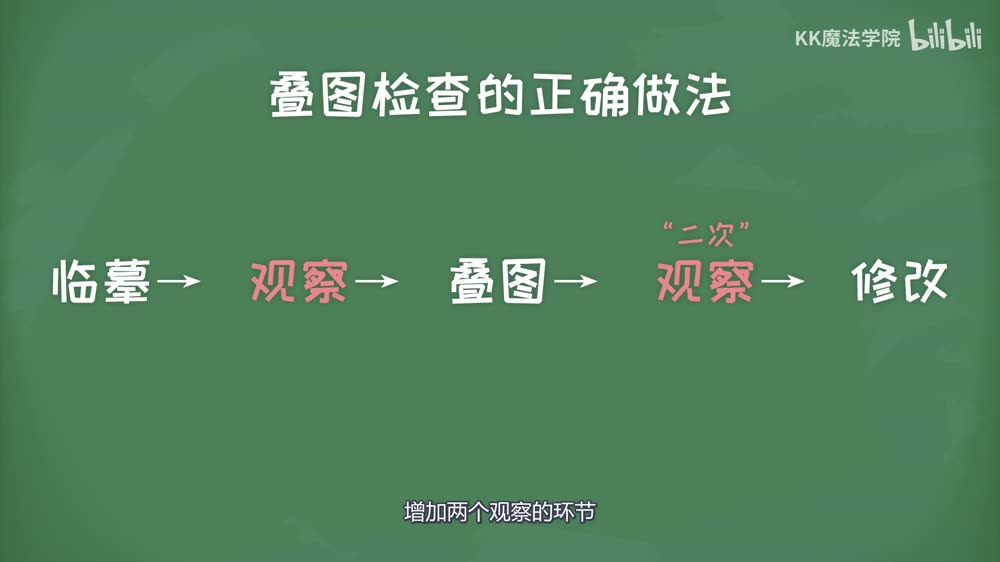
The bird demo
1. Copy one stage. He frames a cartoon bird with a simple triangle and copies just the triangle.
2. Judge, out loud or on paper. Not “accurate” or “not accurate”. A definite verdict on three things: height, width and slope.
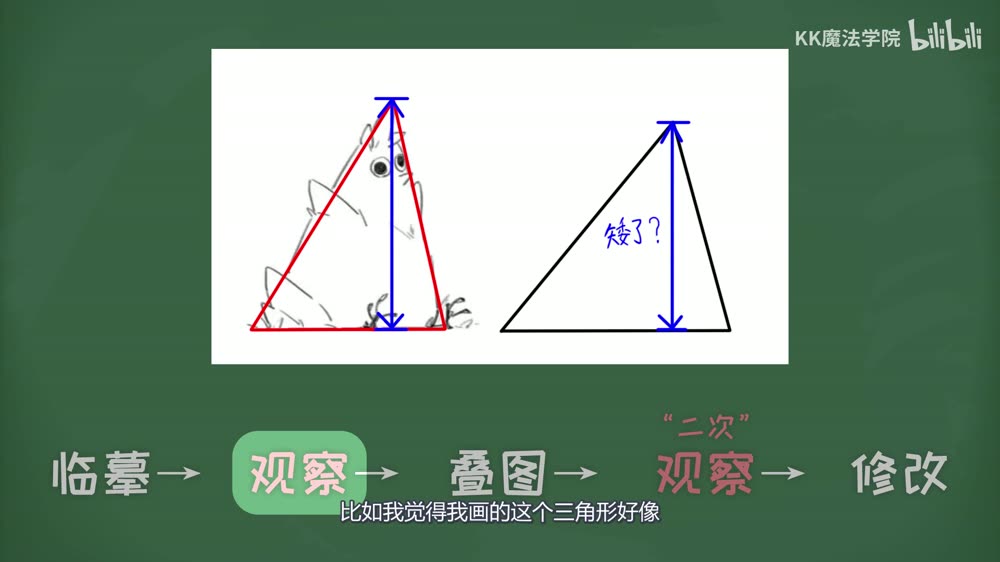
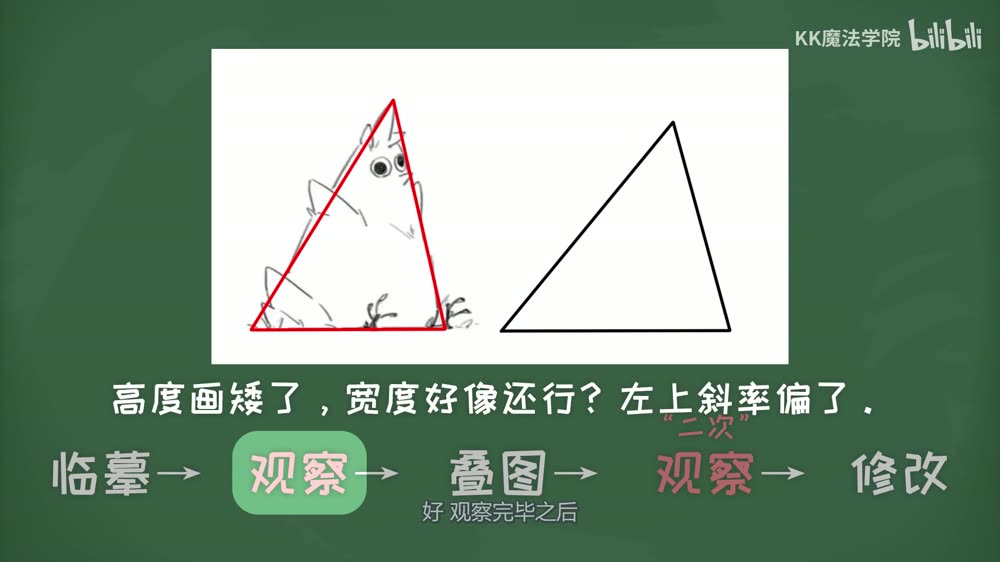
“You must give a definite observation. You can’t just say ‘accurate’ or ‘not accurate’. Some common indicators: tall or short, fat or thin, tilted or straight. … Dare to make a judgement. Don’t fear observing wrongly; just do your best.”
3. Overlay to test the verdict. Height: right. Slope: right. Width: wrong. The copy is clearly fatter, so his eye is weaker on width.
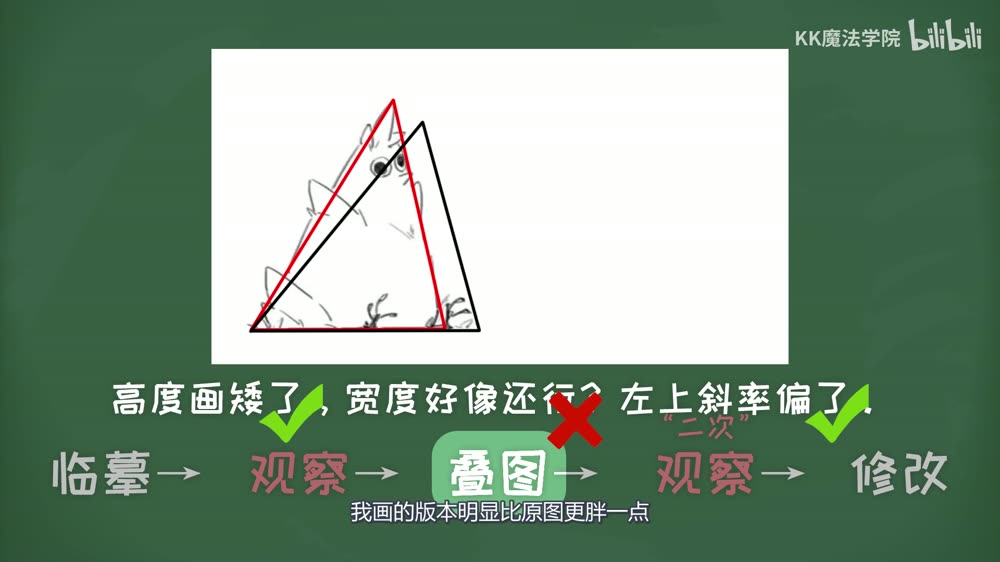
Erqiao · 04:03“The real purpose of overlay checking is to correct your observational judgement: which parameters your eye is sensitive to and which are weak. Fixing is done with your eyes, not just the overlay.”
4. Second look. Move the copy back beside the original. Knowing the answer, look again at the width you missed, until you can see it without the overlay.
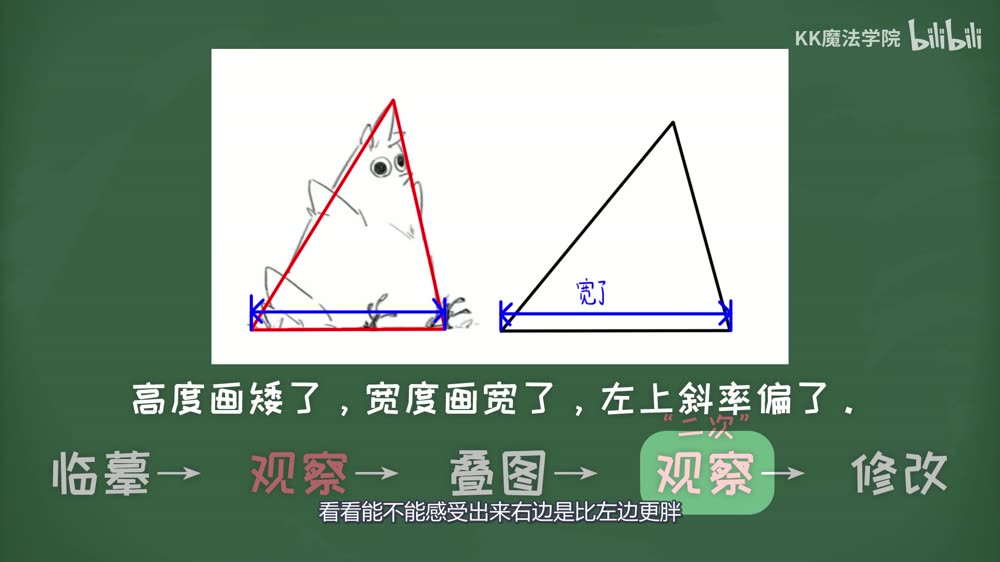
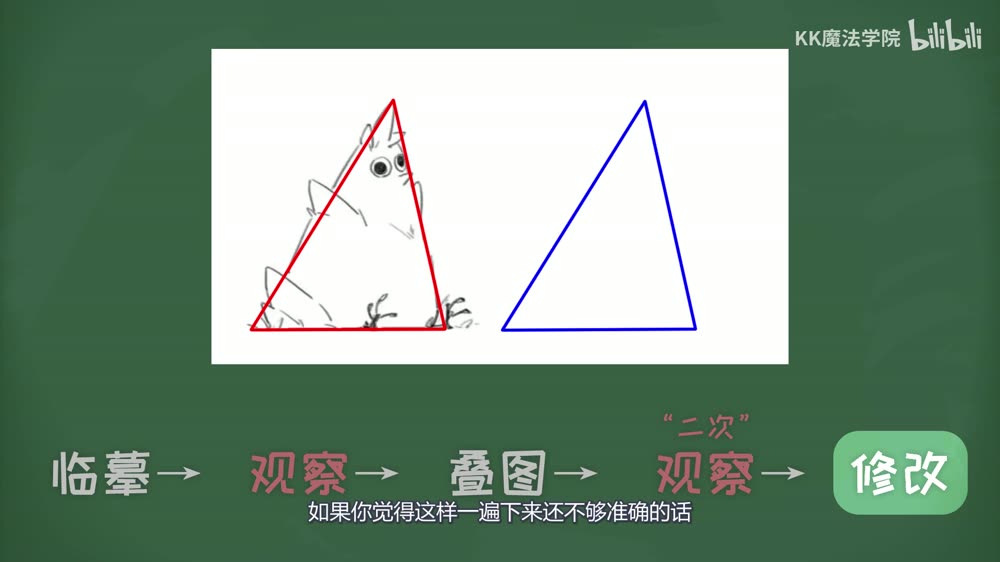
Erqiao · 04:27“Look again knowing the right answer, focusing on the width you misjudged. … Let your brain remember the feeling of these two widths differing.”
5. Fix by eye. Draw the corrected version over the flawed one, then erase the wrong lines. Repeat the loop if needed.
When to overlay
Not after every stroke. After a whole stage: the outer frame, the second-level frame, the sketch, the line art. At most three times per stage.
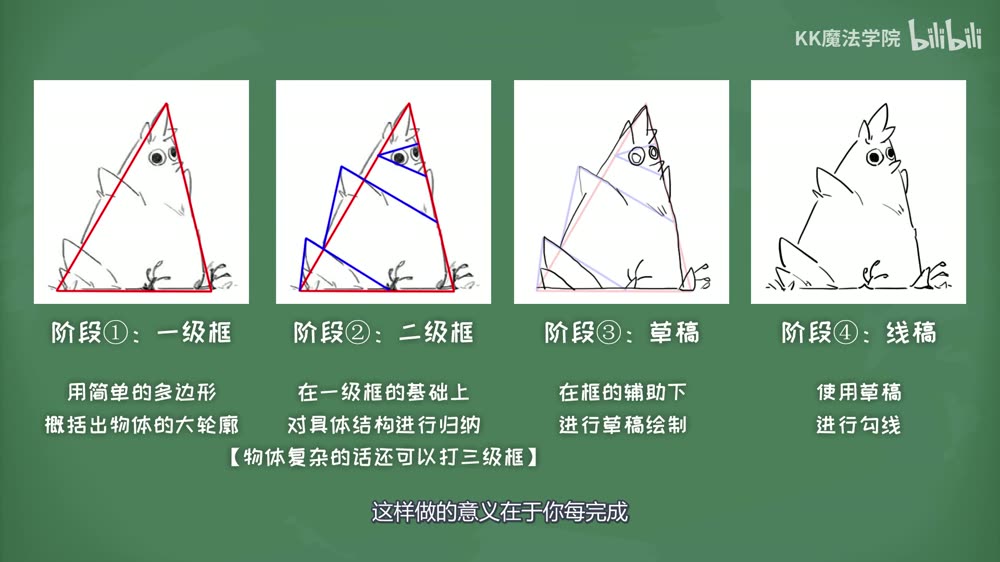
Erqiao · 06:07“Don’t overlay-and-fix endlessly within a stage. At most three times, because overlaying is copying the answer. The more you copy, the less your eye works.”
His practice guide adds a way to see progress: start with many checkpoints, then drop some as you get fluent and see how far you get with fewer.
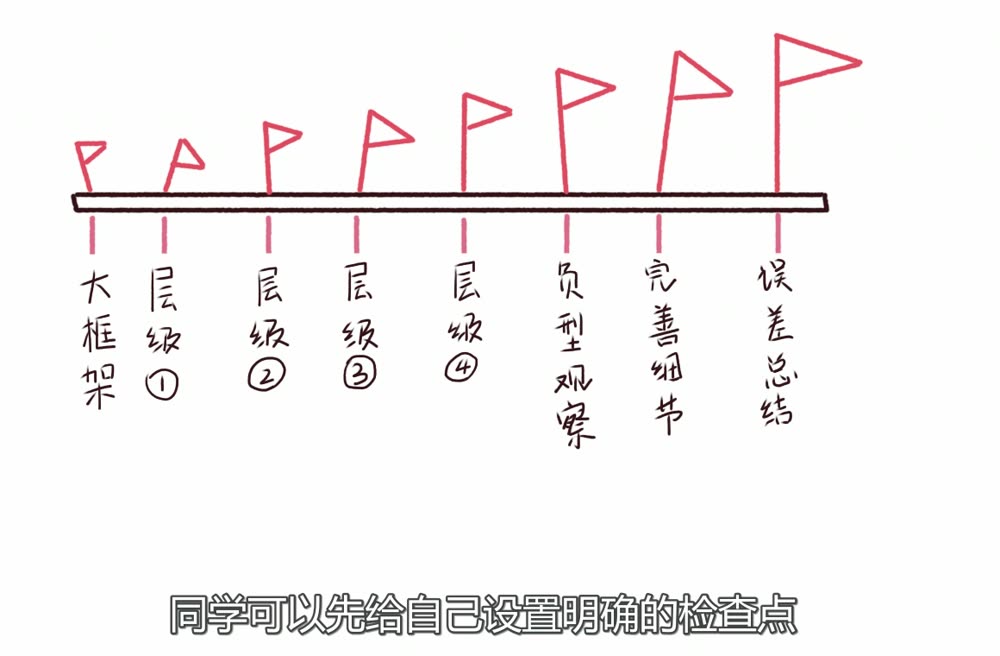
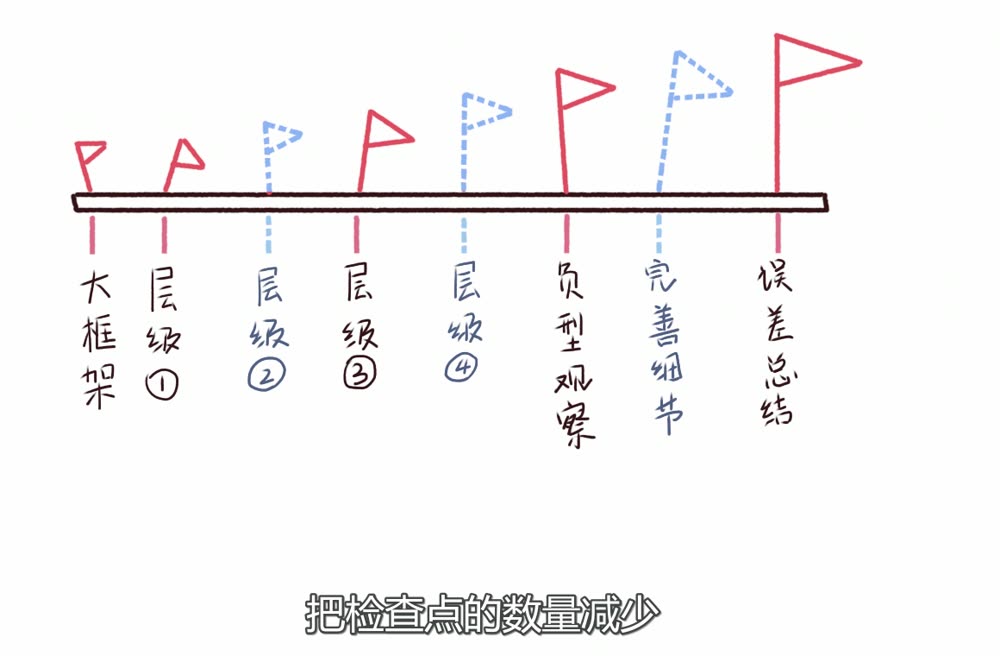
Erqiao · Practice guide 1 · 07:15“Fixing with Ctrl+T only nudges the result toward accuracy. What matters is knowing what caused the error: wrong height or width, or a slope error? If that’s hard, use a nine-square grid or the coordinate method to get familiar with these proportions.”
When you practise
Use this on any copying study, including Practice 1 above and the cut step in Area 2. Read once, then hold his question.
- Each stage on its own layer. Finish one stage.
- Side by side, write a verdict: height, width, slope.
- Overlay. Which parts of the verdict were wrong?
- Separate them. Look at the miss until you can see it.
- Redraw by eye. At most three overlays per stage.
CheckWas your verdict right, parameter by parameter? Over time: can you manage with fewer checkpoints? (Erqiao, 04:03; Practice guide 1, 07:03)
Judge first, then overlay
Stage → verdict → overlay → second look → redraw by eye.
Keep asking: taller or shorter, fatter or thinner, more or less tilted?
Push a pose’s angles
Use your eye for slope on purpose: find the main directions in a figure, then push them to change its attitude.
Krenz · Learning map 1 · 00:32:40–00:38:00 · 360p recording, so images are soft
Students straighten things
He draws a simple “teacher” head, tilted hard. Then he duplicates and rotates it to show what students’ copies turn into: B is less tilted, and C is fully upright.
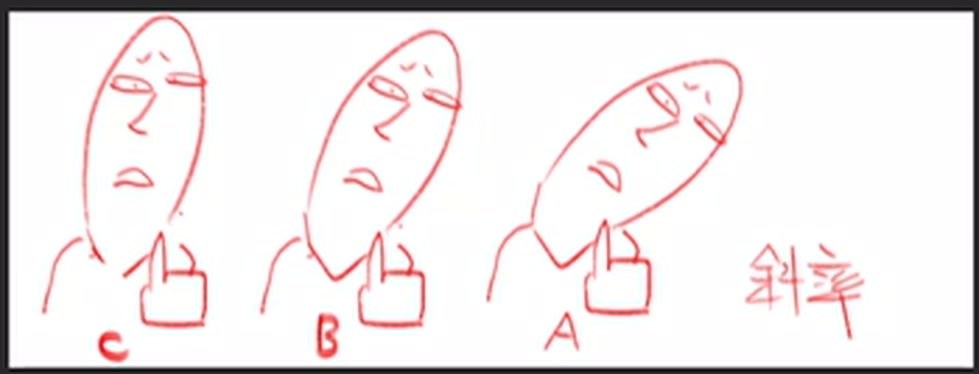
“Everyone tends to straighten things up, so it gets weaker again, until it’s completely upright. … Of A, B and C, which looks more pissed off? Isn’t it A, with that slant?”
His teaching assistant’s study notes make the same point, with a monkey drawing: get the outline’s slope slightly wrong and it’s fine, but get the axis wrong and it’s ruined. Erqiao’s practice guide uses the same monkey.
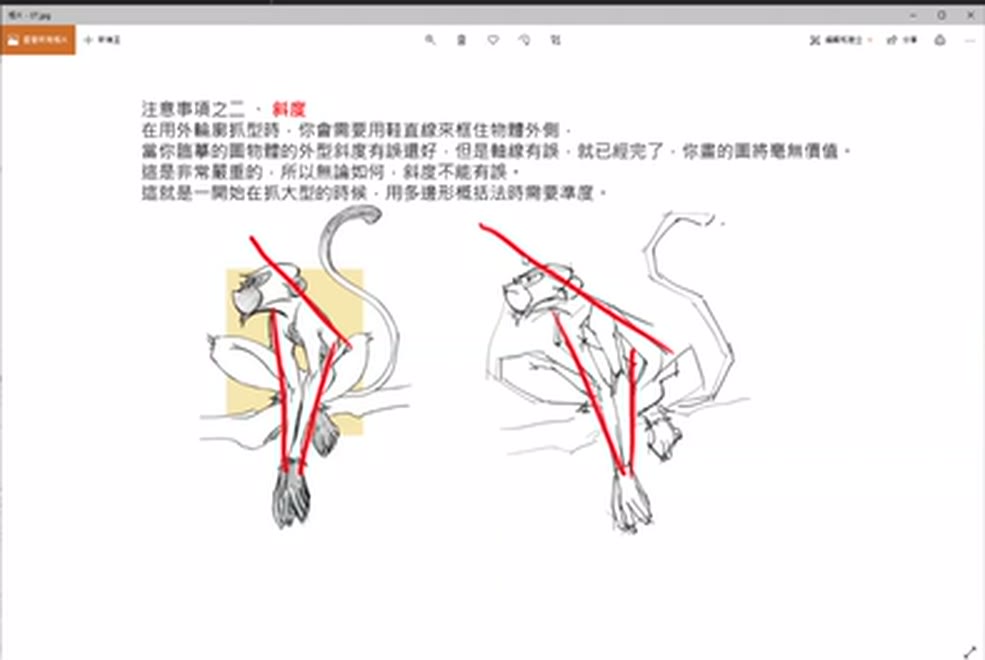
Marking a figure, then a pushed version
On a sketch by another artist, he draws red lines live through the body axis, head, shoulders, garment hem, hands and knee. Then he opens a pushed version beside it. That version was prepared earlier, not drawn on stream.
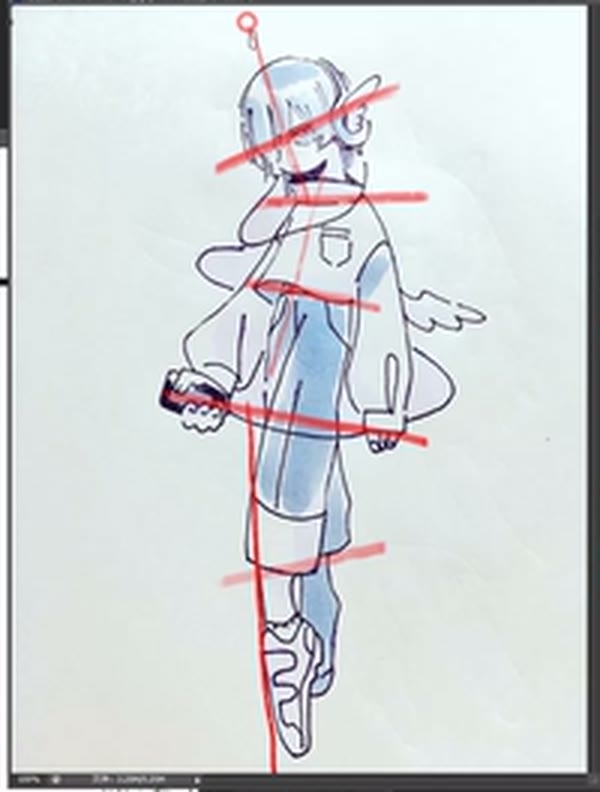
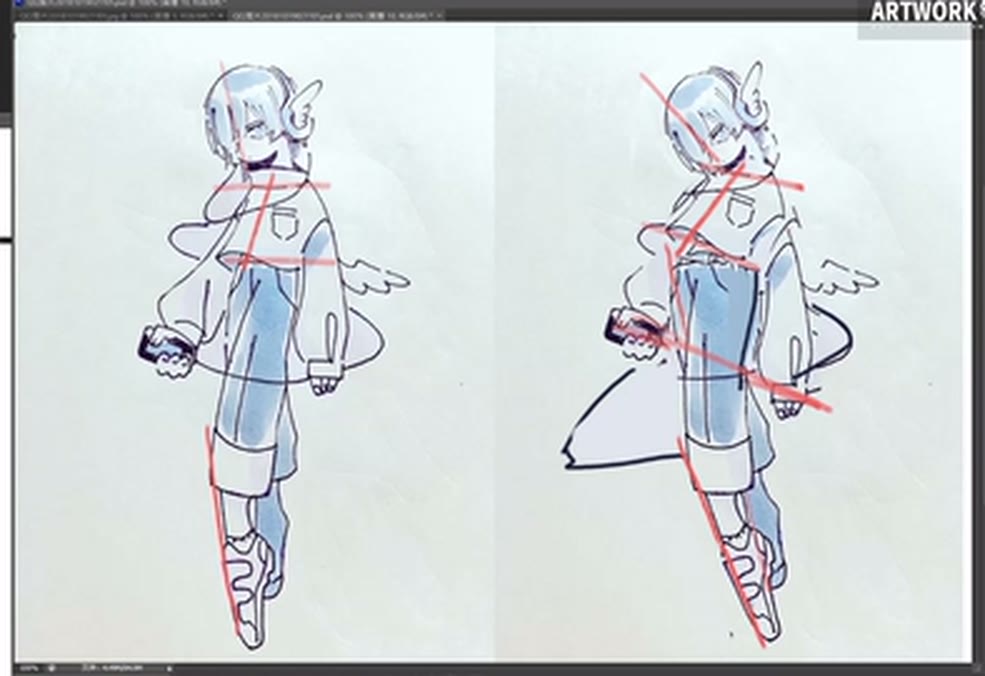
“Once you have this information, you can strengthen it when you draw yourself. … We changed the original axis to this one. His shoulders were flat; we dragged them down like this. … So the slope gets more exaggerated, and the body axis swings more than before.”
The changes he lists: a new body axis, the flat shoulders tilted down, the garment flipping up with it, one hand raised and the other lowered, and the leg bent at more of a slant.
Krenz · 00:37:03“If you ask how to train gesture: whether you can feel the effect of slope makes a big difference. … The overall slope changes, and then your action changes with it.”
When you practise
- Take a reference figure. Draw lines through its main directions: body axis, head, shoulders, hips or hem, hands, legs.
- Redraw it beside the original with those directions pushed further.
- Compare the two. Which has more attitude?
Check“Doesn’t it look much more swaggering?” (Krenz, 00:36:38). It’s the attitude you read, not a measurement.
Push a pose’s angles
Mark the directions → redraw them pushed → compare.
Keep asking: can you feel what the slope does to the attitude?