Shapes you can remember
This area trains one thing: turning what you see into a few simple pieces you can hold in your head and rebuild later. It has two practices and three worked examples.
Krenz · Learning map 2 · 00:11:33“These simple shapes came from copying other people’s pictures. I cut out those masters’ shapes, recorded them as simple shapes, and drew them from memory. Because I’ve done memory drawing for a while, when I draw my own work I can call these shapes up from my image memory bank.”
The polygon pieces
See any subject as a few simple pieces, get each piece’s slope right, and reuse the pieces in new poses or arrangements. He demonstrates on legs; the method isn’t leg-specific.
Krenz · Shape lecture 00:12–00:32 · Learning map 1 01:18–01:24
The problem he’s answering
A student told Krenz they had copied twenty or thirty Bridgman drawings and still couldn’t draw from imagination. Krenz explains why. The anatomy-book way asks you to memorise a whole leg at once: the greater trochanter, the thigh muscles, the knee, the calf, the tibia, the soleus, and the height of each. That’s too much to hold. It only works for the leg in that one view, and drawing it once won’t make it stick.
Krenz · Learning map 1 · 01:22:22“Even after drilling it, many people only remember how to draw a straight, standing leg. Bent legs, kneeling legs, crossed legs: each one has to be memorised by rote. Once the leg bends, they can’t remember it. Their CPU crashes. They don’t realise this shape could be pieced together entirely from the shapes they memorised for the front-view leg.”
His answer: five pieces
He gave the student five shapes, labelled A to E. Most have five or six sides.
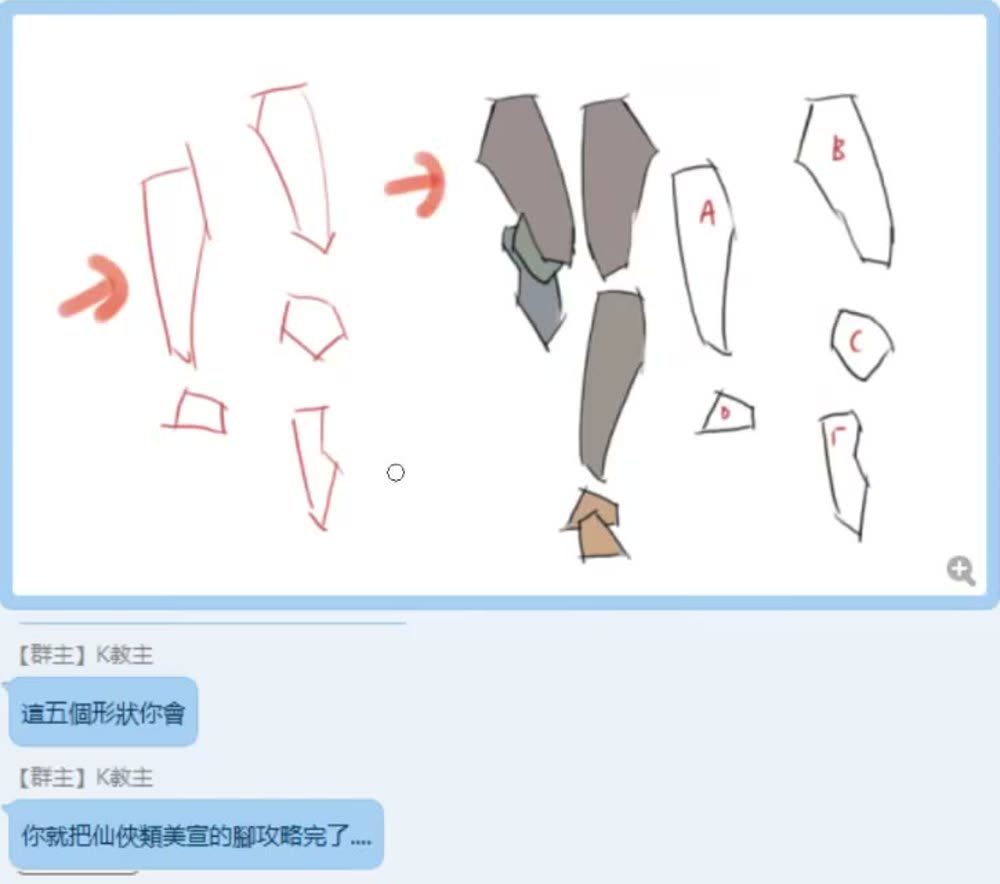
Krenz · Shape lecture · 00:13:50“Simplify the shape into something you can remember, and divide it into several small groups. … The shapes are separated into pieces. You’re not being asked to memorise the whole leg in one go.”
Fitting the pieces to a real illustration
He takes a painted illustration he found online and builds its legs from the same pieces. He flips piece A for the lower part, uses B in two places, and uses C for another section. Then he draws a blue line down the middle of each piece.
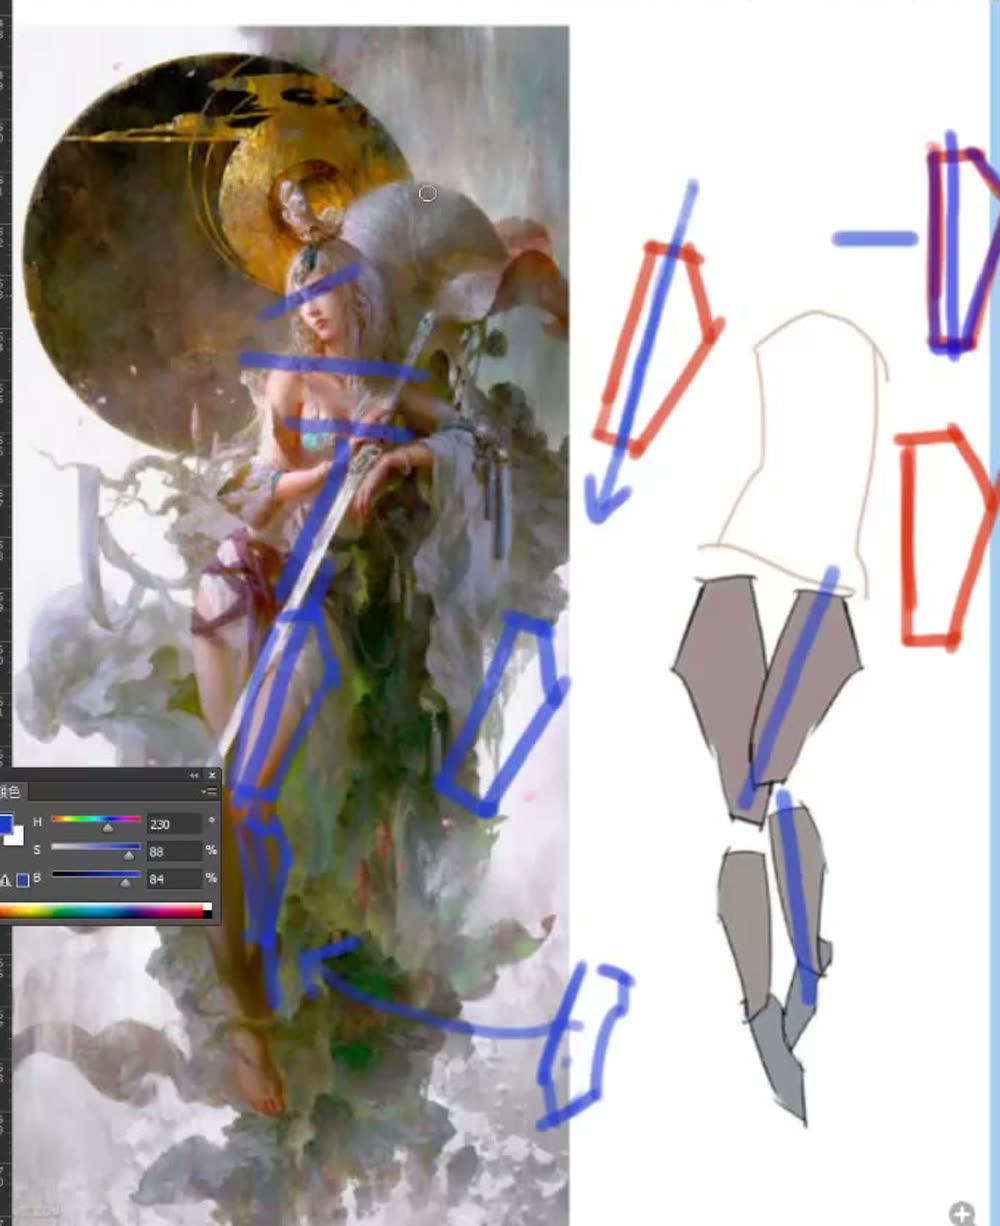
That blue line is the key. Every pentagon has a hidden centre line that shows which way it points. Tilt the piece and the line tilts. Because the piece is simple, you can see its tilt clearly. On a bumpy painted leg, you can’t.
He does it again on a different artist’s character in the map lecture. There he says he didn’t change the proportions much. He only changed the slopes. Thigh, then calf, then the foot as a small separate block with its own direction.
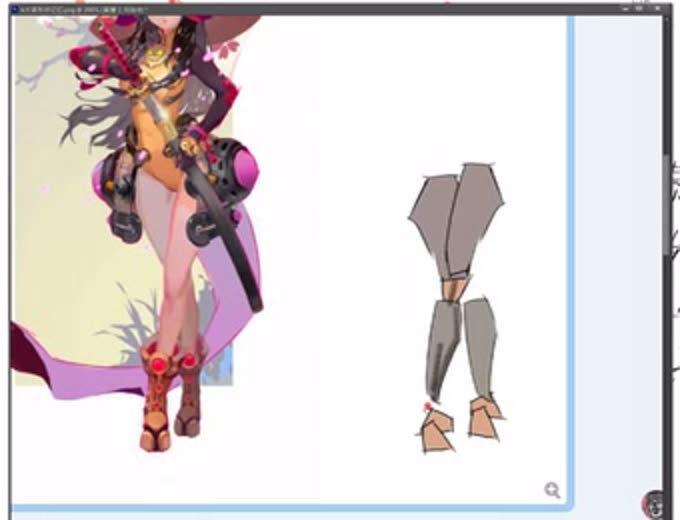
Krenz · Shape lecture · 00:17:53“It’s really a game of building blocks, a tangram, a sticker book. Given the puzzle piece, can you set it at the correct slope, and put the right piece in the right place? … Once simplified, it becomes a module. The recurring question is whether its slope is right. Get the slope and the angle right, and the overall rhythm will be right.”
Then the anatomy comes back
The pieces don’t replace anatomy. They come first.
Krenz · Learning map 1 · 01:21:18“I first split it into paper-like pieces. This is shape memory. Once I’ve assembled the shapes, I call on my understanding of the muscles: add a sartorius here, put the quadriceps on, and it looks like a muscled leg. … First get the shapes assembled correctly, then call on your understanding of the muscles.”
Why it pays off
- Any pose. The same pieces build bent, kneeling and crossed legs. Only the slopes change.
- Arms too. “You’ll find the arm and the leg have almost the same shape, so remembering the arm is remembering the leg.” (Learning map 1, 01:23:39)
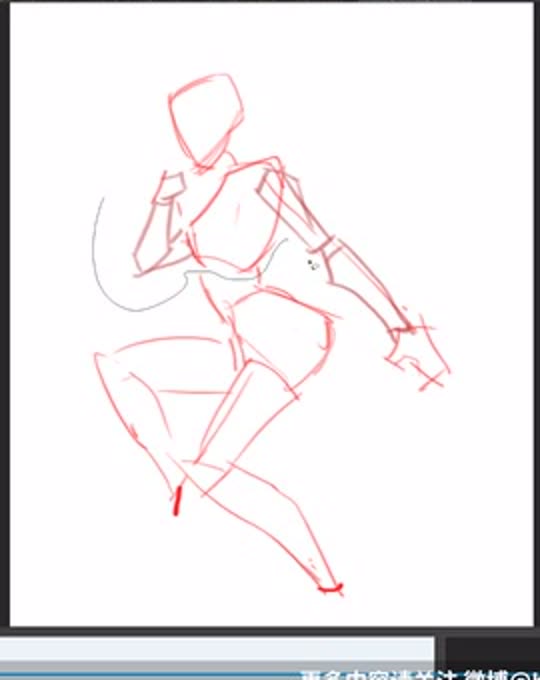
- Your own figures. He uses these pieces to start an invented figure. While it’s still flat he resizes the chest and head and lengthens the arm, because at that stage changes cost nothing. That’s the Area 3 practice “Invented figure”.
Making your own pieces from any reference
The five pieces are his, and they’re leg pieces. The method works on anything.
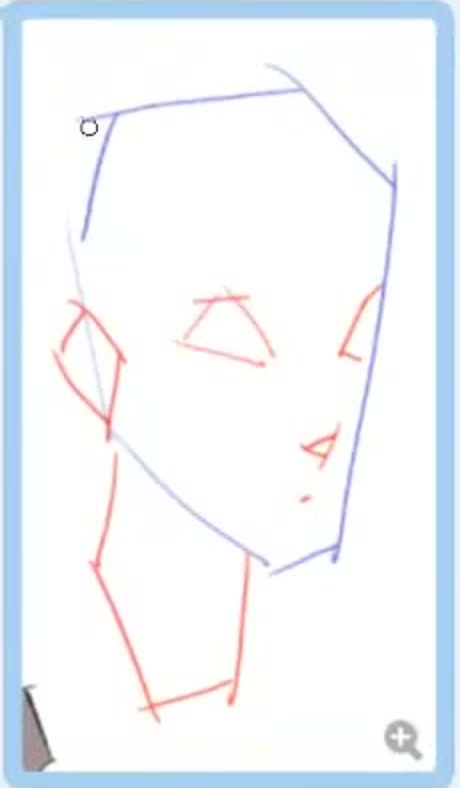
Krenz · Learning map 1 · 01:17:46“When we draw objects, we usually cut them into five- or six-sided shapes, a combination of five- and six-sided shapes. Cutting the chest, for example: one, two, three, four, five, six. Cutting a head: one, two, three, four, five.”
The same lecture shows how he makes new pieces.
Cut with straight lines, not curves. A note on his screen earlier in the lecture says it bluntly: “Curves: super hard to remember.”
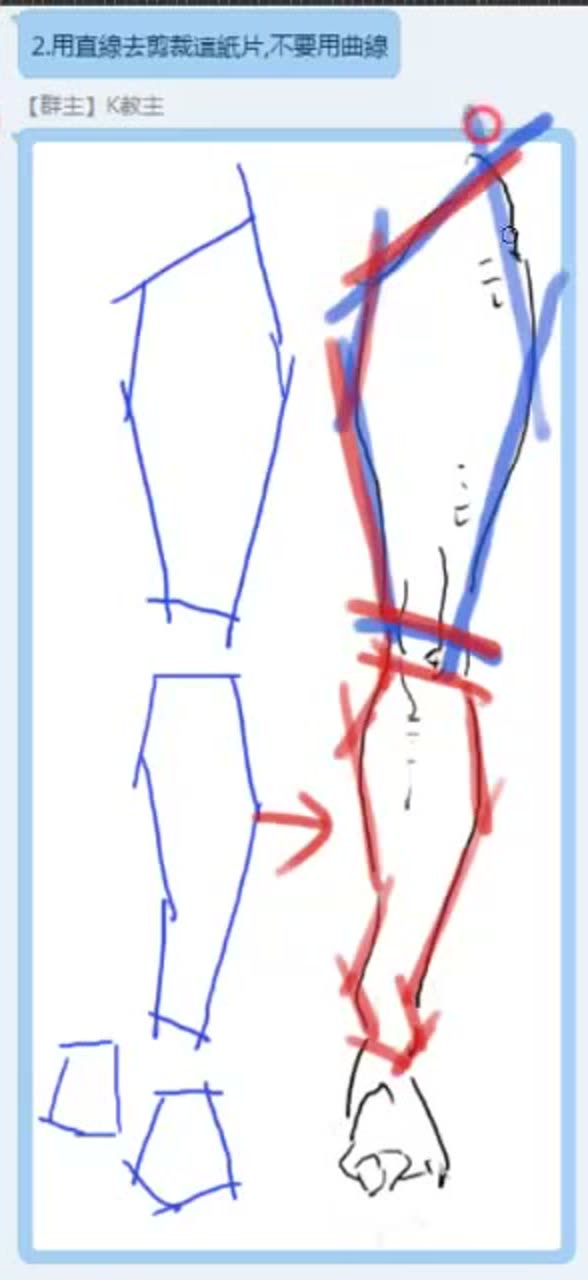
Don’t be fussy. A student found nine changes along one edge and tried to record them all. Krenz calls that too wordy.
Krenz · Shape lecture · 00:29:25“How do you decide which details to keep? That differs from person to person. What I’m telling you is: group first. Then use five to seven lines per group to enclose something.”
He compares it to a phone number: give someone fifteen digits and they can’t hold it. He adds that five to seven is his own view, not an absolute rule.
Remember the corners, not the wiggles.
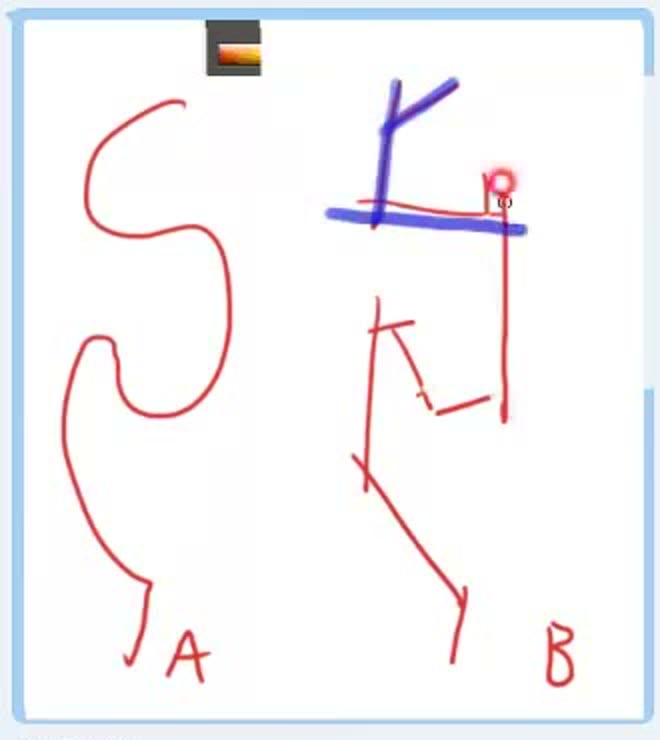
Krenz · Shape lecture · 00:31:58“You can’t completely remember all those subtle changes. But fix its key points and remember the scaffold, and next time you draw it, I believe version B will be much easier to remember than version A. Even after I’ve looked for a while, moved it away and drawn from memory, I can remember it better.”
When you practise
One session in three parts: cut, remember, reuse. Part 3 is the point, and parts 1 and 2 feed it. Read the steps once. While drawing, hold Krenz’s question instead of the list.
Krenz · Learning map 2 · 00:18:04“Shape capture is not mindless shape capture: it involves strategies. … If you only draw mindlessly, after practising for a while you may not know why you are practising this.”
Optional warm-up · his assignment · Learning map 1 · 01:18:44
Spend five minutes drawing his A–E pieces, then recall a couple. Skip this if you already break shapes down easily.
Part 1 · Cut · Shape lecture 00:16–00:18, 00:28–00:32
- Pick an illustration and a part of it: a limb, a torso, a head, hair, clothing, an object.
- On a layer over it, group that part into a few pieces. Enclose each group with five to seven straight lines.
- Draw a line down the middle of each piece.
Part 2 · Remember · the loop from Practice 2, kept short
- Hide the reference and your pieces. Redraw the pieces from blank.
- Take one look back at the biggest miss. Hide it again and redraw.
Stop whenthe major directions and simplified shapes are similar enough. Small errors can be ignored. (Erqiao, Memory guide 05:54)
Part 3 · Reuse · Learning map 1 · 01:19:06, 01:22:45, 01:23:49
- Copy your pieces to a new layer. Lasso, flip and rotate them into a different pose or arrangement. Change the slopes, not the proportions.
- Add the anatomy you know on top.
Checkis each piece’s slope right? “Get the slope and the angle right, and the overall rhythm will be right.” (Krenz, Shape lecture 00:18:09)
Krenz does this part digitally. He colours the pieces, copies and pastes them, merges them, drags the foot into place and erases the overlap.
Krenz · Learning map 1 · 01:23:49“On the computer I can very easily adjust the proportions and positions. This stage is all silhouette. … Because no volume has been assigned yet, it’s quite simple. Changing it doesn’t carry much cost.”
Krenz on choosing a reference · Learning map 2 · 00:34:51“The better approach is to copy a shape that has already been simplified, and first experience how its line segments flow.”
Polygon pieces
Cut → remember → reuse.
Keep asking: is each piece’s slope right?
Memory redraw
Find out whether your simplified version lets you rebuild the image, and let what you forget tell you what to look at next.
Erqiao · Memory guide 03:03–06:16 · Krenz · Learning map 1 01:10–01:15, 02:45–02:51
How the two practices fit · my summaryKrenz calls his straight-line scaffold “a memory method” (Shape lecture, 00:31:04). The pieces are what you remember. Memory redraw is how you find out whether they worked.
Erqiao · Memory guide · 02:31“There is an enormous amount of information in one picture. … Unless you are a memory master, you cannot remember all of it. That forces you to choose the most important information to remember, and to summarise complicated shapes in a simple way.”
The dog demo
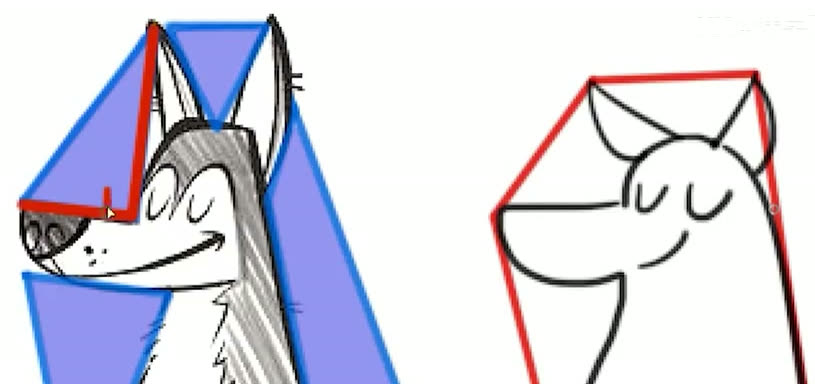
1. One study while looking. Erqiao draws a red angular enclosure for the whole dog, then blue shapes for the gaps around the ears, muzzle and chest.
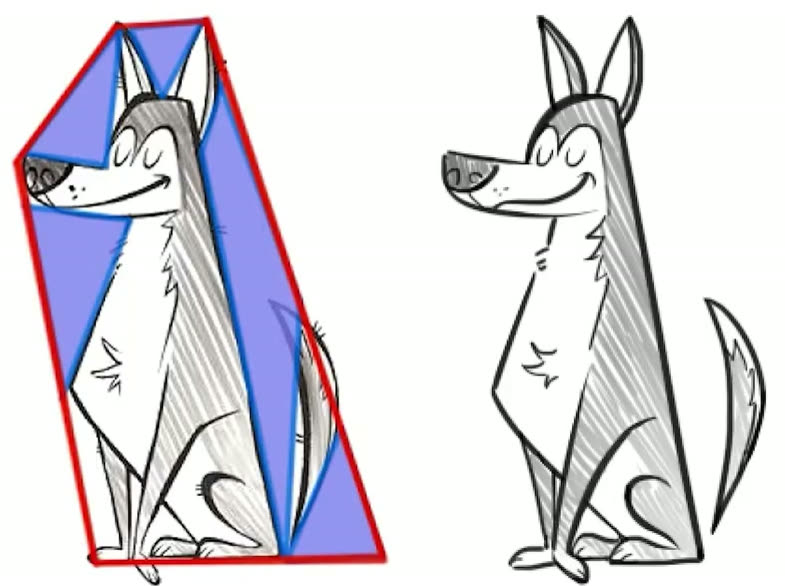
2. The first recall stalls. Reference hidden, blank page. He gets a top edge and one long side, then stops. He calls this completely normal. He looks back only at what he couldn’t rebuild, the overall enclosure. Then he hides it and starts again from blank. He doesn’t patch the old attempt.
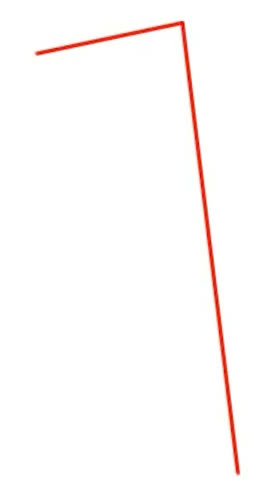
3. Turn a vague feature into a relationship. A later attempt reads as a dog, but the ears are too broad and short. Instead of telling himself to remember the ears better, he looks at the gap between them: a tall, upside-down triangle. He also notices that the line from the ear tip to the muzzle junction sits roughly at right angles to the top of the muzzle, and that the chest edge slopes more steeply than he remembered.
4. If it’s hard to remember, change the scaffold.
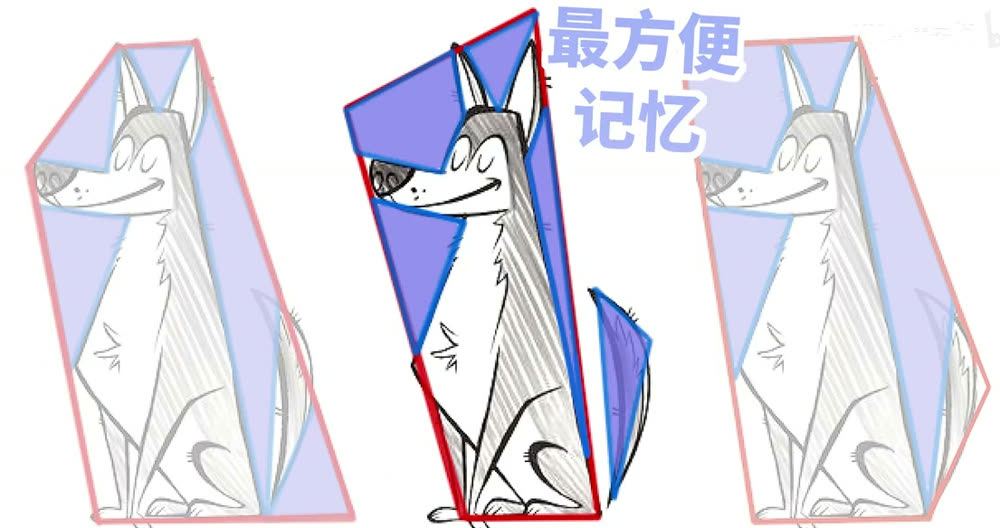
Erqiao · Memory guide · 05:09“The reason may be that the initial scaffold and simplification were not good enough: you made it too complicated. Try different scaffolds to find the way that is easiest to remember.”
5. When to stop.
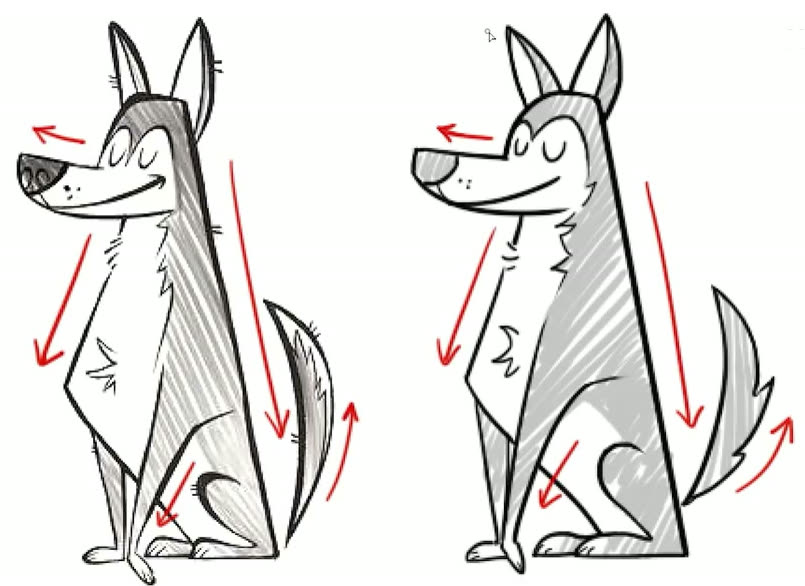
Erqiao · Memory guide · 05:54“If your memory drawing is sufficiently similar to the source in its major directions and simplified shapes, you have already achieved ninety-five percent of the exercise’s effect. Small errors that do not affect the picture can be ignored. … You can complete them through reasoning.”
Krenz on the same practice
What to remember.
Krenz · Learning map 1 · 01:10“What do I remember? First its inclinations. Second its large shapes. … Third, the proportional relationships within it. For example, if the head is one unit, the body is four.”
How much depends on what it’s for. On a student’s practice sheet he picks out four lines: the head position, the arm’s slope, the torso curve and the leg curve. He hides the source, draws just those four lines, then finishes the figure from his own knowledge.
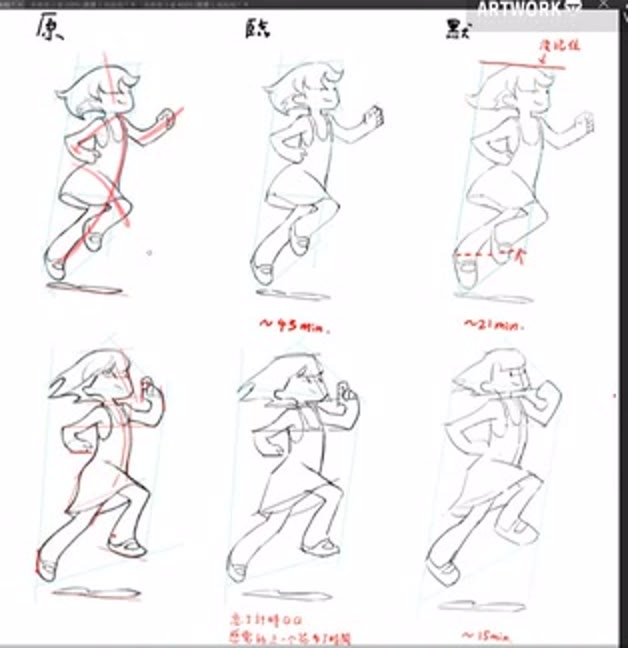
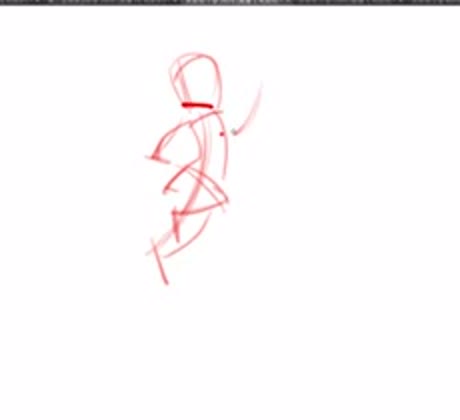
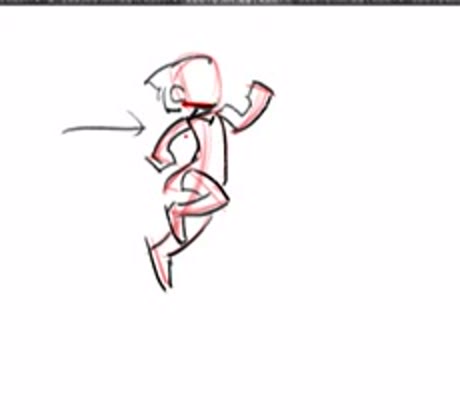
Krenz · Learning map 1 · 02:49:01“It depends on your purpose. Why remember it to this extent? Because when I draw for myself, I can use my everyday drawing knowledge to complete the rest. Roughly speaking, I only need to remember its gesture. … Once I have the red line stage, I can use my own reasoning to develop it to this stage. It has now become my own drawing.”
When recall fails.
Krenz · Learning map 1 · 02:48:18“What if you copied it but can’t draw it from memory? Copy it again! Think about which things are actually important. … It may mean you’re remembering the wrong things.”
Timing and scale. “After copying, you can draw it from memory immediately, or after an interval” (Shape lecture, 02:31:12). His students keep sheets in three columns, original, copy and memory. His guidance: “One drawing a day is enough, or one every two days. … This is not something to practise only for a short time” (Learning map 1, 02:47:52). Later he talks about sustaining roughly thirty or forty of these.
When you practise
Erqiao’s procedure
- Pick a clear, low-detail drawing. He says to start simple, not to torment yourself with a hard one.
- Make one shape study while looking: the big enclosure first, then the main shapes inside.
- Hide the reference and your study. On blank space, draw everything you can remember, big to small.
- Finish what you can before you check.
- Look back for the biggest thing you missed. Turn it into a concrete relationship: a gap shape, a right angle, a steeper slope.
- Hide it and restart from blank. Don’t patch the old attempt.
- If remembering feels like a slog, try a simpler scaffold.
- Stop when the major directions and simplified shapes match.
Krenz’s lighter version
- For a figure, pick only the few lines your purpose needs: head position, arm slope, torso curve, leg curve. Redraw those from memory and finish the rest from what you know.
Memory redraw
- Study once, big to small.
- Hide both. Redraw from blank.
- Finish what you can, then check.
- Biggest miss → make it a relationship.
- Hide. Restart from blank.
- Too hard? Simpler scaffold.
- Stop when the big directions match.
What it looks like in use
These are for reading, not drills. Each one shows the area’s pieces being used in a new drawing.
The witch: remember, rebuild, change
Krenz · Learning map 1 · 01:10–01:14, 02:00–02:10
Krenz looks at a Yoh Yoshinari witch drawing for about thirty seconds to a minute, remembering its slopes, big shapes and ratios. Then he draws her from memory.
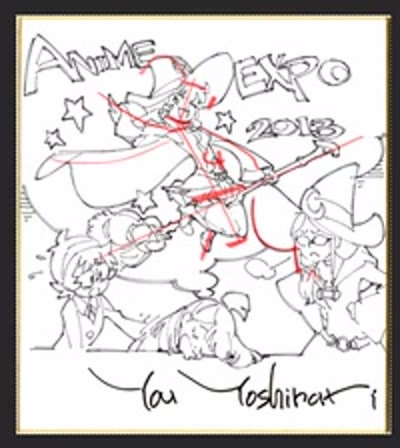
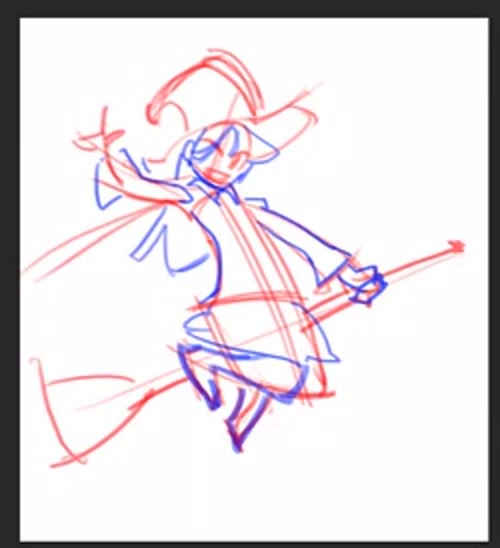
Krenz · 01:13“You can see that I have still lost some information. But when calling the image back from memory, there is more information available to us.”
“After retaining the little witch’s shape, draw it yourself. Change the leg; move one hand to the front and the other behind. The pose begins to change. You’re not tracing the pose. You’re drawing from the impression retained through CSI.” (CSI is his straight, C-curve and S-curve line vocabulary.)
ShowsRemembered pieces become a new pose.
The suit photo: old studies help read a new reference
Krenz · Learning map 1 · 01:02–01:10
He draws a suit from a photograph. He doesn’t trace every wrinkle. He groups the darks into a few decisive shapes, and says those choices come from artists’ work he studied earlier.
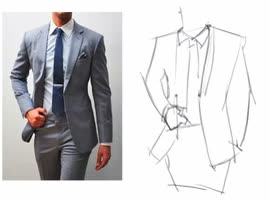
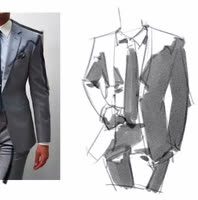
“I retrieve impressions of shapes I have drawn before, and use them in what I’m now seeing in the photograph. … Among the shapes I drew before, has an artist dealt with a similar fold? How was it organised? I can bring that way of distributing the folds into this situation.”
ShowsWhat you keep is a way of organising, not a whole picture.
The sleeve: clean outline, fold inside
Krenz · Shape lecture · 00:33–00:42
He draws the same sleeve twice. In one, the fold breaks into the outline as extra bumps. In the other, the outline stays long and clean, and the fold is drawn as marks inside it.
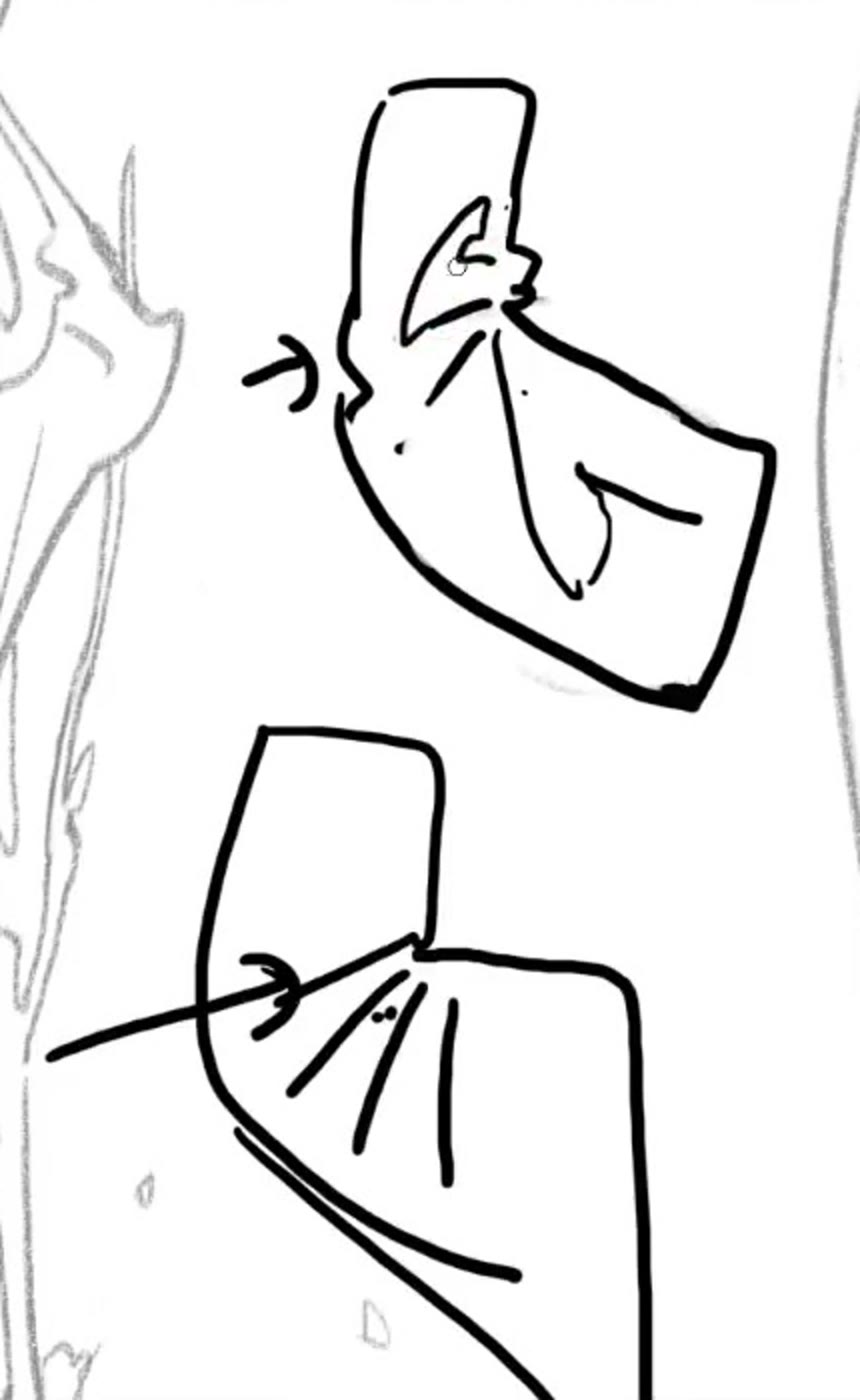
“Establish the shape first, and only then attend to the small folds within it. … People don’t need all of those things. What’s needed? Enough suggestion in the shape. I can simply suggest it with the internal lines, and people can still understand it.”
ShowsSimplifying the outline doesn’t lose the information. It moves inside.