Long assignments
Six bigger pieces, each a whole sequence or one finished panel, that can run across more than one session.
Mateu-Mestre · FI2 p.91“Remember, the scene needs to have a meaning and a feeling.”
Key frames from a premise
Take one premise through his checklist and a feeling/setup table to a set of key shots in one ratio, then rework those shots for other formats. His marina story is the demo; use a premise of your own.
FI2 ch.8, “Developing Key Frames for a Short Sequence”, pp.91–103 · figs 8.1–8.55. It is the only full worked sequence in either book.
What he shows
The checklist (p.91). He says you need to be able to come up quickly with a structure for playing the scene. His order:
- First, the physical elements the story point needs. His premise: an elegant woman arrives at a marina club to meet someone on a yacht and make a deal that leads to an adventure. His list: the woman, the marina surroundings, the yacht, the yacht’s owner.
- Second, the story point and how to show it. He offers five rival readings of the same premise: her confidence and charisma; the owner as a tough cookie; the owner’s wealth shown through the vessel, maybe without seeing him; her walking into a shady plot, overpowered by the yacht; a relaxed scene about the surroundings.
- Then rank every element by relevance, so the relationships read with almost no words.
- The non-physical elements: each element’s visual importance (its size and space in the frame, and how light and position enhance or hide it), and the overall dynamics (flow, push–pull, balance, lines of tension, points of inflection).
He says these are the points to explore in the preliminary thumbnails.
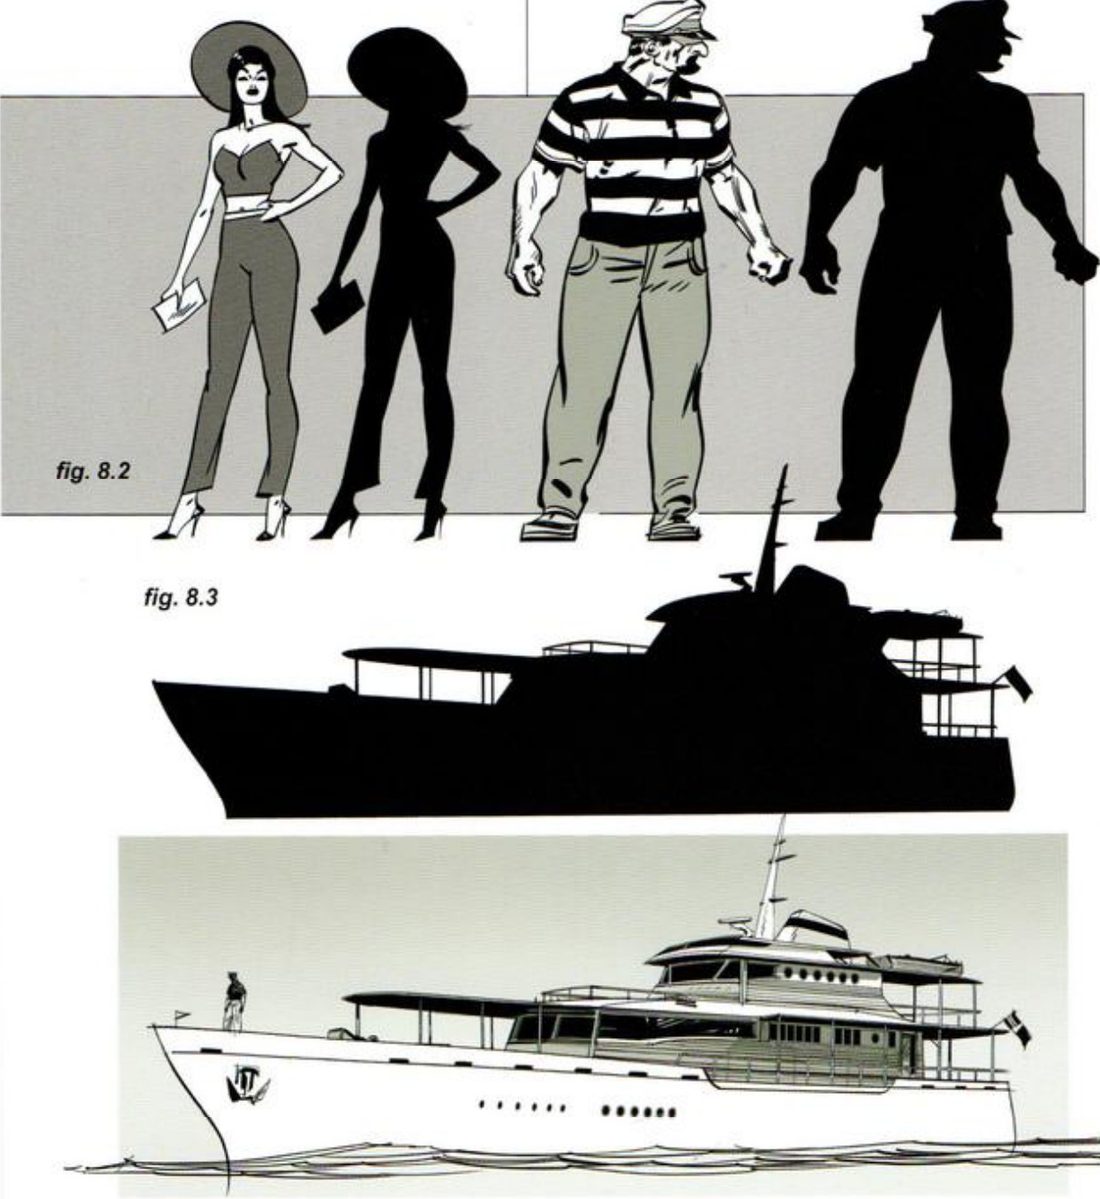
The ingredients (pp.92–93). Before roughing a composition he draws each ingredient, rendered and as a solid silhouette. He contrasts a thin, stylised woman with a bulkier captain, and shows how the yacht’s silhouette changes with the camera: compressed and square from the front, long and stylised from the side.
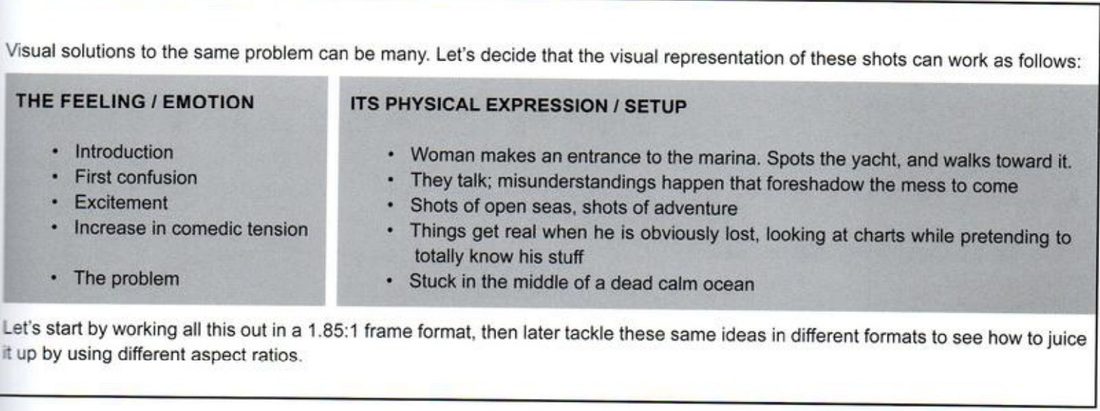
The story and the table (pp.94–95). He writes the story in four lines: an entitled young woman arrives and walks to a yacht; she makes a deal with a thuggish captain, with humour from the clash; they set sail; she realises he is as lost as she is. Then he pairs each feeling with a physical setup. He works everything out in 1.85:1 first and tries the other formats afterwards.
Mateu-Mestre · FI2 p.99“Always remember what the point of the scene is.”
His version: open after you've done yours
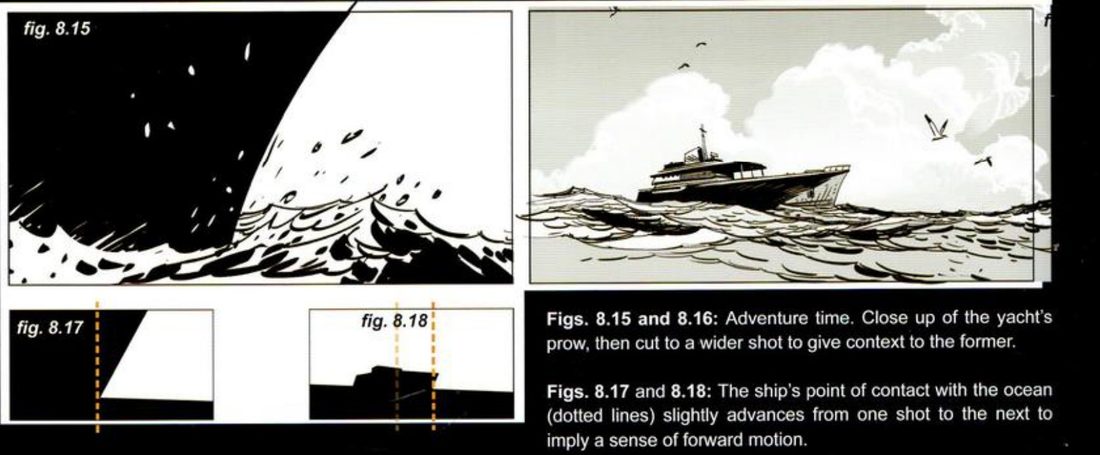
Seven key shots in 1.85:1. Each has a rough and one or two flat structure thumbnails. Several choices are made across the cut.
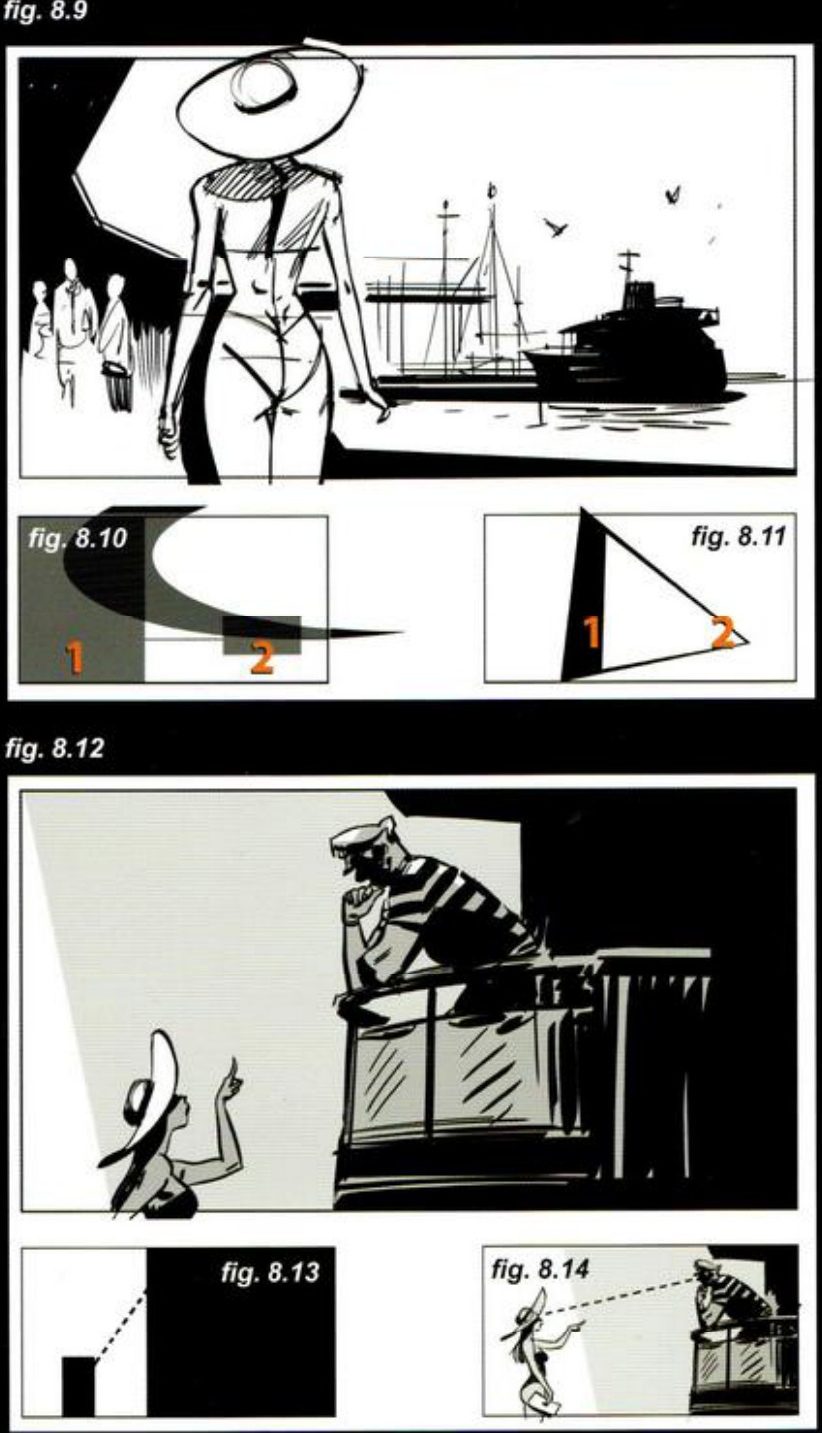
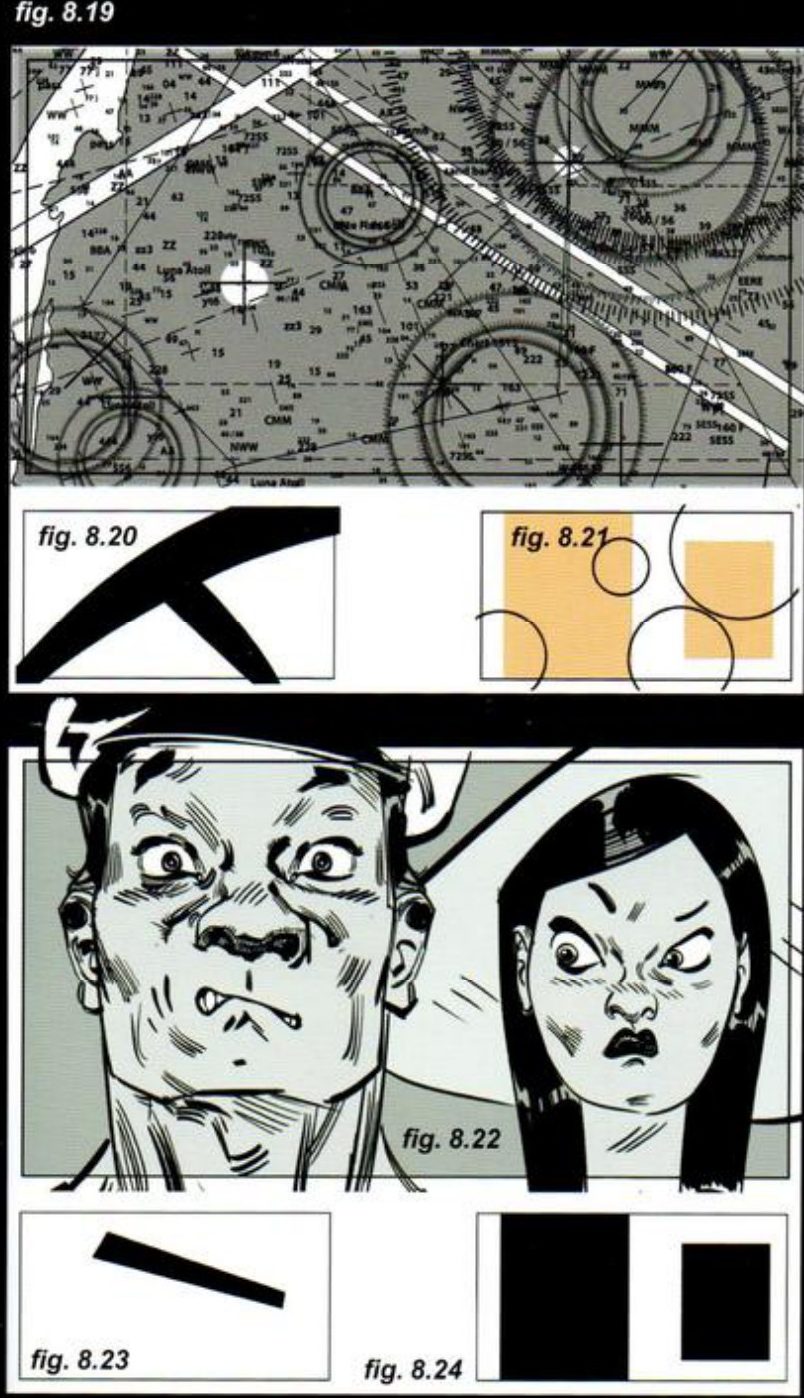
Then the same shots in other formats. For the entrance he first extends the 1.85 frame to 2.35:1 and 4:1 by adding to both sides, finds she no longer makes much of an entrance, and rethinks the 4:1 (pp.98–99). For each format he asks what its extra room can do for the beat.
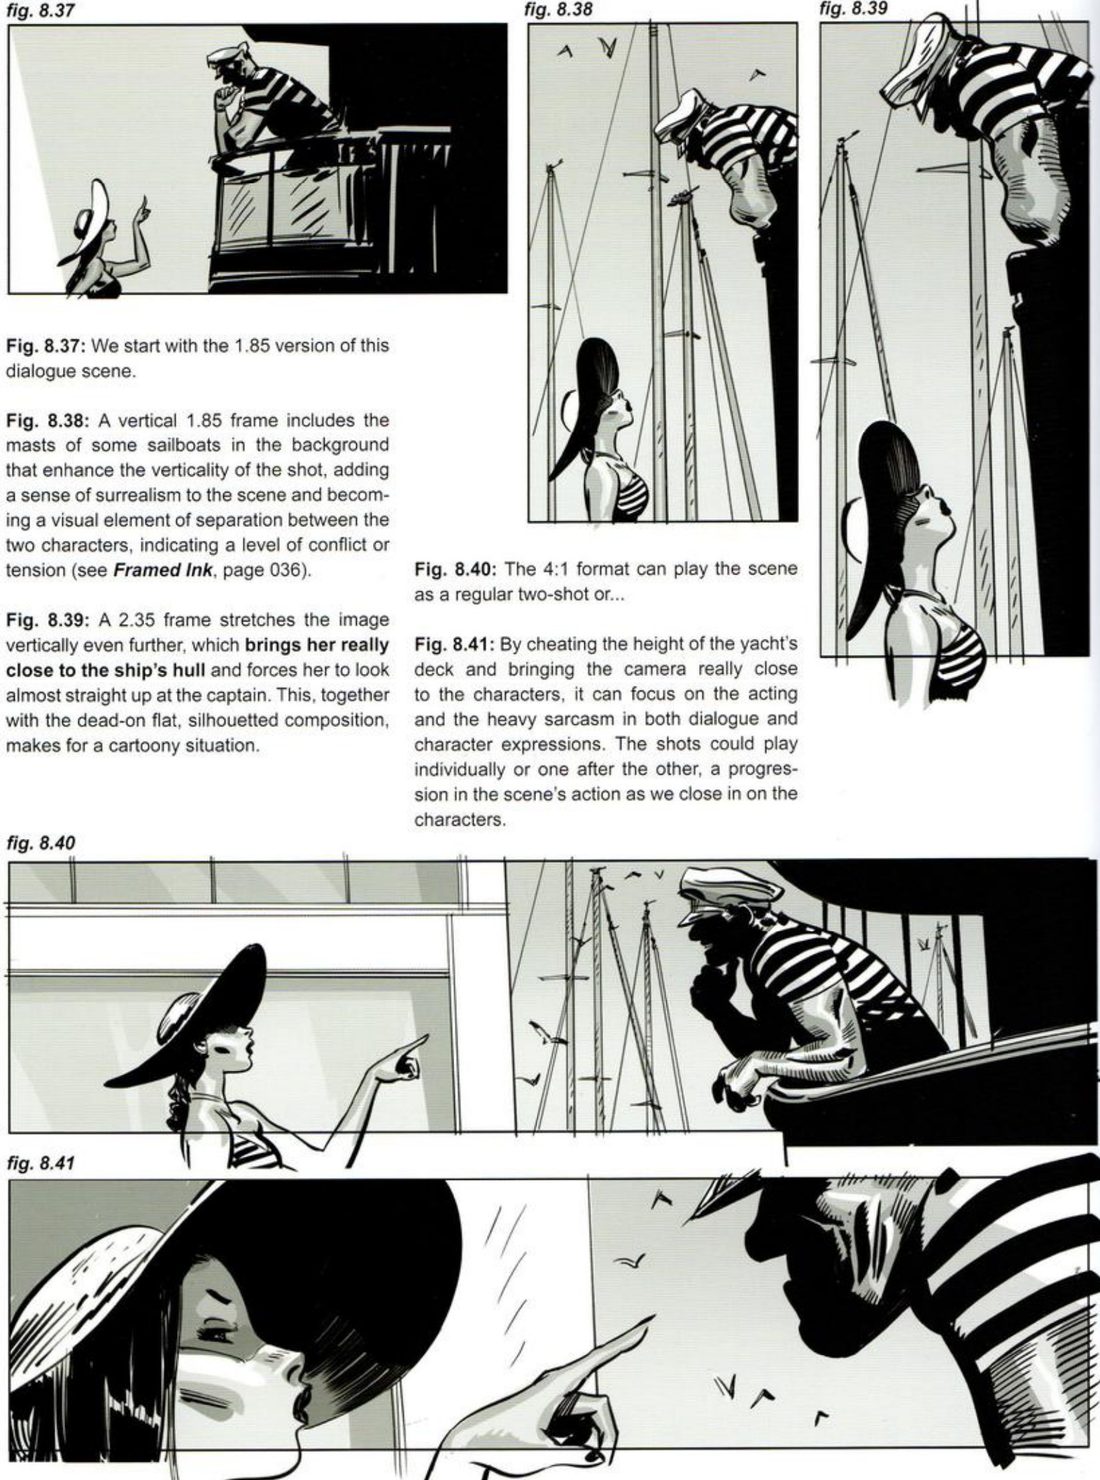
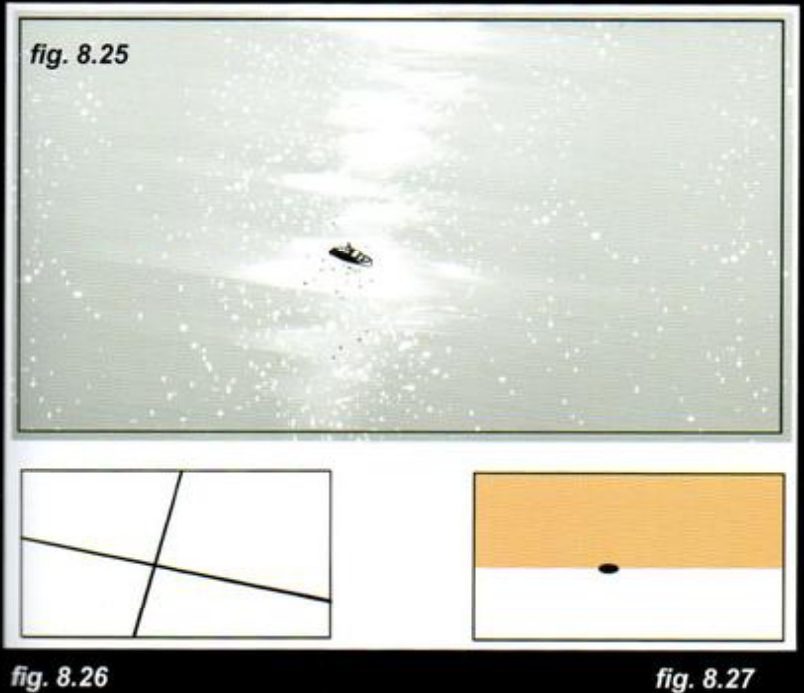
The rest: the prow in two verticals divided by fourths (p.101); the yacht at sea with more sky or more ocean in 4:1, depending on the tone needed (p.101); the faces in vertical and 4:1, where the extra side room doubles down on the chaos (p.102); and the isolation shot in four formats, where the 4:1 is the exception and puts the boat just above the half-line (p.103).
When you practise
Read once · stop after any finished step
- Write one line for the whole sequence: what should it make you feel?
- Write the premise in one sentence. List the physical elements it needs.
- Write several rival story points for the same premise, as he does on p.91. Pick one.
- Rank the elements by relevance. Note each one’s visual importance (size, space, light, position) and the dynamics you want.
- Make a silhouette sheet of the ingredients: each character rendered and as solid black, a few poses, any vehicle or prop from two angles, the location from above and on foot.
- Write the story in four lines. Fill in the feeling/setup table below.
- Thumbnail the key shots in one ratio. He drew seven for his five feelings. For each shot make the two thumbnails: value masses and lines of tension. His thumbnails beside each shot (figs 8.10–8.27) do a similar job.
- Look across each cut. What does each shot hand to the next: a flipped balance, a contact point moving forward, a busy shape kept off the next shot’s faces, a close-up before an extreme wide?
- Reformat. Take each shot into at least one other format. Extend it mechanically first, say what was lost, then rethink it. Ask what the new format’s extra room is good for.
Physical elements:
Rival story points: 1 2 3
Chosen:
Feeling → setup: →
Feeling → setup: →
Feeling → setup: →
Base ratio: · Other formats:
CheckHis p.91 test: the order of relevance should make the narrative “so clear that you barely need words to explain the emotional interactions”. For the reformats, his p.98 failure is the test: does the main subject still make an entrance, or has the extra room watered it down? On p.102 he adds that every part of the screen should enhance the shot’s meaning. Then the session check: shrink and flip the row of thumbnails; does it still read as your one-line intent? Compare with his shots above.
Key frames from a premise
Checklist → feeling/setup table → key shots in one ratio → reformat.
Keep asking: what is the point of the scene?
Ambush sequence
Build a seven-panel ambush in two halves: four messages from one fixed camera, then three camera moves that raise the intensity, plus a plan view to check the line. His cowboys are the demo; any watcher and targets will do.
FI1 p.80–83 (“Using the same elements we can deliver very different messages”, “Cowboys” parts 1 and 2; scan pages 81, 80, 82, 83, as the scan swaps 80 and 81) · p.90 (“Staying on the same side of ‘the line’”). No figure numbers printed.
What he shows
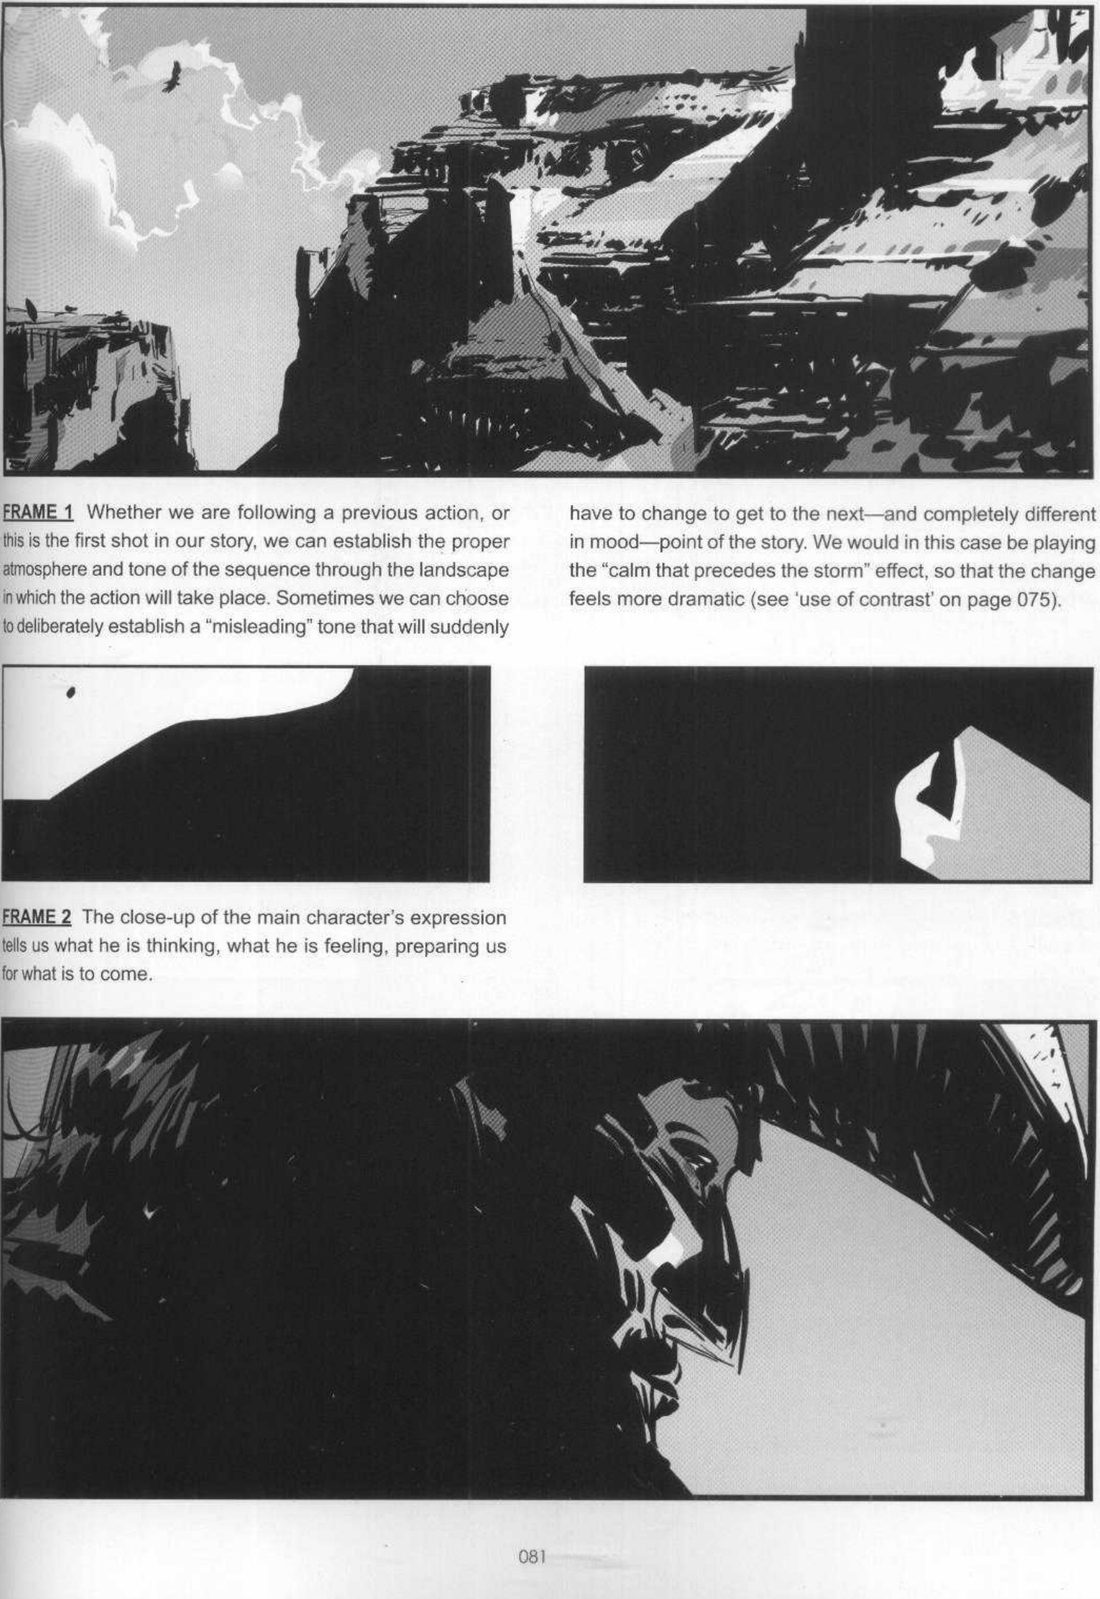
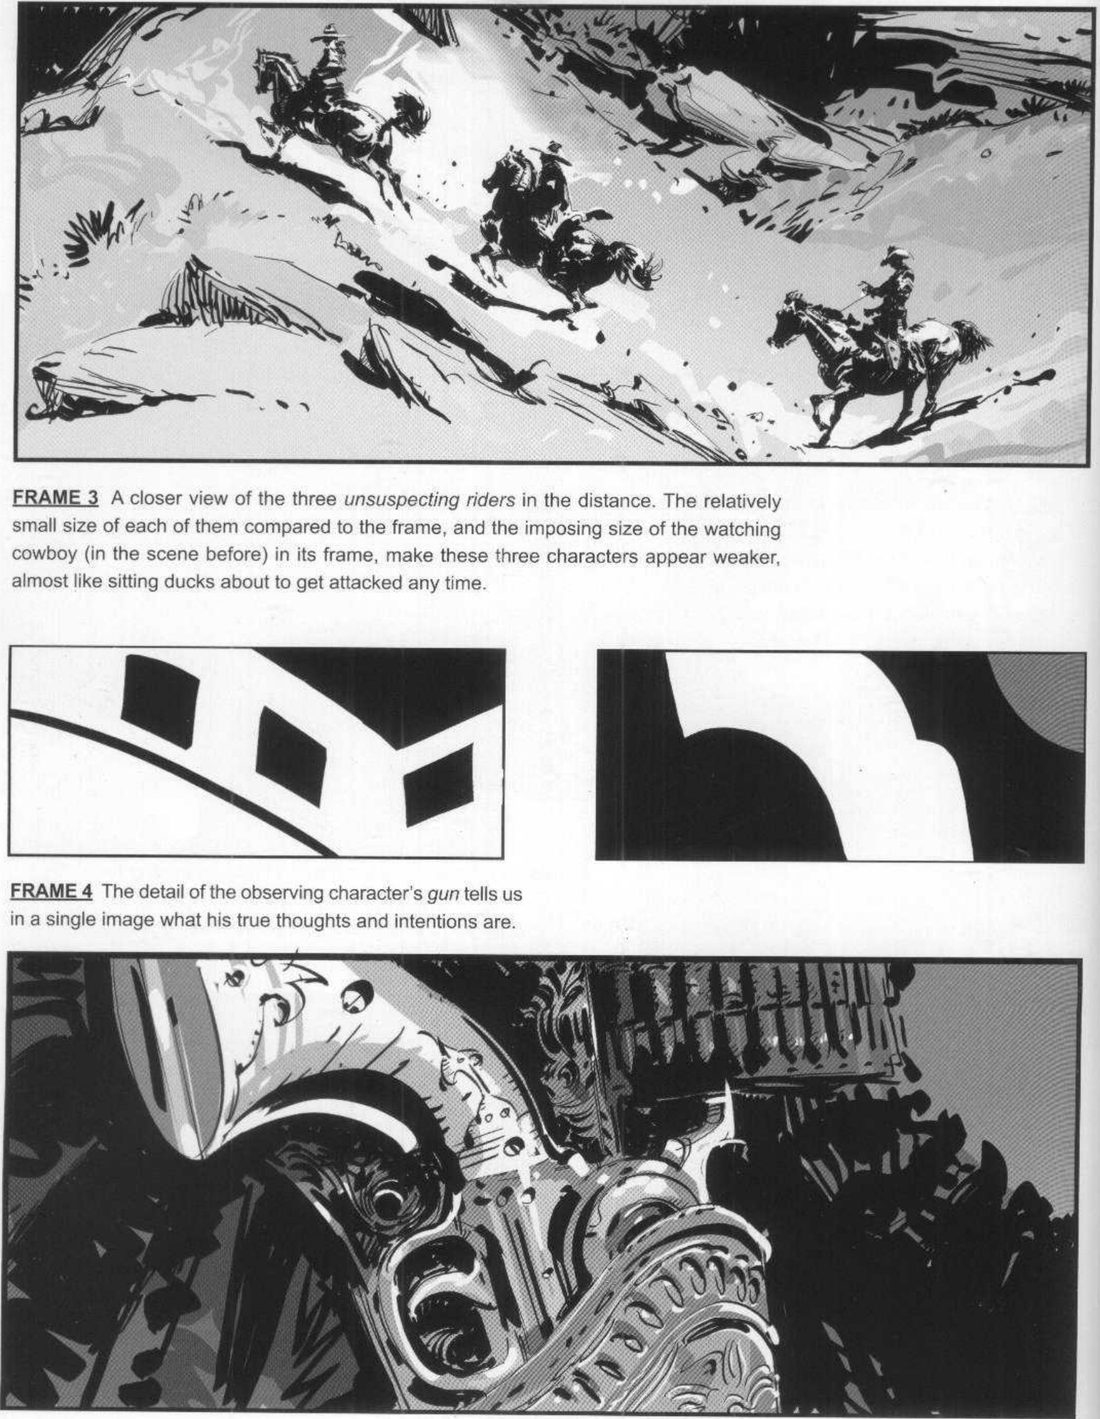
The master shot and its inventory (p.80). He lists what each element does. The cowboy dominates because he sits higher in the frame than the others, his head is above the horizon, he watches without being seen, and he is armed. Dry vegetation frames the scene and partly hides him. Three riders in the distance ride away. An open south-western landscape is the backdrop. Then he says that, from the same camera position, the framing alone can tell many different things.
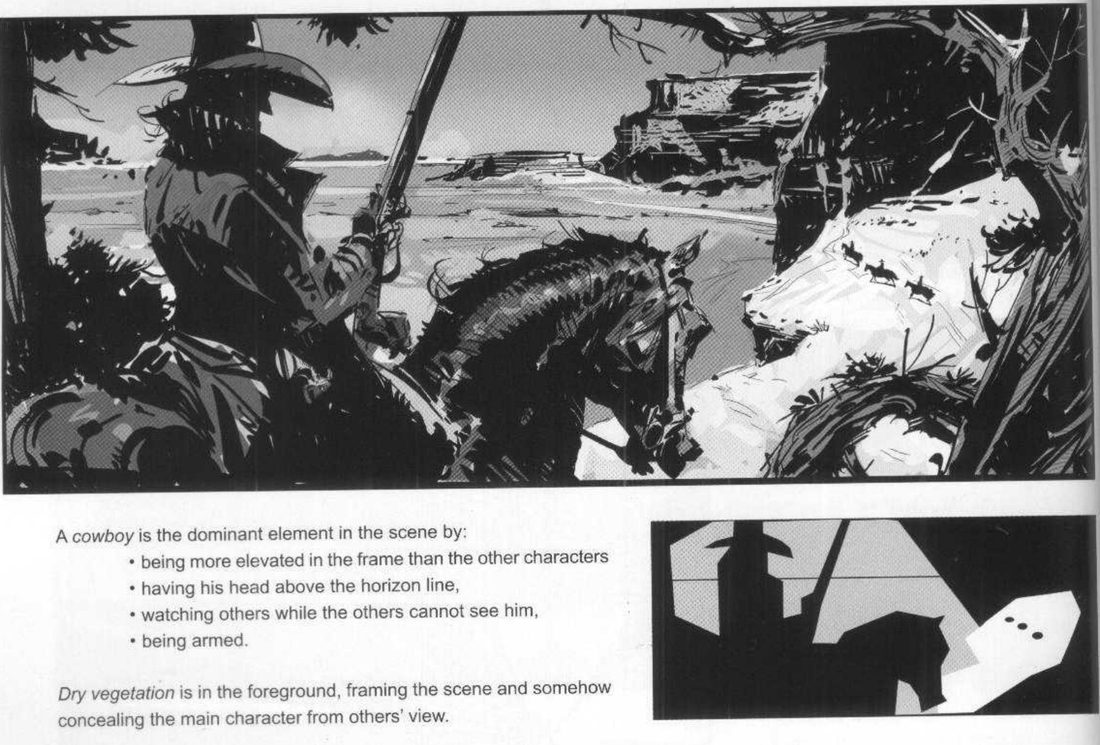
Mateu-Mestre · FI1 p.82“different messages gathered from the same scene and viewed from the exact same spot”
Part 1, four messages (p.81–82). Four frames from the master’s camera position, each isolating one element for one message: the landscape for tone, which can be a deliberately misleading calm; his face for what he thinks and feels; the riders, small in frame against his size in the shot before; the gun, for his intention. Each frame has a two-value abstract.
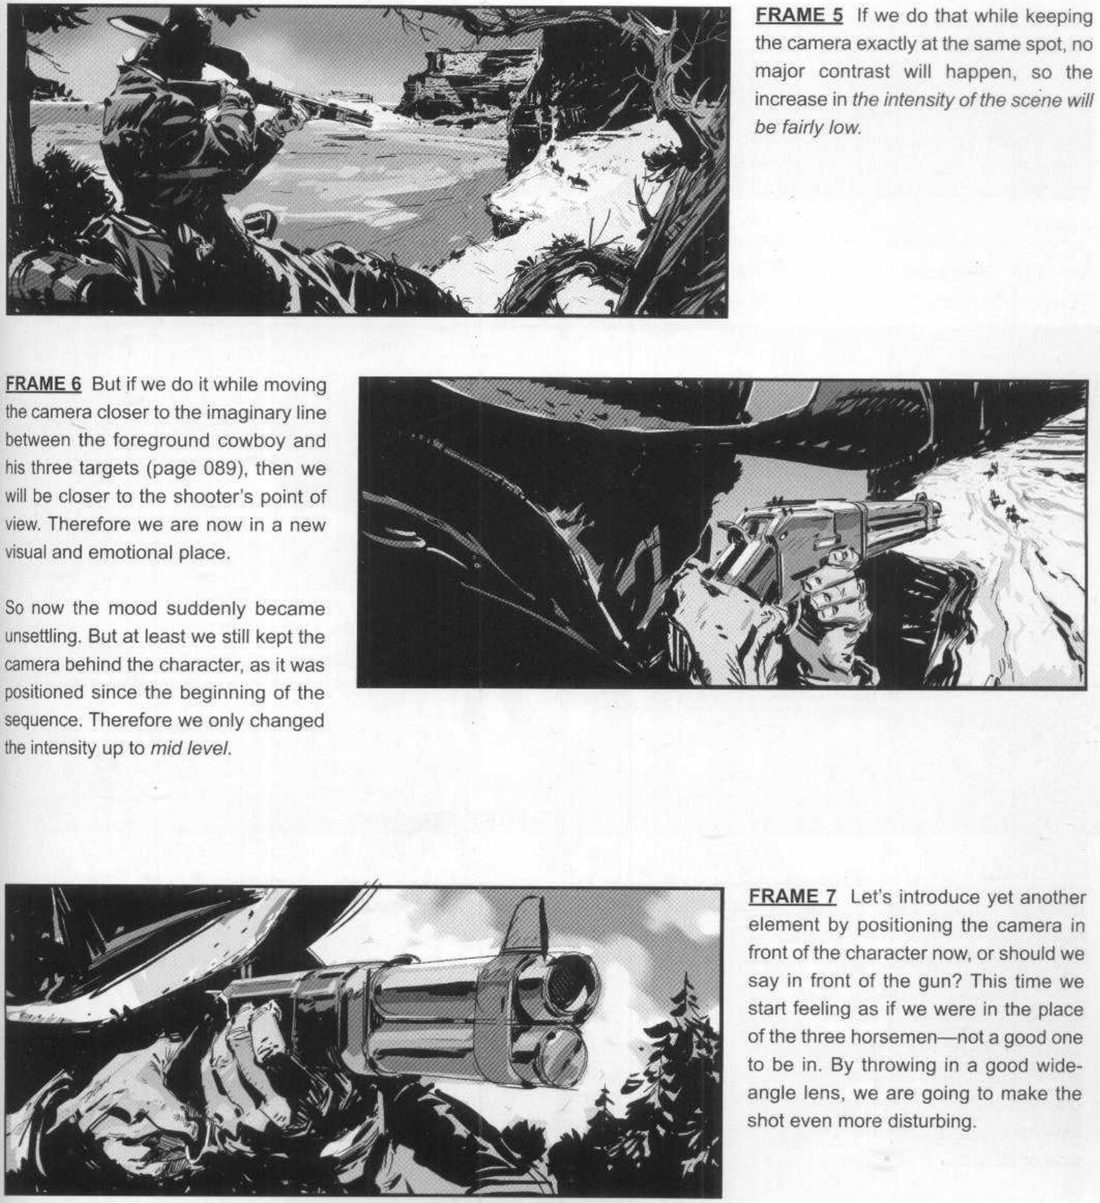
Part 2, the camera moves (p.83). The beat steps up: he decides to raise the gun and aim at the riders. He shows it three times, each from a different camera relationship, and grades the intensity of each.
Mateu-Mestre · FI1 p.83“How about expressing this visually as opposed to with words?”
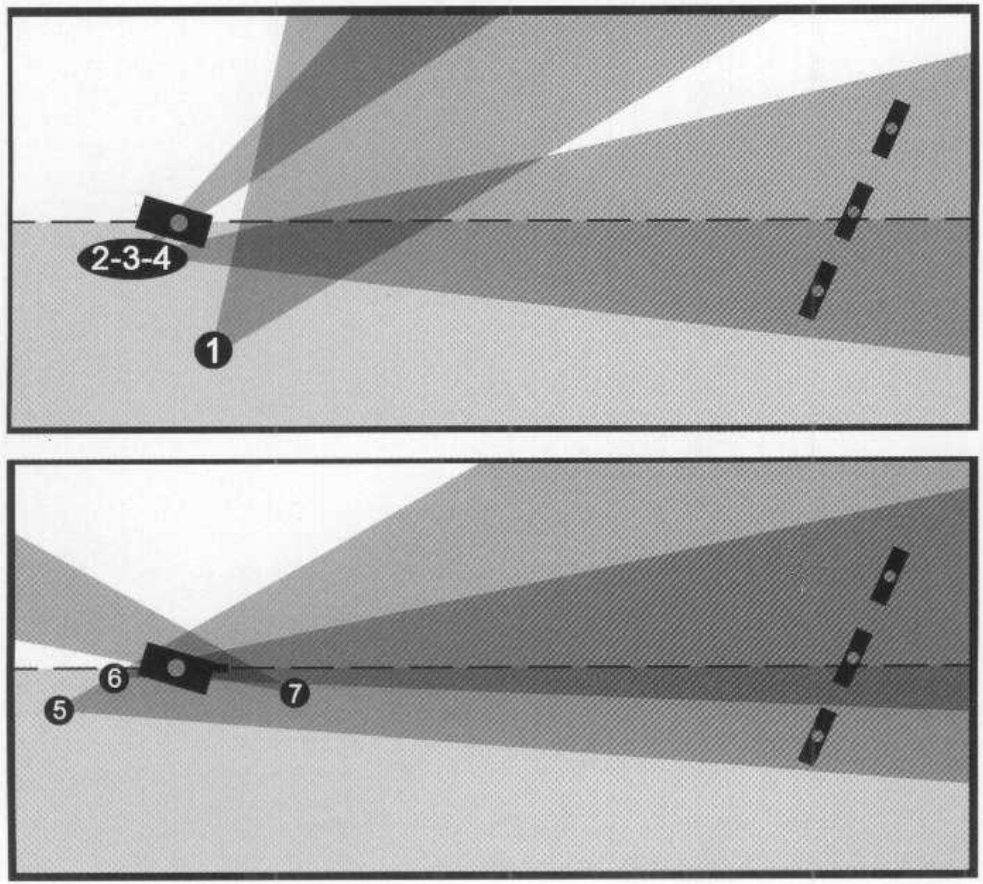
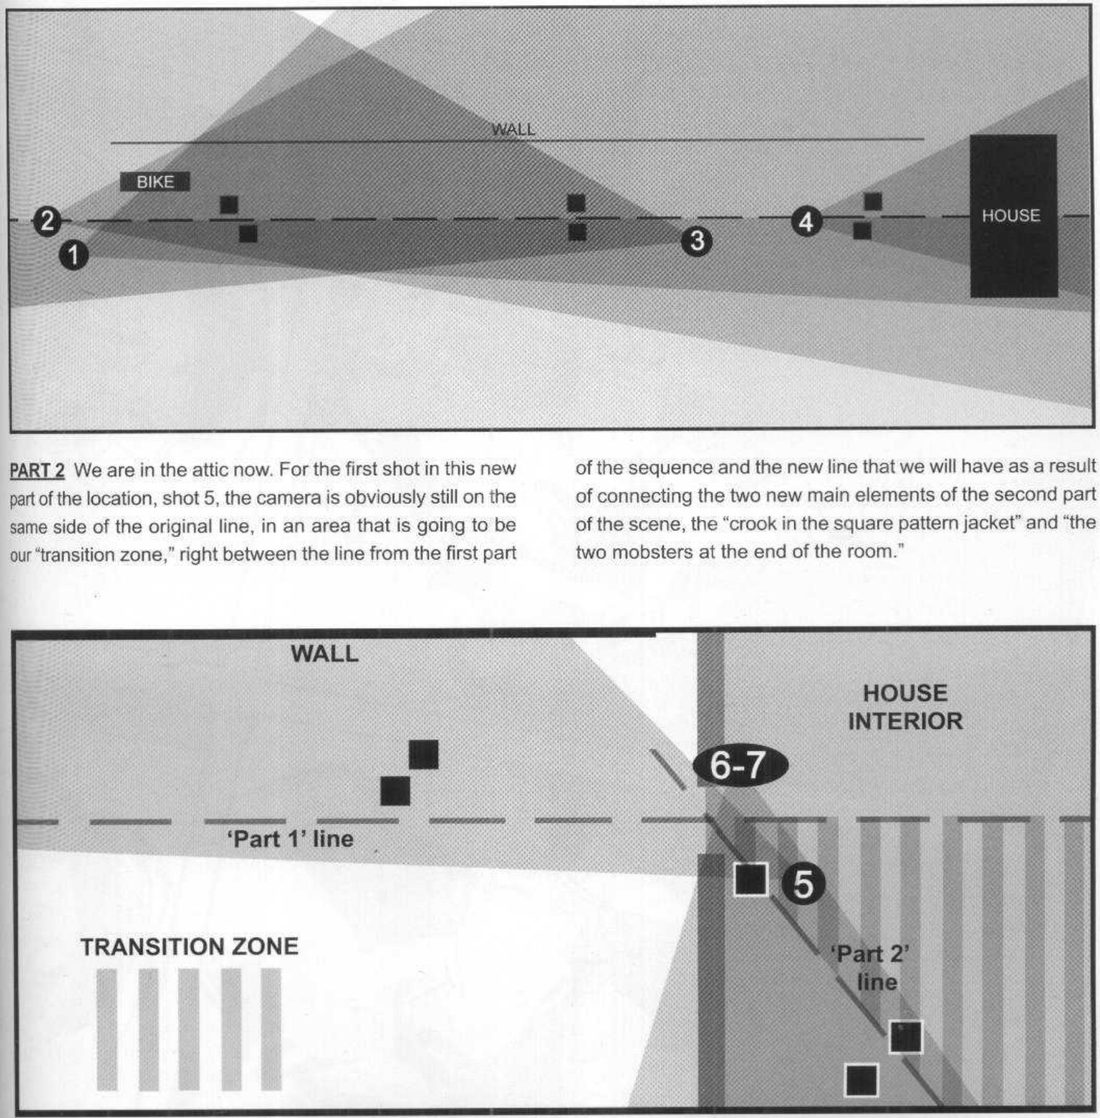
The plan (p.90). Afterwards he draws the sequence from above: the two main elements, a dashed line between them, and a numbered view cone for each frame.
His version: open after you've done yours
When you practise
Read once · stop after any finished step
- Write one line: what should the whole sequence make you feel?
- Choose a watcher, the targets and a setting. Draw the master shot from one camera. Make the two thumbnails: value masses and lines of tension.
- Write the inventory under it: each element and the job it does. Say why the watcher dominates.
- Part 1. From the same camera position, draw four frames. Each isolates one element and delivers one message. Write the message under each. Make a two-value abstract of each.
- Part 2. Pick the beat where things step up. Draw it three times: same spot; closer to the line between watcher and targets, still behind the watcher; in front of the threat, with a wide lens. Label them low, mid, high.
- Draw the plan from above: the two main elements, the line between them, and a numbered view cone for every frame.
Why the watcher dominates:
Frame 1 message: · Frame 2:
Frame 3: · Frame 4:
The beat that steps up:
CheckHis checks, close paraphrase: each Part 1 frame delivers its own message from the same scene (p.80–82); the intensity rises with the camera relationship, fairly low from the same spot, mid while still behind the character, higher in front of the gun (p.83); and on the plan every camera stays on one side, so the watcher keeps favouring one screen side and the targets the other (p.90). Then the session check: shrink and flip the row; does it still read as your intent? Compare with his frames and plans.
Ambush sequence
Inventory → four messages, one camera → three moves up the dial → plan.
Keep asking: how about expressing this visually as opposed to with words?
Approach to a threatening place, then the cut inside
Escalate an approach to a threatening place over four frames by moving the camera, then cut inside to whoever is watching, and keep the geography readable across the cut. His bikers and mobsters are the demo.
FI1 p.84–88 (“Using the same elements we can deliver very different messages (transitions)”, “The Bikers” part 1, “Mystery House”, and part 2, “Mobsters in the Attic”) · plan views on p.91. No figure numbers printed.
What he shows
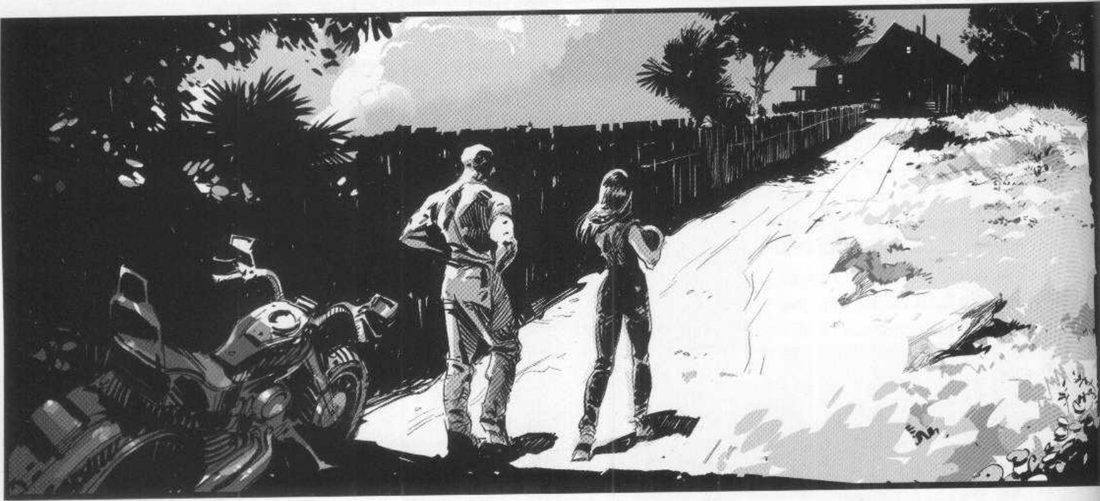
The elements (p.84). A couple who have just got off a motorcycle, the bike, a path up to a house on a hill, and the house with one attic window highlighted. This time the variety comes mostly from relocating the camera. He notes that frames 2 to 7 also form a continuous sequence.
Frame 1 (p.84). The camera is behind the couple and at a distance, so we read only their body language and the general action. The main dynamic is a diagonal between the two focal points, the couple with the bike and the house, and the wall along the path stresses it. He says the diagonal gives instability. The sun backlights the house for mystery and discomfort. A cast shadow from the trees closes the bottom of the frame so the eye doesn’t wander out.
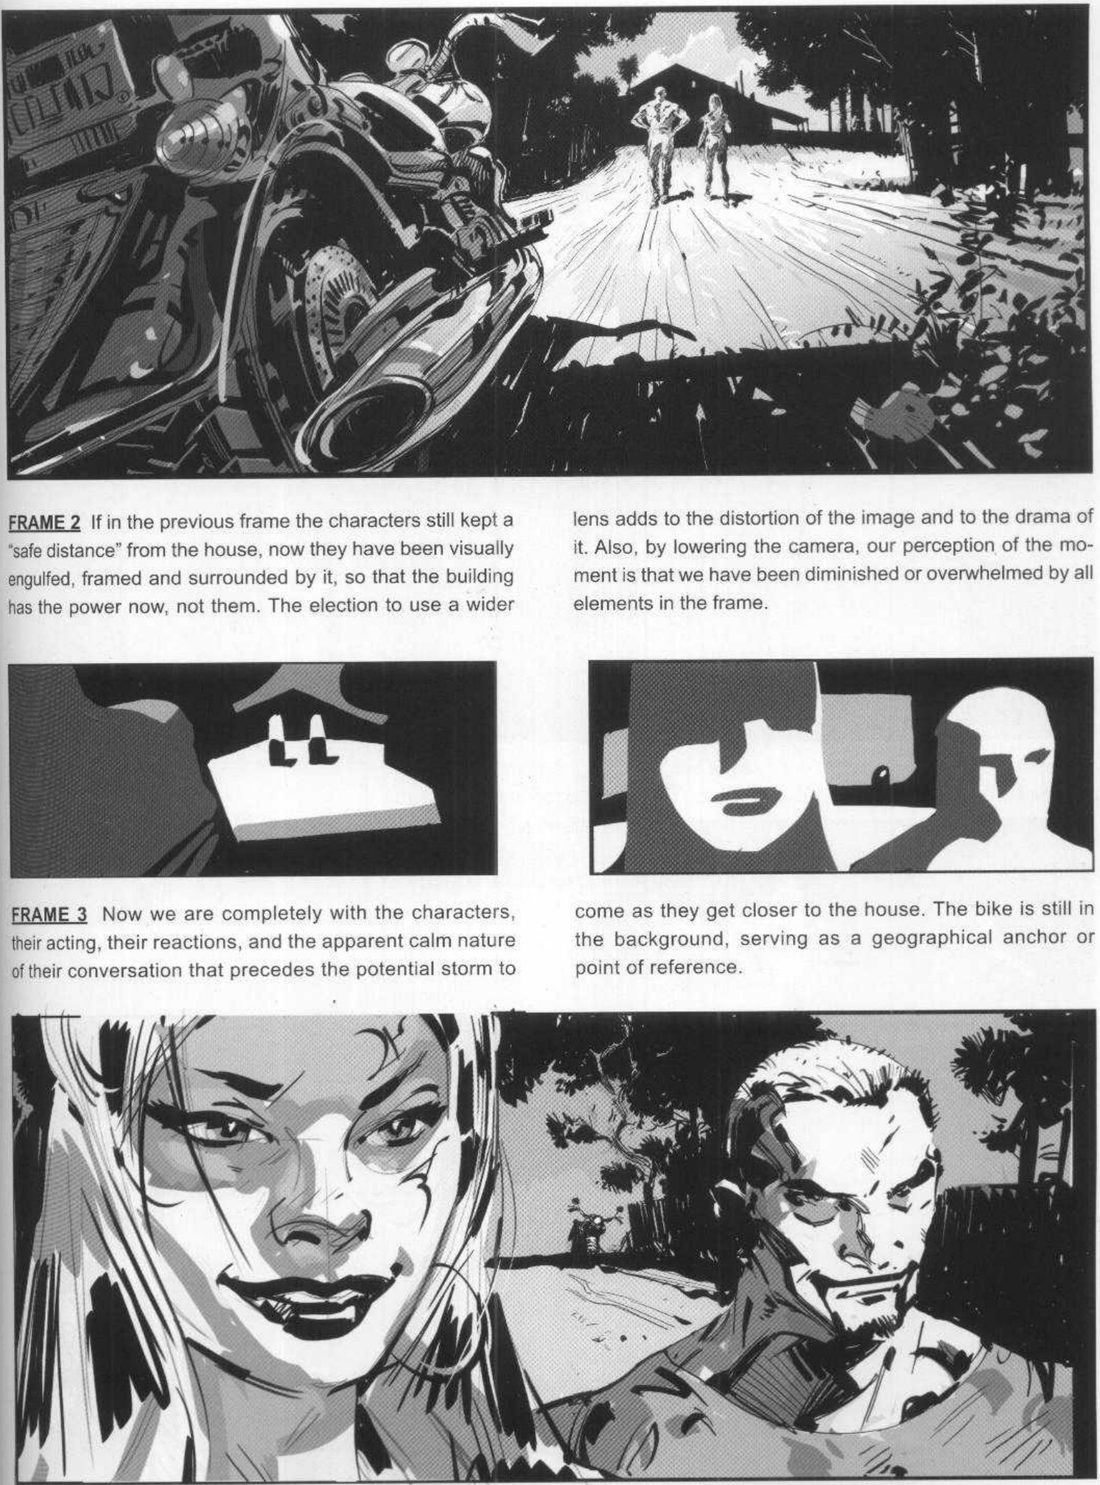
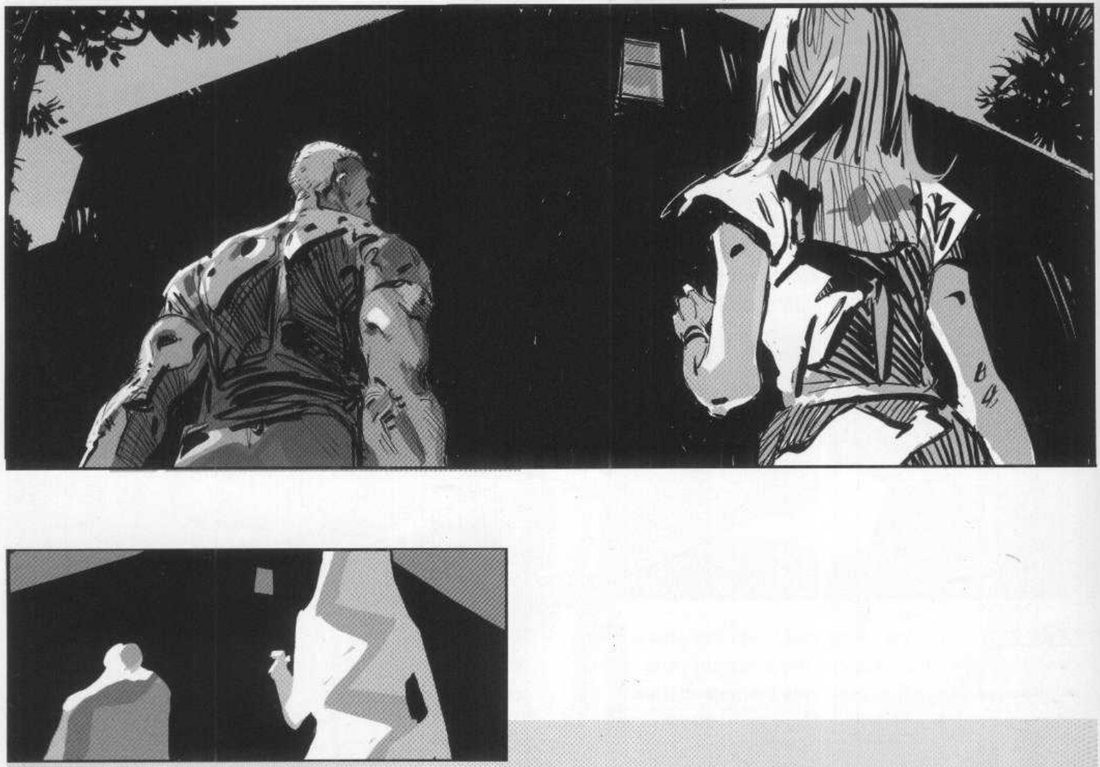
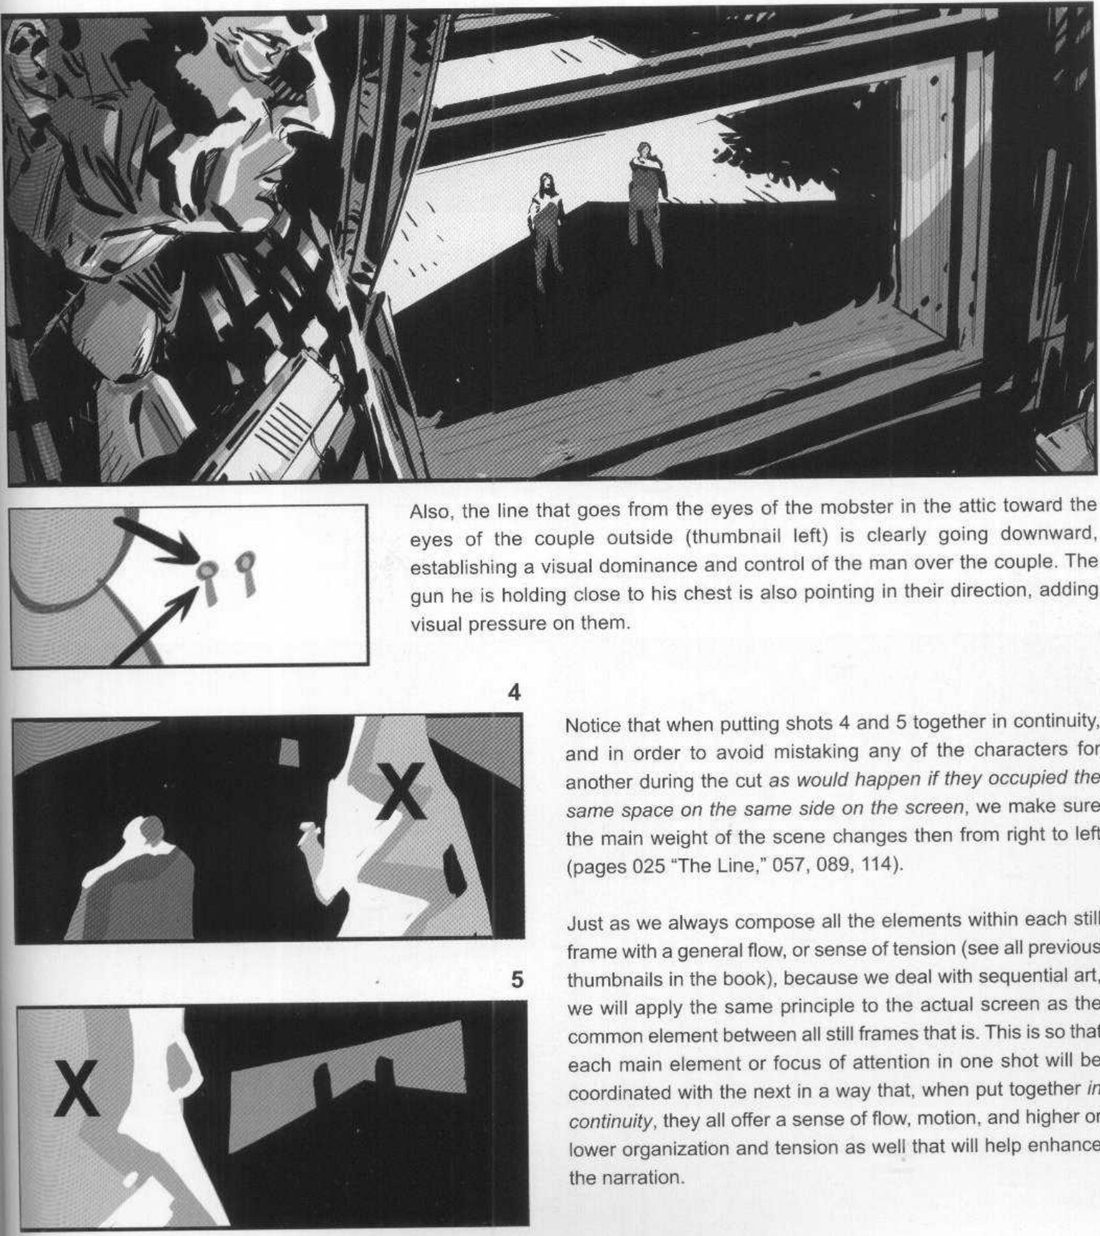
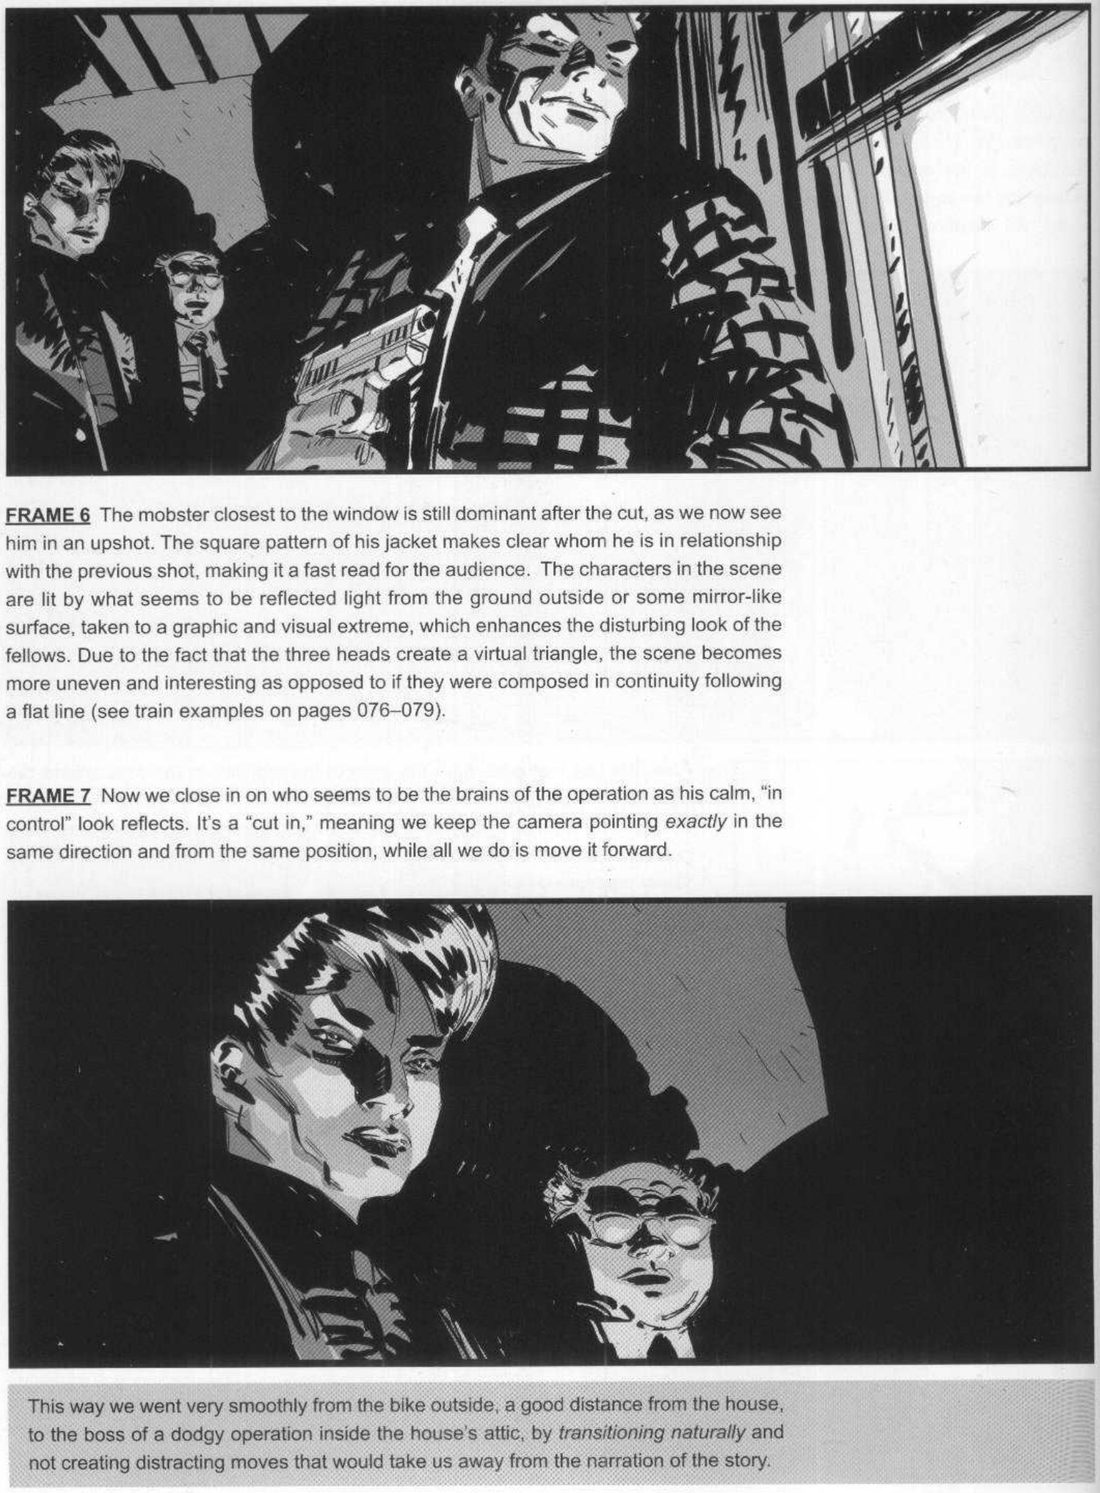
The escalation and the cut (p.85–88). Over the next three frames he closes the distance to the house, lets it frame them, lowers the camera and widens the lens. Then he cuts to the other side of the window. He marks the main weight of frames 4 and 5 with an X on two thumbnails. Inside, a jacket pattern identifies one mobster after the cut, and the last frame is a cut-in: same position, same direction, camera moved forward.
Mateu-Mestre · FI1 p.86“all the elements are now pointing at it”
Mateu-Mestre · FI1 p.88“not creating distracting moves that would take us away from the narration of the story”
His version: open after you've done yours
When you practise
Read once · stop after any finished step
- Write one line: what should the approach make you feel?
- List the elements: the people, an anchor object they leave behind (his bike), the way in, and the place with one feature that matters (his attic window).
- Frame 1: from behind and at a distance. Find the diagonal between the people and the place. Close any open edge the eye could leave by. Make the two thumbnails.
- Frames 2–4: close the distance; let the place frame and engulf them; lower the camera and widen the lens; keep the anchor in view. End with every element pointing at the one feature. Make a two-value abstract of each.
- Frame 5: cut to the other side of that feature, keeping the people in view. Draw the eyeline and any prop direction as arrows on a thumbnail.
- Thumbnail frames 4 and 5 stacked. Mark the main weight of each with an X.
- Frames 6–7 inside: give the dominant figure something that identifies him after the cut, then a cut-in down the same axis.
- Draw the plan: the first line, the new line inside, and the transition zone where frame 5 sits.
CheckHis checks, close paraphrase: who has the power in each frame, the people or the place (p.85)? Is the anchor still there to place us (p.85)? Across the 4 to 5 cut, does the main weight change sides, so no character can be mistaken for another (p.87)? Does the whole run move without a distracting move (p.88)? Then the session check: shrink and flip the row; does it still read as your intent? Compare with his frames and plans.
Approach, then the cut inside
Distance → engulfed → close → all pointing at it → cut to the other side.
Keep asking: who has the power in this frame?
Locked-camera scene
Stage a scene where the camera never moves: list every key pose first, then set the framing so that every combination of characters reads. His diner and phone call are demos; any one-room scene works.
FI1 p.68 and the facing page of panels (no printed number; scan page 69) · FI2 p.107 (fig. 9.3).
What he shows
The method (FI1 p.68). With the camera locked while different actions happen on one background, he calls preparation essential. Consider all the key poses the scene needs, and before fixing the final framing and perspective, make sure any character or combination of characters in frame at any time works.
Mateu-Mestre · FI1 p.68“will constitute a clear and well-arranged composition”
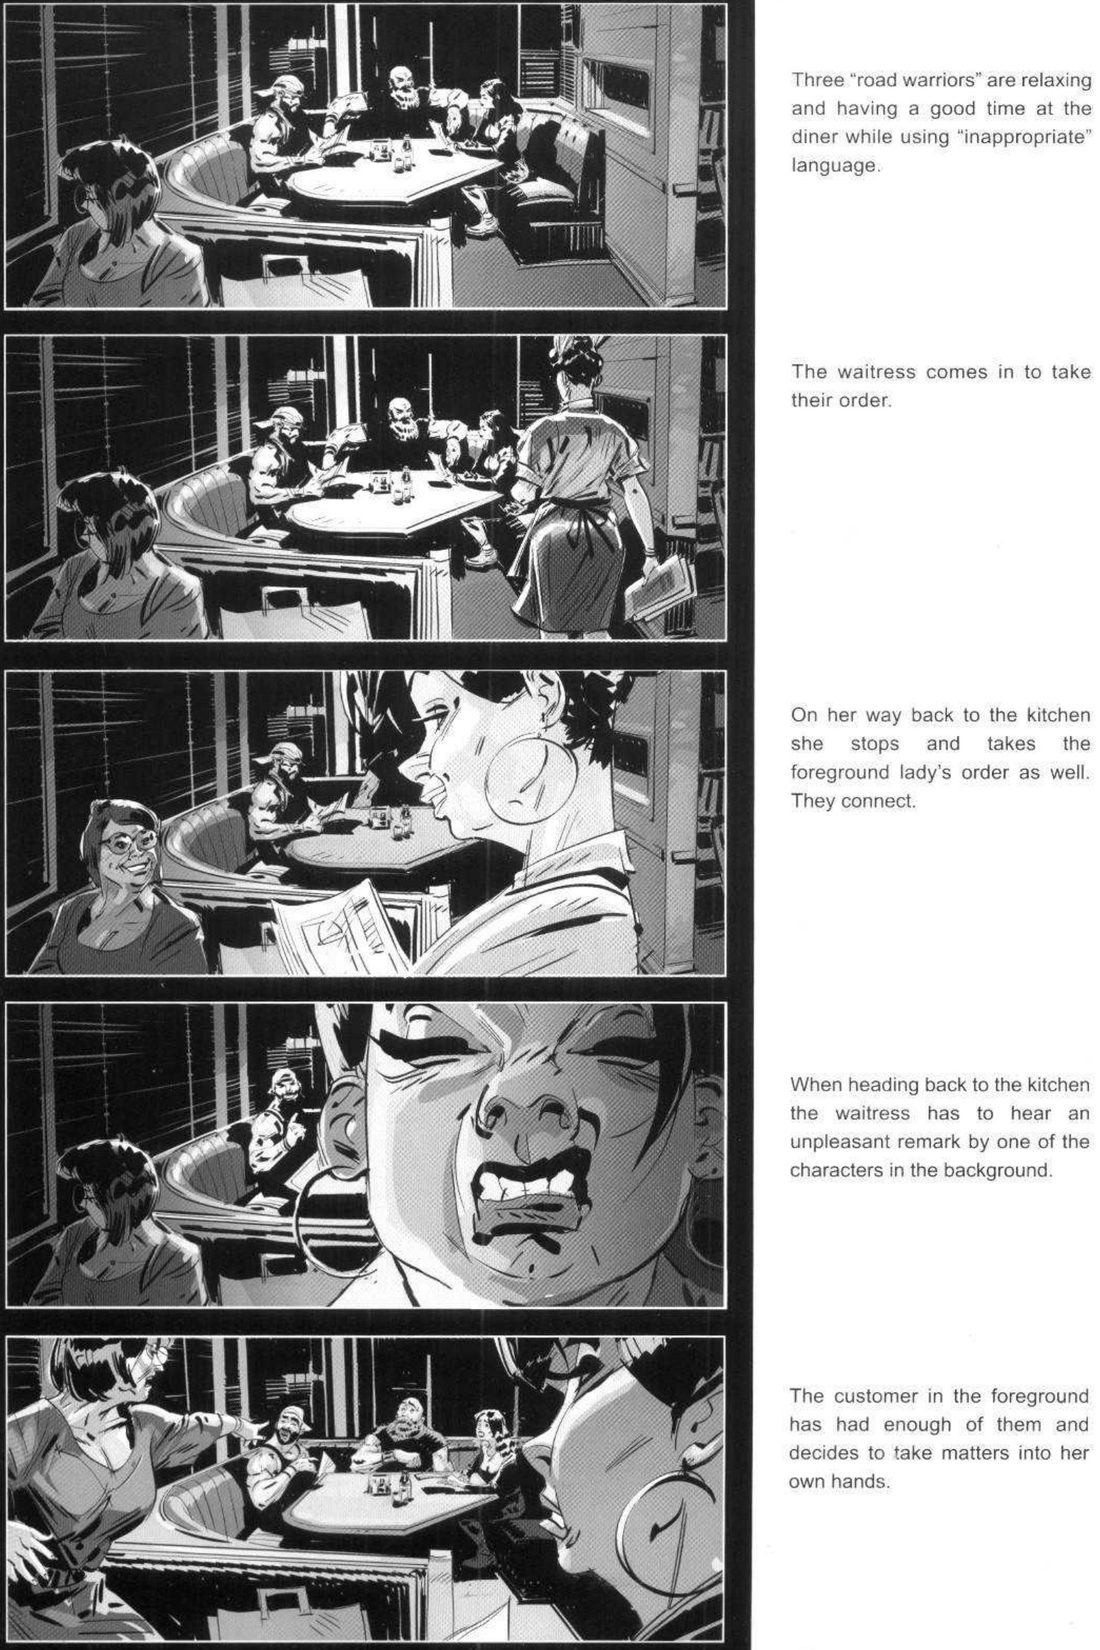
His reasons, character by character (p.68). In the “argument at the diner” the camera sits close to the waitress’s eye height.
- The trio are the steadiest element and cause the drama, so the scene revolves around them. All the lines to the vanishing point aim at them, and the spotlight is on them at the start.
- The waitress has her eye level on the horizon, so wherever she stands her eyes stay in frame and we can follow her acting.
- The lady customer, close to camera at bottom left, would pull attention. Her head is turned left and away, and she is out of the spotlight, so there aren’t two steady focuses at once.
Other choices (p.68). A shopping bag breaks the empty back of the bench. The seat edge sits off centre. The far right shows enough to suggest more restaurant without leading the eye out. Night keeps the light inside; by day he would draw the blinds, make it cloudy or keep the view dull. Light can favour one group or another, subtly enough not to distract.
Mateu-Mestre · FI1 p.68“Splitting the image in symmetrical halves here would kill the composition.”
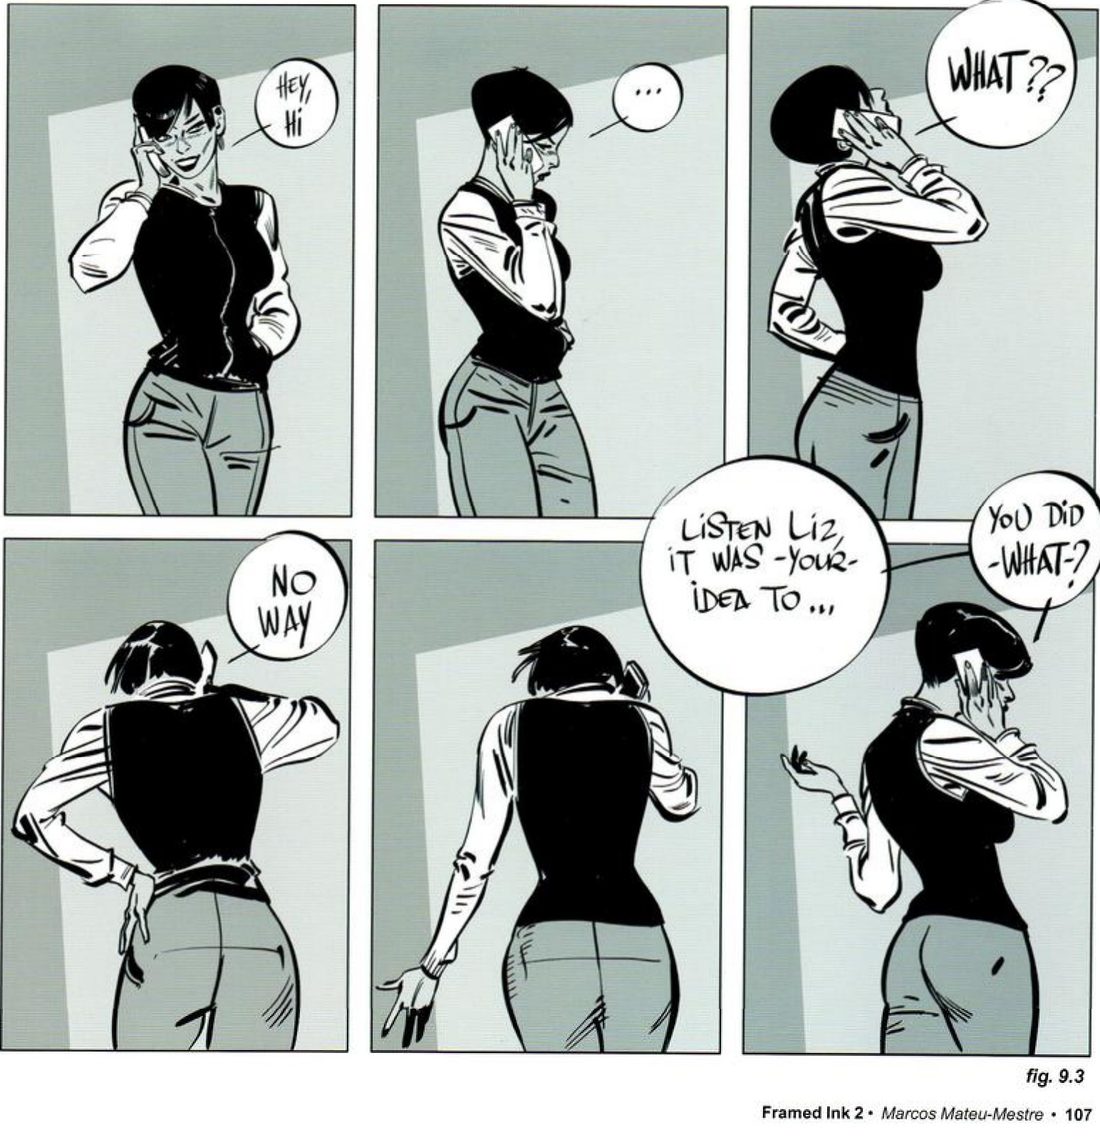
The phone call (FI2 p.107). He calls this total restraint on the camera: one locked position for the whole scene while the character turns around the set on a phone call.
His version: open after you've done yours
When you practise
Read once · stop after any finished step
- Write one line: what should the scene make you feel?
- Write the beats. For each beat, list every key pose: who is where, who is in frame, who is out.
- Name the steady element the drama revolves around and the character who moves most.
- Set the horizon at the moving character’s eye level. Aim the vanishing lines and the light at the steady element.
- Draw the background once. On separate layers, block each pose as simple shapes.
- Test every combination that happens in the scene. Each must be a clear composition. Where one fails, use his fixes: turn a competing figure away or take it out of the light, break an empty surface, move structure off centre, stop the edges leading the eye out.
- Draw the panels from the locked camera. Make the two thumbnails for each.
Beat 1 poses:
Beat 2 poses:
Beat 3 poses:
Combinations to test:
CheckHis p.68 test: any character or combination in frame, at any moment, forms a clear and well-arranged composition. Also from p.68: no two steady focuses competing, no symmetrical split, and any lighting shift subtle enough not to distract. Then the session check: shrink and flip the panels; does each still read as your intent? Compare with his diner panels.
Locked-camera scene
List every pose → set the frame → test every combination.
Keep asking: is every combination a clear and well-arranged composition?
One finished panel, his way
Ink one finished panel in the order he works in his video: underlay, light direction, main character first, regular pull-backs, structure overlay at the end. His subject is a city street; use any scene of your own.
Mateu-Mestre, “Composing and Inking a Street Scene / Thought Process”, his YouTube channel, 27 May 2024, 44 min. Timestamps are approximate, from a read of the auto-captions.
What he shows
He narrates his thinking while inking one storyboard-like panel: a woman hurrying down a crowded street in late-afternoon light, in black, white and one or two greys. There are no stills on this page; each step links to roughly where he does it.
- Underlay. A rough sketch comes first, and the composition gets worked out there.
- Light direction (~03:00–05:00). Fixed before inking: top right, late afternoon. Line weight follows it, thin on the lit side and thick on the shadow side.
- Main character (~06:00–09:00). She wins visually: her head is highest, she is nearest the camera bar one framing figure, and her body leans on a diagonal against the other figures’ diagonals and the cast shadows.
- Only enough shadow (~09:00–10:00) to say where the light is, with the care going into the border between light and shadow.
- Pulling back (~07:00, ~29:00). He works in on details, then zooms out to see whether the whole still works. Once, pulling back made him add a dot where an extra head should go.
- Feeling first, perspective second (~22:00). He wants a composition with punch first, then fits the horizon, vanishing points and grid to it.
- Silhouettes (~32:00–34:00). A background figure can be pure black, but its shape must read. A pose drawn clearly once can be echoed in other figures.
- Order of work (~38:00, ~41:00). He finishes the main character first and makes everything else adapt to her. Figures who look at the camera are kept further away and smaller; those near the camera look away.
- Structure overlay (~43:00). On a colour layer over the finished panel he draws the plan: a V made by the taxi-hailer’s diagonal and the shadows against her diagonal, with the buildings framing her.
Mateu-Mestre · 2024 video · ~22:00 · auto-captions“lose track of what really brought you to do that composition in the first place”
That is his warning about starting too technical. The loose panel fills the video’s 44 minutes; he says a final comic panel would take longer.
There is no printed key. His panel in the video is there if you want to compare afterwards.
When you practise
Read once · stop after any finished step
- Write one line: what should this panel make you feel? Name the main character.
- Underlay. Rough the composition loosely and get its punch first. Make the two thumbnails here: value masses and lines of tension. Fit the perspective to the composition after.
- Light direction. Decide it and mark it before any ink. Lit side thin lines, shadow side thick.
- Main character first. Make her win: highest, nearest, on a diagonal that opposes the rest. Ink her fully before anything else. Shadows only as much as tells where the light is.
- Pull back every so often while inking the rest. Fill background figures black where you can and check each silhouette reads. Keep figures who look at the camera smaller and further back.
- Structure overlay. When the panel is done, draw on a colour layer the lines the eye actually follows.
CheckHe states no formal check. His habit is the pull-back: zoom out and see if the whole is still “working according to planning” (~07:00, auto-captions). Then the session check: shrink and flip the finished panel; does it still read as your intent, and does the eye land on the main character first?
One finished panel, his way
Underlay → light → main character first → pull back → overlay.
Keep asking: is it still working according to planning?
Retro-board a 2–4 minute film clip
Pause on every shot of a short clip and thumbnail it, to see how the staging and cutting work across a run of shots.
Ron Doucet’s storyboarding course pages, floobynooby.com/comp1.html, “Retro-Boarding”. Parts of the page are compiled from other artists without names; the weekly-clip passage is written in the first person by an unnamed board artist. This isn’t Mateu-Mestre.
What the source says
Play the clip and pause on each shot. Draw what you see: camera moves, changes in pose and expression, framing and where the subject sits. Keep it rough and simple, as if reverse-engineering the sequence into boards. Think about the pacing and editing, why each shot is framed as it is, where the negative space is, when and why it goes to a close-up, and where the focal point is.
Unnamed board artist · Doucet’s course page“Do this exercise for yourself every week, choose a 2-4 minute clip”
The writer suggests filmmakers known for meticulous preparation (Hitchcock, Spielberg, Lucas, Kurosawa, Cameron) and mentions thumbnailing the truck chase in Raiders of the Lost Ark. Speed matters more than polish, so you can see the cutting patterns across several shots. If you don’t want to draw your way through a scene, watch it without sound to concentrate on the cutting.
Unnamed board artist · Doucet’s course page“if you spend an hour making each sketch perfect, you won't ever get the feel”
There is no printed key. The film itself is the comparison.
When you practise
Read once · stop at any cut; the next session starts at the next shot
- Pick a 2–4 minute clip, your choice. MinePick in under 10 minutes.
- Watch it once through. Write one line: what does this scene make you feel?
- Play and pause on each shot. Thumbnail it rough: framing, subject placement, camera position or move, and the value masses.
- Keep going fast. Don’t fix a thumbnail; move to the next shot.
- If drawing every shot is too much, watch a stretch without sound and note only the cuts.
- At the end, look along the row. Note one cutting pattern you can see: a screen side kept, a close-up and why, a focal point handed across a cut.
CheckThe source states no check; it frames the exercise as being for yourself. Ours: does each thumbnail show the camera position and the value masses? Then shrink and flip a few; do they still read as the scene you felt? Optional: step through the film again and compare.
Retro-board a film clip
Pause on every shot. Thumbnail it rough: camera and masses.
Keep asking: why is this shot framed the way it is?