Camera: distance, lens, height
Three exercises in choosing where the camera stands, and what that does to how a moment feels.
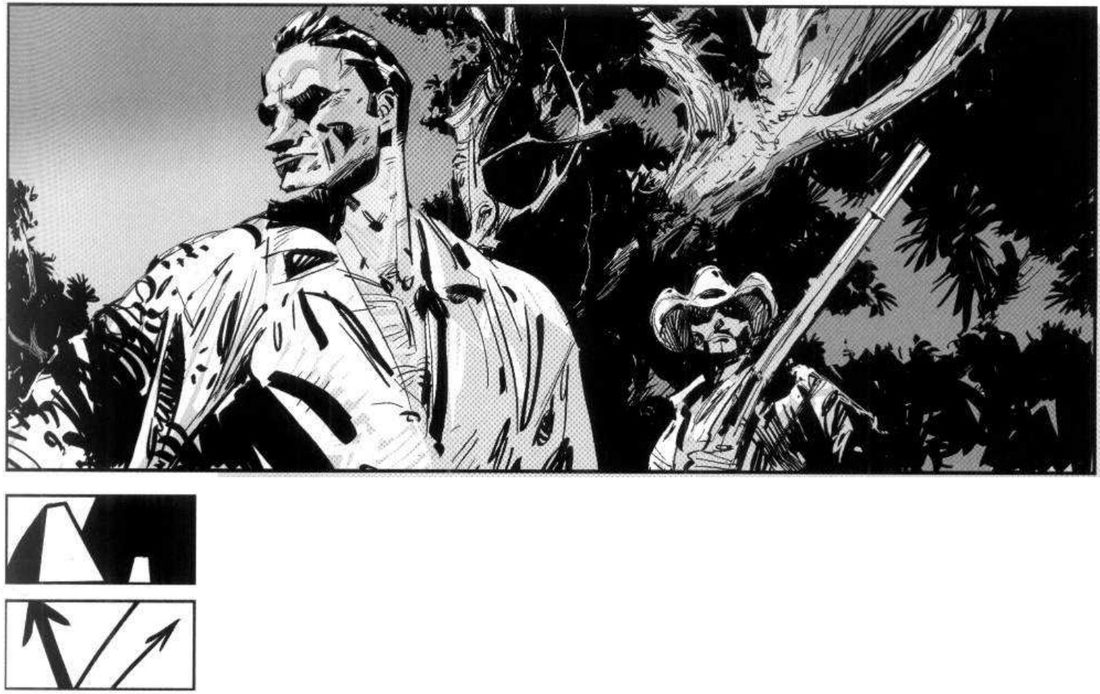
Mateu-Mestre · FI1 p.41“the subject becomes a towering, imposing figure, apparently more in control of the situation.”
Fill-in brief
Answer three questions about a character before you draw, then let the answers pick the camera for three thumbnails.
Chris Legaspi · DRAW with Chris, “Composition Lessons #2: Framed Ink” (22 May 2022) · draw-along 24:56–47:45 · background: FI1 pp.28–30 (lenses)
What he shows
This is Legaspi’s method, built on his reading of Framed Ink. It is not Mateu-Mestre’s. He plays an art director handing himself a brief.
Legaspi · DRAW with Chris · 25:15“establishing shot of a villain in their lair.”
- The rules (25:45). Loose thumbnails only. Three values only: white, black and a mid-tone. Three shots at three focal lengths: a wide shot, a mid establishing shot, and something nearer a close-up.
- Three questions first (26:30). Who is the villain? What kind of villain are they: crafty and sneaky, cold and mechanical, or big and dominating? What mood do we want: dark and sinister, lighter, or mysterious? He says these are the decisions the drawing has to answer.
- His answers (29:00, 35:00). A huge sci-fi demon samurai on a throne. He first calls him a war general, then changes his mind: crafty and manipulative, a commander who lets his army fight for him.
- Shot 1, wide (30:30–34:00). He puts the camera very low so the villain feels huge. He weighs centred (more drama) against off-centre on a third. He says he’ll use a longer lens from far away. He picks a shape theme from the answers: horns and sharp angles. Then he adds a tiny hero, “us”, into the room.
- Shot 2, closer, wide-angle (40:00). Tighter, with the villain above us and the room warping. He explains that a wide-angle close shot makes things that should be straight bend, so you feel uncomfortable.
- Shot 3, close, long lens (42:15–46:15). He tries the hero blocking part of the frame, then rejects it because the villain doesn’t look big enough. He redraws it at the villain’s giant feet, with a henchman our size, and blurs the foreground the way a narrow lens would.
- Read in order (46:30), the three thumbnails walk us towards the villain like a short sequence.
Legaspi · DRAW with Chris · 28:00“What kind of emotion do I want to communicate?”
Background from the book. On FI1 pp.28–30, Mateu-Mestre shows the same girl and house through a wide lens and a long lens. The wide lens exaggerates depth and distorts the face. The long lens flattens depth and keeps proportions realistic. Legaspi’s shots 2 and 3 lean on that difference.
When you practise
Read once · then fill in the template
- Write one line: what should this establishing shot make you feel?
- Fill in the brief and answer the three questions in the template below. Pick from the bank or write your own.
- From your answers, decide one shape theme for the character and the place.
- Thumbnail 1: wide. Decide the camera height and whether the character sits centred or on a third. Use only white, black and one mid-tone.
- Thumbnail 2: closer, with a wide-angle lens that distorts.
- Thumbnail 3: close, with a long lens.
- For each thumbnail, make the two little thumbnails beside it: the value masses, and the lines of tension.
- Run the check at the bottom of the template. If a thumbnail fails an answer, redraw that one.
[who] in [where] at [what moment]
1. Who is it?
2. What kind are they?
e.g. crafty, cold and mechanical, dominating, gentle, desperate
3. What mood?
e.g. dark and sinister, lighter, mysterious
Rules
· thumbnails only, no detail
· three values: white, black, mid
· three framings: (a) wide · (b) closer, wide-angle, distorts · (c) close, long lens
Check: each thumbnail against your three answers
(a) shows 1 ☐ 2 ☐ 3 ☐
(b) shows 1 ☐ 2 ☐ 3 ☐
(c) shows 1 ☐ 2 ☐ 3 ☐
Brief bank · mine
- Fantasy. A witch in her book-crammed attic at the moment a stranger knocks.
- Fantasy. A dragon in a collapsed cathedral the morning after a raid.
- Sci-fi. A retired mech pilot in a scrapyard hangar as the recruiters land.
- Noir. A rookie detective in a rain-soaked noodle bar, waiting for an informant who is late.
- Horror. A lighthouse keeper in the lamp room as the light goes out.
- Western. A bounty hunter in a desert motel room, cleaning a gun at midnight.
- Slice of life. A tea-shop owner in her tiny alley shop after the last customer leaves.
- Romance. A violinist on an empty station platform as the last train pulls in.
- Adventure. A merchant queen on her floating market barge at closing time.
- Legaspi’s own. A villain in their lair as the hero walks in.
CheckLegaspi states no formal check. He judges each thumbnail against what he decided about the villain: at 43:30 he drops a version because the villain doesn’t look big enough. So compare each thumbnail with your three written answers. Then shrink it and flip it: does it still read as your one-line intent?
Fill-in brief
Three answers → three values → three framings.
Keep asking: what kind of emotion do I want to communicate?
Three points of view
Thumbnail one confrontation from each side and from a bystander, and see camera and shape choices flip who the audience roots for.
Chris Legaspi · DRAW with Chris, “Composition Lessons #2: Framed Ink” (22 May 2022) · demo 47:50–68:45
What he shows
His brief is David vs Goliath, the underdog against the unstoppable force. He makes three sets of thumbnails: David’s point of view, Goliath’s, and the audience’s or a third party’s (48:15). David vs Goliath is his demo. Any two characters in conflict will do.
Legaspi · DRAW with Chris · 48:45“I work small, fast, loose, and just have fun and explore.”
- David’s set (50:15–54:30). The words that come to him are small, intimidating and unstoppable. David sits close to us at the bottom of the frame, which makes him small. A low-angle camera makes Goliath loom. Then he tilts the shot so both stand on one slanted plane. He adds a beam of light from above for David’s inner strength, a device he credits to Rembrandt.
- Goliath’s set (54:45–59:30). A plain, straight-on camera with no exciting angle. He says this makes Goliath read as a possible gentle giant who is only following orders. Next he tilts the ground so Goliath has to climb uphill, and says we cheer for whoever faces adversity. Then he gives Goliath curvy shapes and David angular ones. Goliath holds out a hand while David readies his stone, and the sympathy shifts to the giant.
- The third party’s set (60:00–67:15). He adds what David is protecting: the village, his sister and the sheep. In one version Goliath is only a huge cast shadow over them. In the last he moves the camera up and switches to a very wide, fish-eye lens, so the cliffs warp and the shot feels uncomfortable.
- His wrap-up (67:30). First decide who the story is mostly about, and what kind of character each one is. Is Goliath vicious or softer? Is David strong alone, or helped by a greater power?
Legaspi · DRAW with Chris · 56:15“typically we cheer for the underdog, right?”
When you practise
Read once
- Pick a confrontation between two characters, A and B. Any genre.
- Write one line: for this set, who should the audience root for, and what should they feel?
- Answer his wrap-up questions: who is the story mostly about, and what kind of character is each one?
- Set 1, A’s point of view. Thumbnail small, fast and loose.
- Set 2, B’s point of view. Try a plain camera, a tilted ground, and swapping the shape language between A and B.
- Set 3, a third party’s point of view. Bring in someone or something with a stake, and try a lens change.
- Across the sets, change these four levers: camera height, horizon tilt, shape language (angular or curvy), and lens.
- Make the value-mass and tension-line thumbnails for the strongest one in each set.
- Under each set, write who you now root for.
CheckLegaspi states no formal check. He names the effect as it lands, for example that the curvy giant now gets our sympathy (58:15). So compare who you root for under each set with the line you wrote before it. Then shrink and flip the strongest of each set: does it still read?
Three points of view
A’s view, B’s view, a bystander’s. Move height, tilt, shapes, lens.
Keep asking: who is this story mostly about?
Camera intensity dial
Raise the intensity of one beat in steps by moving the camera, then try the same beat from above and from below.
Mateu-Mestre · FI1 p.80 (master shot), p.83 (frames 5–7), p.90 (plan), p.40 (downshots), p.41 (upshots)
What he shows
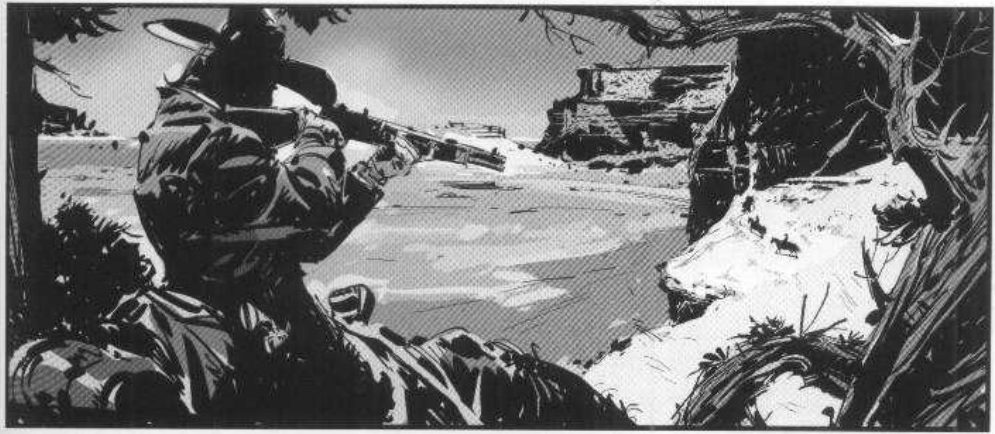
The established camera. The “Cowboys” sequence starts with a master shot. He lists why the cowboy dominates: he sits higher in frame than the others, his head is above the horizon, he watches unseen, and he is armed. Dry foreground plants frame him and half hide him. Three riders are far off, riding away (p.80). The cowboy is his demo. The method works for any beat where one character is about to act on another.
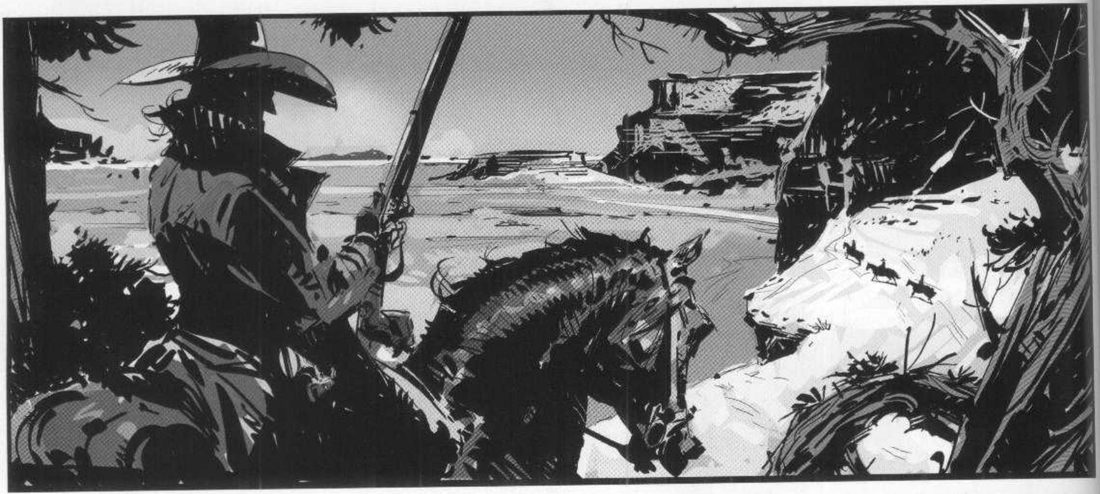
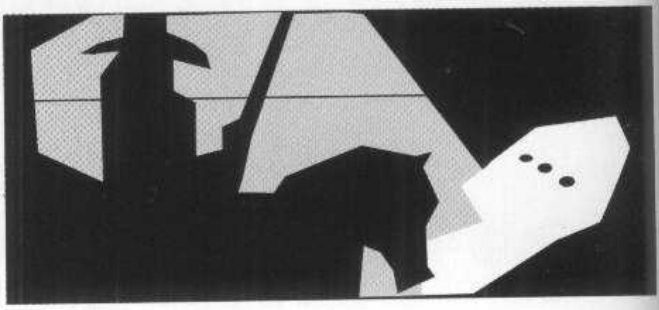
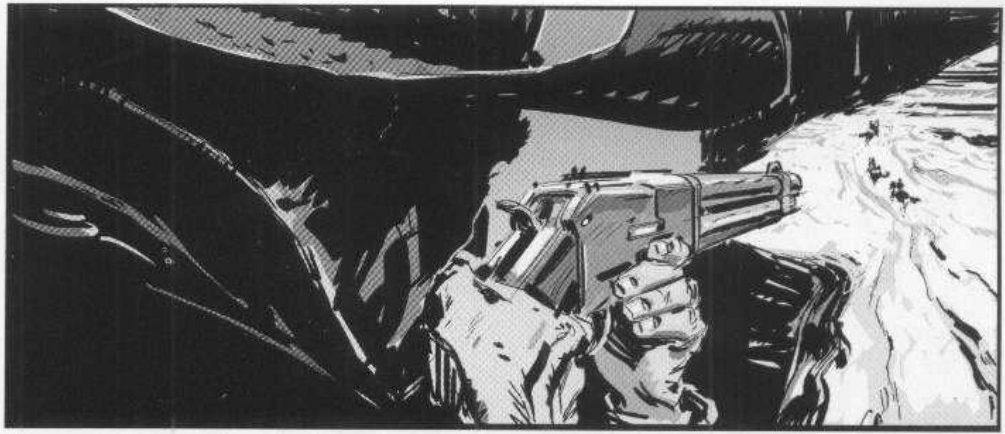
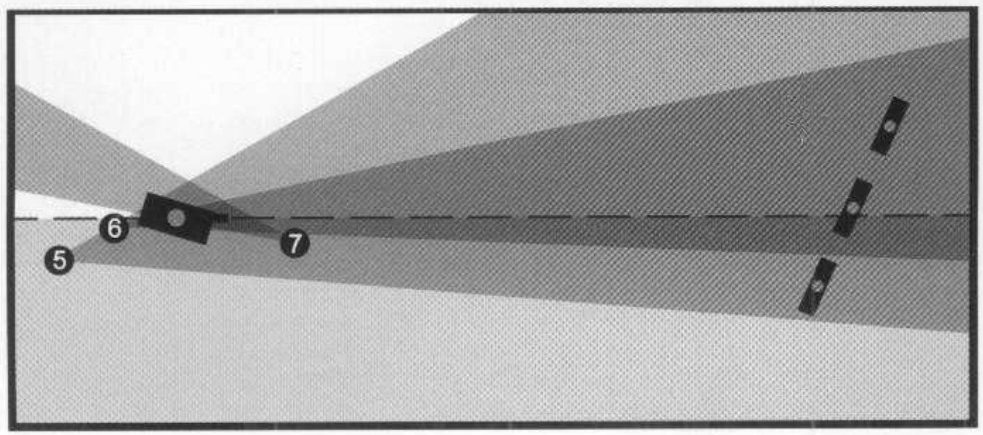
The beat. On p.83 he asks how to show the calm before the storm visually. The cowboy decides to bring up the gun and aim at the three riders. He then turns the camera into a dial with three named steps:
- Frame 5, low. The camera stays exactly where it was. No major contrast happens, so the intensity rises only a little.
- Frame 6, mid. The camera moves closer to the imaginary line between the shooter and his targets, so we are nearer his point of view and the mood turns unsettling. It stays behind him, as it has all sequence, so the intensity only reaches mid level.
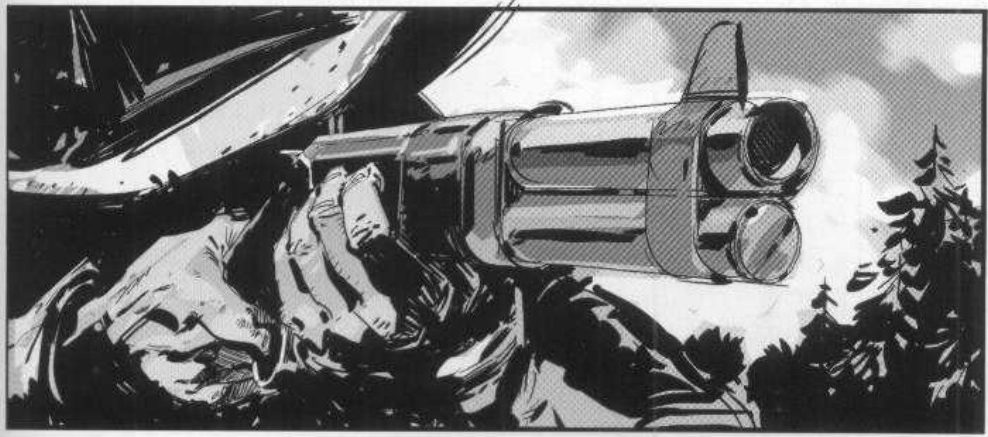
- Frame 7, high. The camera goes in front of the character, or really in front of the gun. Now we feel like the riders. A wide-angle lens makes it more disturbing still.
Mateu-Mestre · FI1 p.83“the intensity of the scene will be fairly low.”
Mateu-Mestre · FI1 p.83“we start feeling as if we were in the place of the three horsemen”
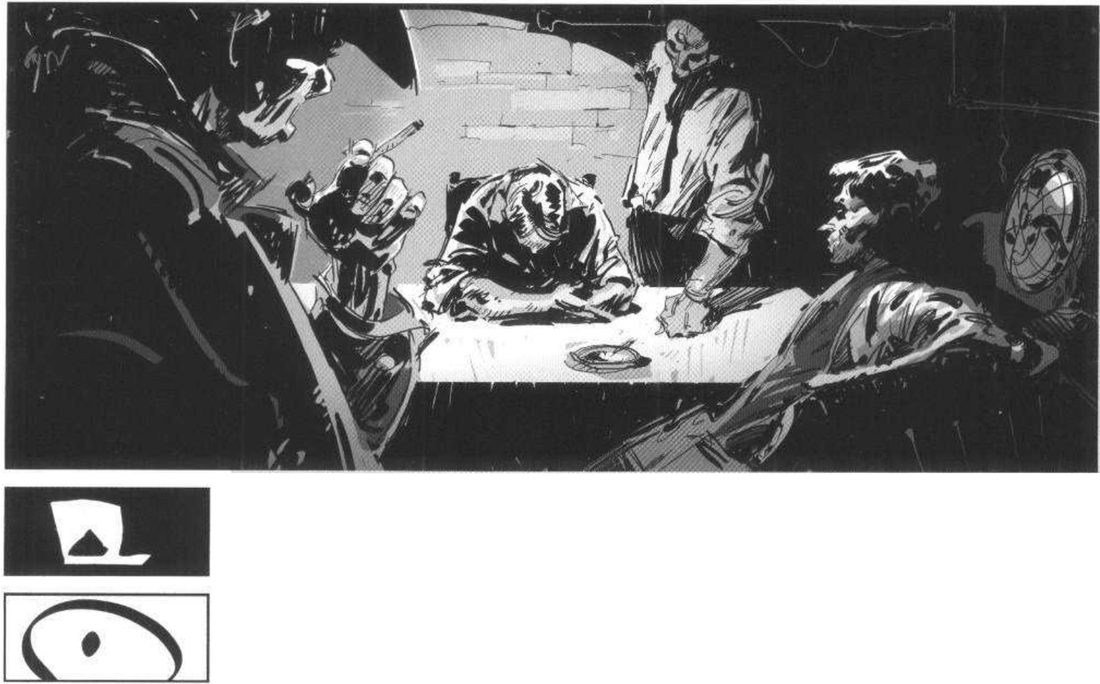
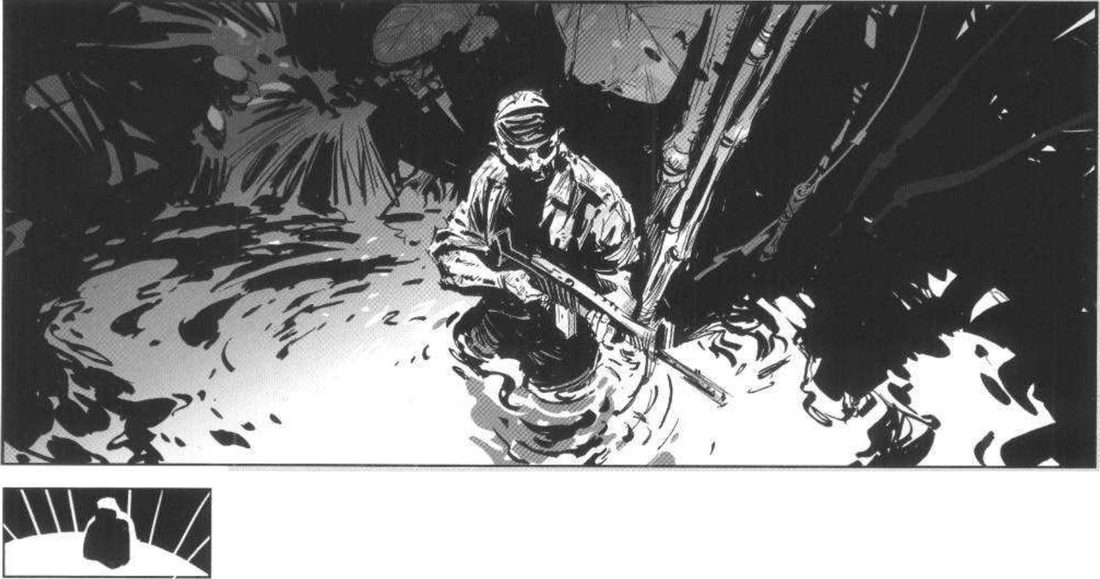
Height: the downshot. In “Looking down, feeling down” (p.40) the man being questioned sits in a lit frame at the centre. Every other character’s eyes sit higher in the frame than his, and his body is below the horizon line. Closed fists contrast with his open hand. A forearm and a hat point at him, and the wall shadow above his head closes the circle. In the swamp shot the camera is high, so we barely see what is around the soldier, as he must feel. Big leaves shrink him, and bamboo stresses the downward perspective.
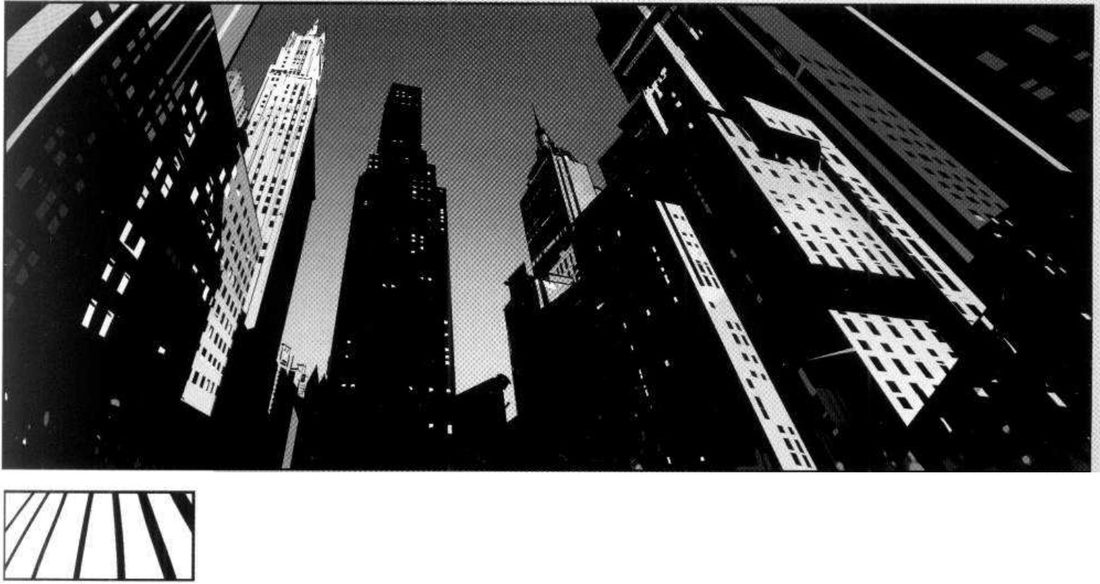
Height: the upshot. In “Overpowering upshots” (p.41) the camera goes below the character’s eyes. The adventurer looms over a distant hunter. The tree and gun lean right while he leans left, and he looks out of frame away from the other man. The city shot applies the same feel to buildings. He adds that pointing the camera high enough to include the vanishing point would push it further.
His version: open after you’ve done yours
When you practise
Read once
- Pick a beat where one character is about to act on another: a threat, a decision, a reveal. Any genre.
- Write one line: what should the reader feel at the peak?
- Draw the master shot from one camera spot, with the value-mass and tension-line thumbnails. List what makes your actor dominate, as he does on p.80.
- Frame 5: the beat happens, camera on the same spot.
- Frame 6: move the camera nearer the line between actor and target. Stay behind the actor.
- Frame 7: move in front of the actor, or of whatever they are pointing at the target. Use a wide-angle lens.
- Label the three low, mid and high.
- Height pair: draw the same beat once as a downshot on the one in trouble and once as an upshot on the one in control. Use the devices he lists on pp.40–41.
- Open his version and compare.
CheckHis own scale (p.83): the same spot gives low intensity, nearer the line but still behind gives mid, and in front of the weapon with a wide lens gives high. Can you name which camera relationship gives each of your frames its level? For the height pair he states no check. Shrink and flip both: does each still read as your intent? Then compare all of yours with his frames 5–7 and pp.40–41.
Camera intensity dial
Same spot → nearer the line, behind → in front, wide lens. Then down and up.
Keep asking: whose place is the camera putting me in?