Across the cut
Six exercises about what happens between two frames: where the eye lands, who dominates, which side of the screen things keep, and how tension climbs from one frame to the next.
Mateu-Mestre · FI1 p.87“the actual screen as the common element between all still frames”
Focal handoff
Put the first focus of the next frame where the eye left the last one, so the viewer never has to hunt after a cut. His house and his eye are demos; any pair of frames with a cut between them works.
FI1 p.26 (Cutting in) · p.55 (Keeping the focal point; scan page 54, as the scan swaps 54 and 55). No figure numbers printed.
What he shows
The cut-in (p.26). Sometimes you jump closer to a detail: the expression in a character’s eyes, or an object that will soon matter. For that case he gives a rule with no exceptions.
Mateu-Mestre · FI1 p.26“always make sure that the subject stays in the same position in both frames”
He means the same position proportionally, measured against the screen. His demo is a house at night. He draws an X from corner to corner over both panels to show it.
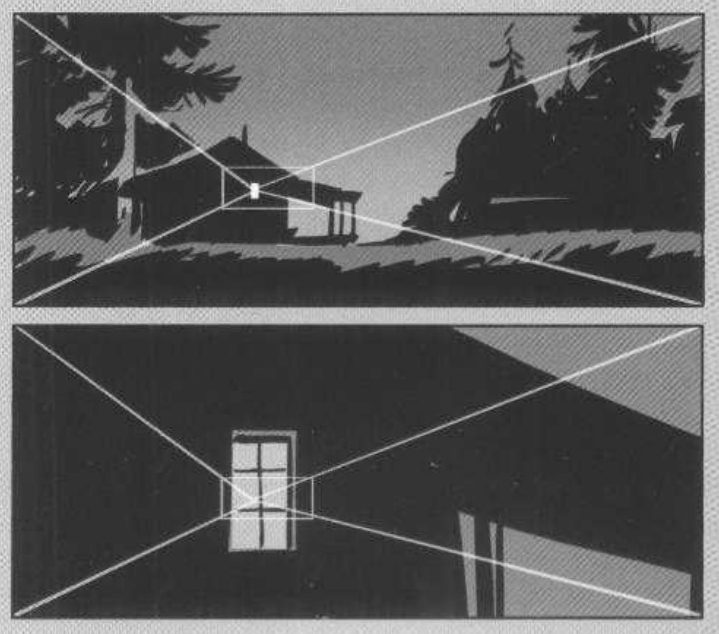
Keeping the focal point (p.55). A cinema screen is a big surface. The filmmaker has to steer the eye in every shot, and also stop it getting lost after each cut. There is no time for the viewer to search, and no reason for it. His device: whenever possible and convenient, the last point of focus in one shot coincides with the first point of focus in the next. He points to pp.57 and 87 as related pages.
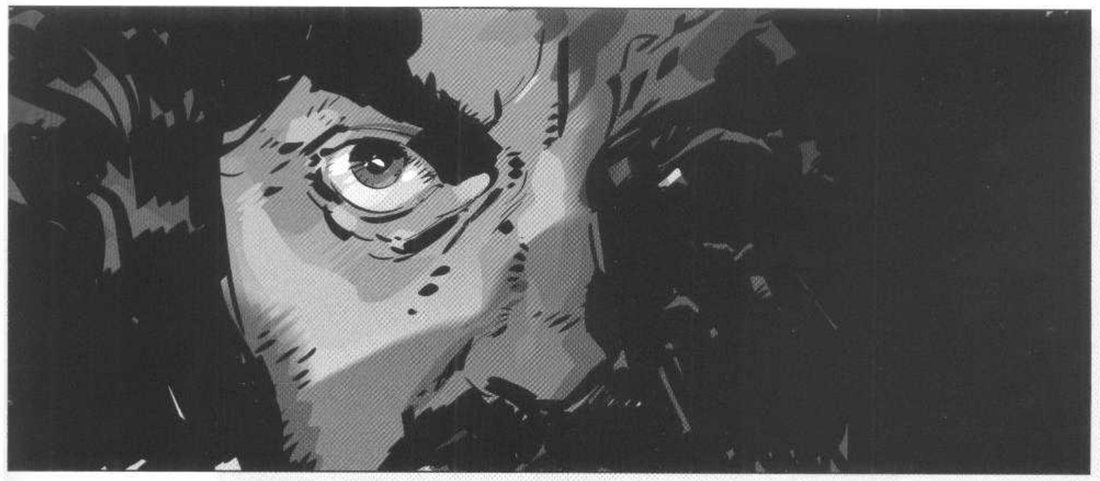
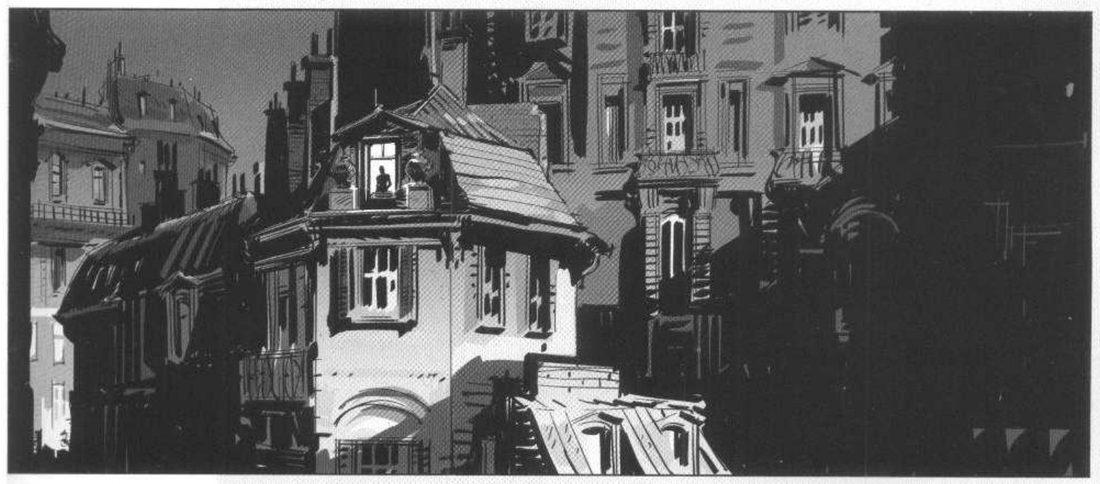
He says the pools of light and the rule of thirds already help here. Without the matching position, though, it would take a while to find which window of which building to look at.
Mateu-Mestre · FI1 p.55“the shot would have lost its meaning and purpose within the story.”
His version: open after you've done yours
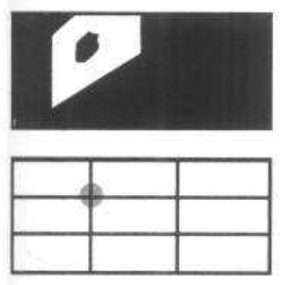
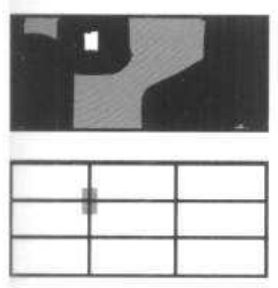
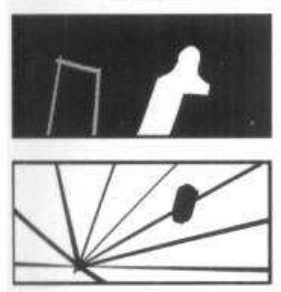
Beside each p.55 shot he prints a mass thumbnail and, unusually, a rule-of-thirds grid with the focus marked. This is the only place in the chapter he uses the grid.
When you practise
Read once
- Write one line: what should this cut make you feel?
- Warm-up on his pair: draw a thirds grid over each p.55 shot above and mark where the focus sits. Then open his version and compare.
- Choose your own pair: a frame and the frame that follows it. It can be a cut-in on the same subject (his p.26 case) or a cut to something else (his p.55 case). A face to a hand, a phone screen to the face reading it, a doorway to the figure inside: any subject works.
- Thumbnail the masses of frame A. Mark where the eye ends up, with an X over the frame or a dot on a thirds grid.
- Trace that X or grid onto frame B before drawing anything. Build B so its first focus lands on the same mark.
- Use contrast to make it land: a pool of light framed by shadow, as he does on both pages.
- Shrink both and flip them. Flick from A to B and back.
The eye leaves A at: (X centre / thirds crossing)
B’s first focus is: , at the same spot.
CheckFor a cut-in, the subject stays in the same proportional position in both frames, which the X overlay shows (p.26). For any cut, the viewer shouldn’t have to search for the new focus; if they do, the shot loses its meaning and purpose (p.55). So flick between them: does your eye land without looking around? Then compare your grids with his.
Focal handoff
Mark where the eye leaves A. Put B’s first focus on that mark.
Keep asking: where does the eye land the moment we cut?
Intercut in three steps
Cut between a side that knows and a side that doesn’t, and let size, eye height and screen side carry the power. His cops and crook are a demo; any knowing side and unaware side works.
FI1 p.57 (Knowledge vs. unawareness, intercutting). No figure numbers printed.
What he shows
He says rhythm in cutting matters as much in comics as in film. The emotion comes from how the images interact, as well as from each image. Here it comes from two levels of tension. The cops know what is about to happen, as we do. The crook, a few feet away, has no idea.
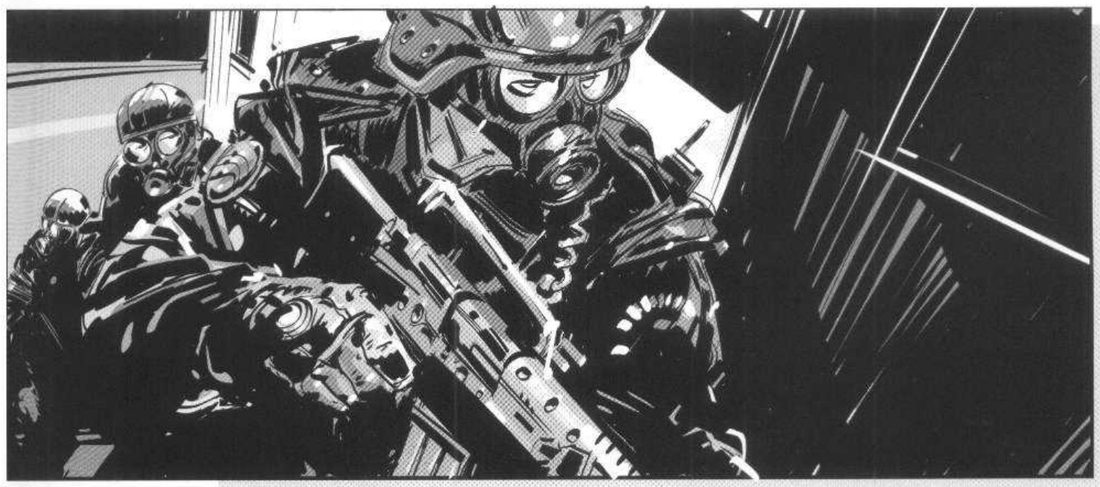
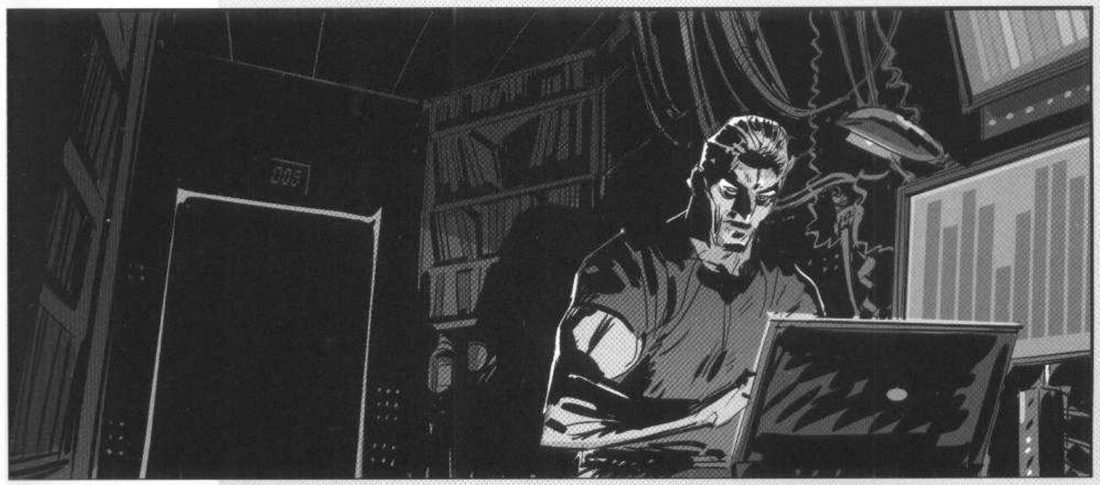
He combines the two shots in three steps, in this order:
- The cops are bigger in their frame than the crook is in his, to show who is more in control.
- The lead cop’s eyes sit higher in his frame than the crook’s eyes in his. When we cut, our eyes have to drop to the crook, which sets up a power relationship.
- The two sides sit on opposite sides of the screen.
Mateu-Mestre · FI1 p.57“made the policemen bigger in their frame than the crook is in his”
Mateu-Mestre · FI1 p.57“the first characters are visually—and literally—chasing after the second.”
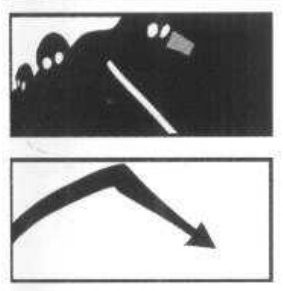
His version: open after you've done yours
When you practise
Read once
- Write one line: what should this cut make you feel?
- Pick a knowing side and an unaware side in one moment. A hunter and the deer, a surprise party and the guest at the door, a thief and the sleeper: any pair works, and it can be one figure each.
- Frame A, the side that knows: two thumbnails, value masses and lines of tension. Make them big in frame, put the lead’s eyes high, and favour one screen side.
- Frame B, the side that doesn’t know: two thumbnails. Smaller in frame, eyes lower, on the opposite side.
- Put A and B side by side. Draw a tick at each lead’s eye height and mark which side each favours.
- Develop them as far as the session allows. Shrink both and flip them.
Bigger in frame: A ☐ · Eyes higher: A ☐ · Opposite sides: ☐
CheckHe gives the effect each step should have (p.57, close paraphrase): size shows who is more in control; on the cut your eye has to go down to the unaware side; the opposite sides make the first group read as chasing the second. Does each one happen in your pair? Then compare your thumbnails with his.
Intercut in three steps
Knowing side bigger → eyes higher → opposite side of the screen.
Keep asking: does the eye have to drop to the one who doesn’t know?
Weight swap
On a reverse cut, mark the main mass of each frame with an X and flip it to the other side of the screen, so no one is mistaken for someone else. His bikers and mobsters are a demo; any reverse cut works.
FI1 p.86–88 (The Bikers, Part 1 frame 4 and Part 2 “Mobsters in the Attic”). No figure numbers printed; frames are numbered 4 to 7.
What he shows
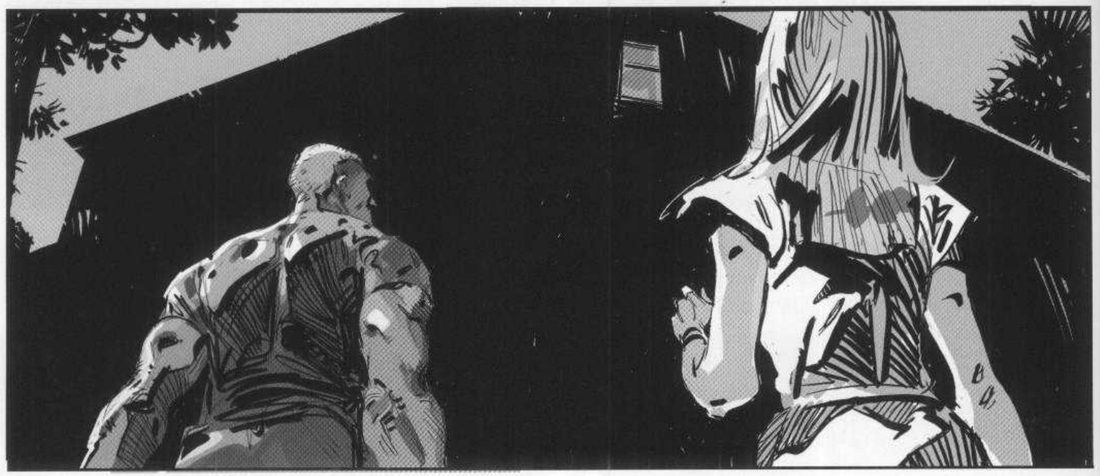
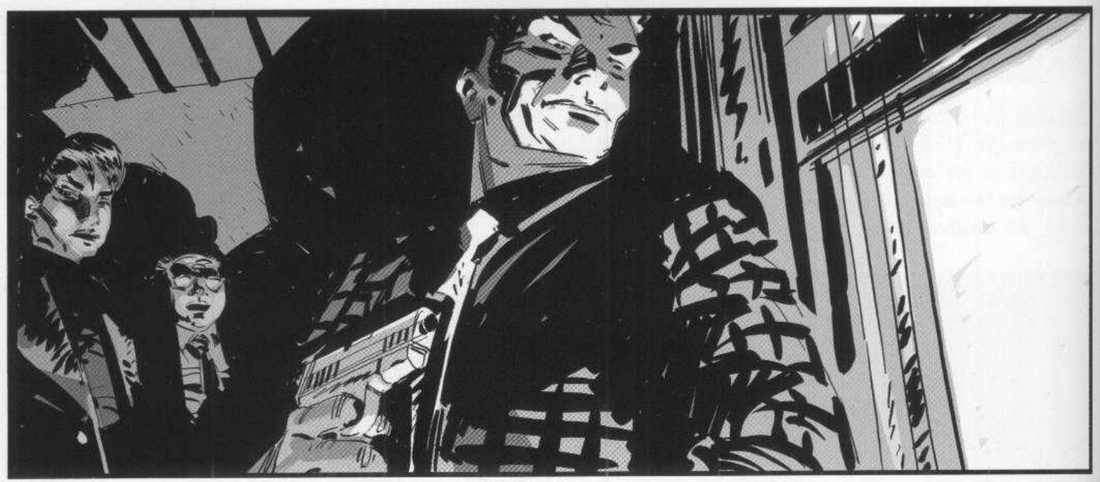
Before the cut (p.86). Frame 4 ends Part 1. The couple stand close to the house, seen from low behind them, and look up at the lit attic window. He says every element now points at that window.
The reverse (p.87). Frame 5 goes to the other side of the window. Keeping at least some of the same characters in both shots lets us link the two set-ups without getting lost in the location. It also reveals new information: we now know of a danger the bikers don’t.
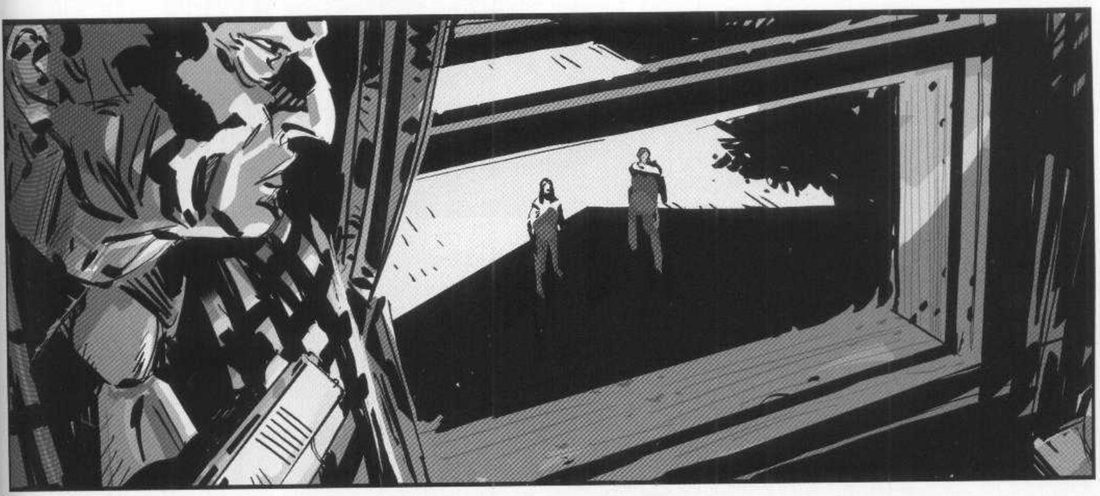
His eyeline thumbnail shows the line from the mobster’s eyes to the couple running downward, which gives him visual dominance. The gun at his chest points the same way and adds pressure.
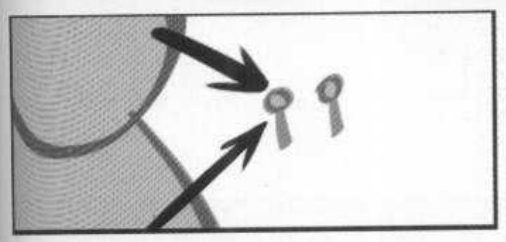
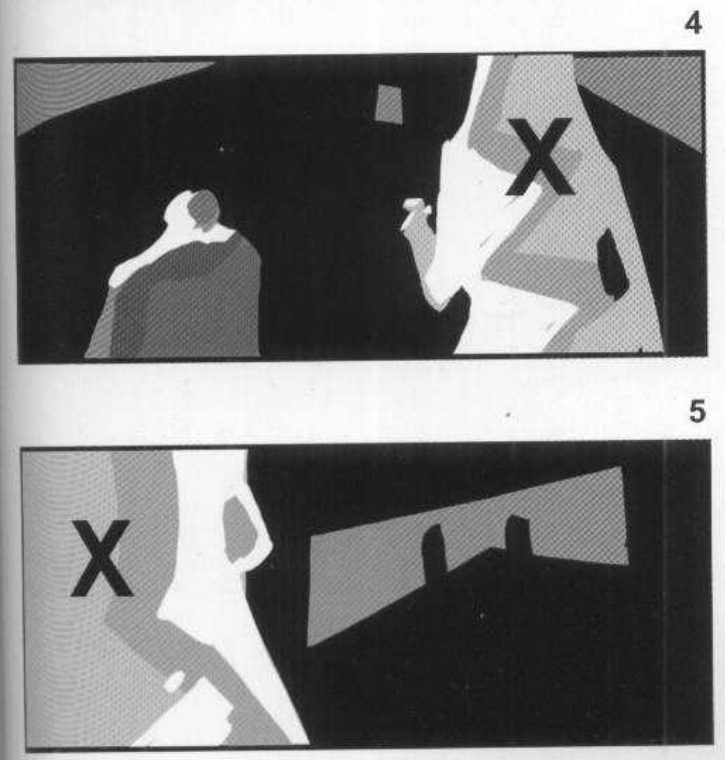
Then the key move. Putting shots 4 and 5 together, he wants no character mistaken for another during the cut. That would happen if they took the same space on the same side of the screen.
Mateu-Mestre · FI1 p.87“we make sure the main weight of the scene changes then from right to left”
He widens it into a principle. Each still frame has its own flow or tension, and in sequential art the screen itself is the common element between frames. So each shot’s main focus is coordinated with the next one’s.
After the cut (p.88). Frame 6 keeps the same mobster dominant, now in an upshot. The square pattern of his jacket tells us at once who he is. The three heads make a triangle, which he finds more uneven and interesting than a flat line. Frame 7 is a straight cut-in on the calm one who seems to run things: same position, same direction, camera moved forward.
His version: open after you've done yours
When you practise
Read once
- Write one line: what should this cut make you feel?
- Warm-up on his pair: thumbnail the masses of frames 4 and 5 above and put an X on the main weight of each. Open his version and compare.
- Choose a reverse cut of your own: two places or two groups that face each other. A hero and the dragon, a stage and its audience, two people across a table. One of your own finished comic pages works too, if it has one.
- Make the two thumbnails for each frame: value masses, then lines of tension. On the lines thumbnail, draw the eyeline as an arrow, as he does.
- Put an X on the main weight of each mass thumbnail. If both Xs sit on the same side, rework one frame until they swap.
- If a character carries over, give them something that reads instantly in both frames, like his jacket pattern.
- Shrink both and flip them.
CheckHis concern is that no character is mistaken for another across the cut (p.87). Flick between your two frames: could anyone be read as someone else? And does the move feel natural, without anything that pulls you out of the story (p.88)? Then compare your Xs with his.
Weight swap
X the main weight on both thumbnails. Across a reverse cut, it changes side.
Keep asking: could anyone be mistaken for someone else across this cut?
Same spot, many messages
List what a master shot contains and what each element does, then pull separate messages out of it without moving the camera. His cowboys are a demo; any establishing shot with a few story elements works.
FI1 p.80 (scan page 81) · p.81 (scan page 80; the scan swaps 80 and 81) · p.82 · “Using the same elements we can deliver very different messages”, Cowboys Part 1: Keeping the camera on the same spot. Frames numbered 1 to 4.
What he shows
He starts by taking stock of the master image.
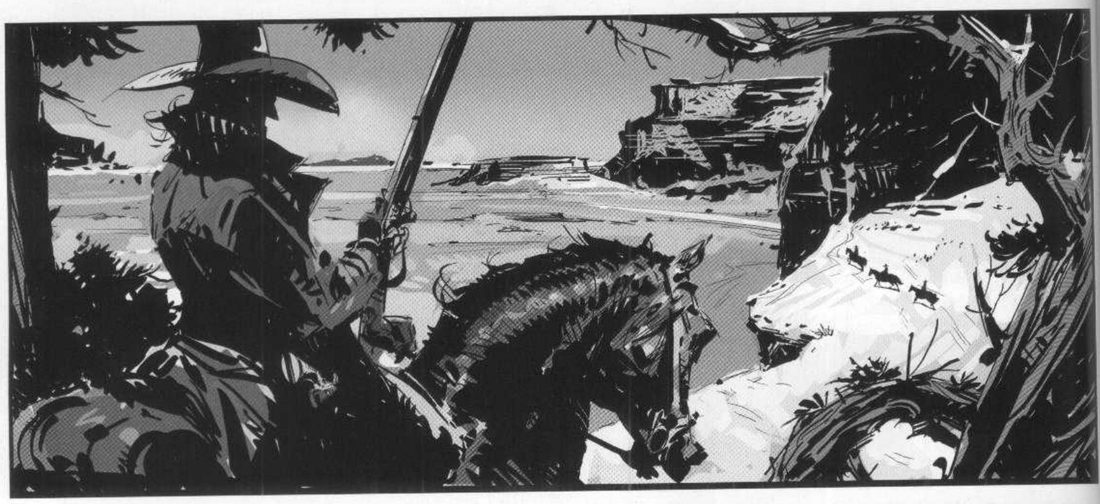
His inventory, close paraphrase (p.80):
- The cowboy dominates. He sits higher in frame than the others, his head is above the horizon, he watches them while they can’t see him, and he is armed.
- Dry vegetation in the foreground frames the scene and partly hides him.
- Three riders in the distance ride away from camera.
- An open south-western landscape is the backdrop.
Then, as he did with the trains, he asks how many different things the same elements can say from the same camera position.
Mateu-Mestre · FI1 p.80“which ones we focus on, which ones we leave out, and what we highlight”
His version: open after you've done yours
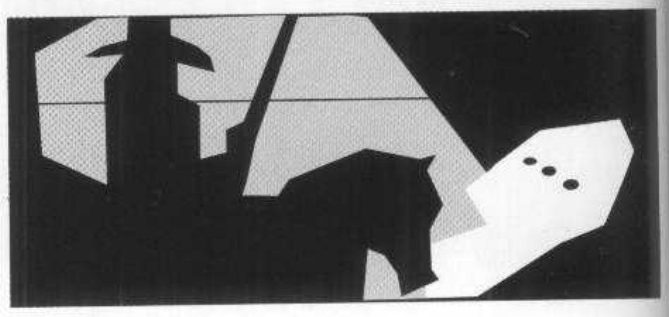
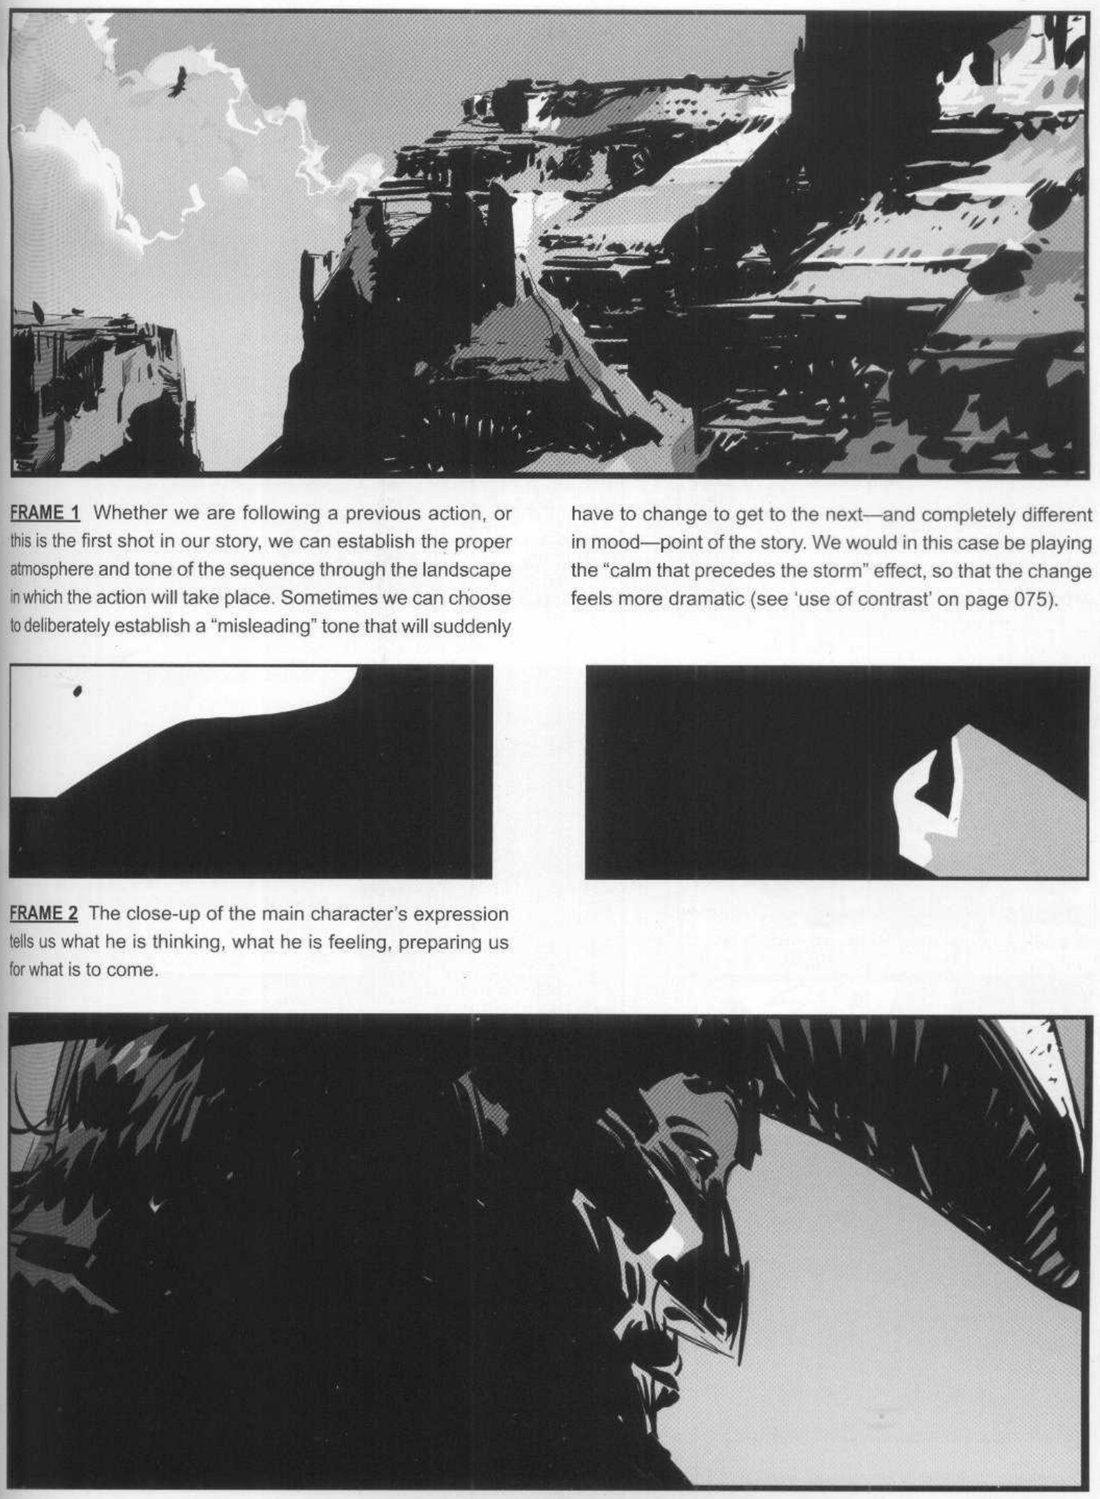
Frame 1 sets the atmosphere and tone. He adds that you can choose a deliberately misleading tone, the calm before the storm, so the next change feels more dramatic. Frame 2 tells us what the cowboy thinks and feels, and prepares us for what comes.
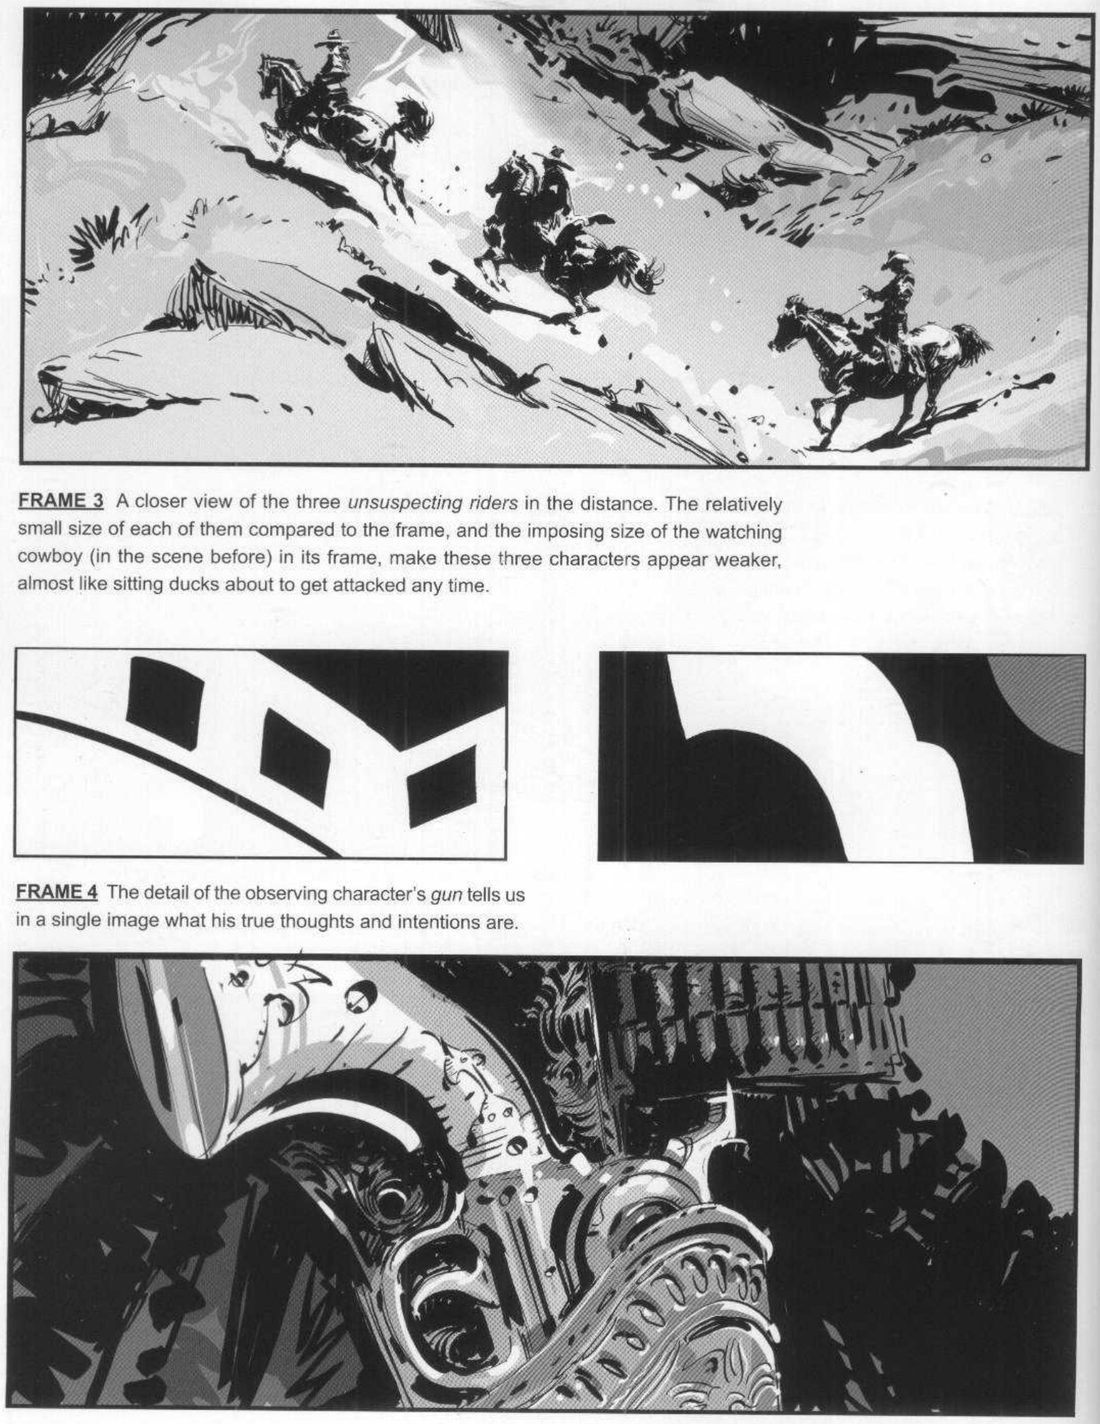
Frame 3 makes the riders look weak, like sitting ducks, because they are small in their frame and the cowboy was imposing in his. Frame 4 shows his true intention in one image.
Mateu-Mestre · FI1 p.82“different messages gathered from the same scene and viewed from the exact same spot”
When you practise
Read once
- Write one line: what should this sequence make you feel?
- Pick or draw one master establishing shot with a few story elements. A kitchen with a letter on the table and someone at the door; a battlefield; a shop at closing time: any setting works. One of your own past panels is fine.
- Make the two thumbnails of the master: value masses, then lines of tension.
- Fill in the inventory below: each element and its job in the master, as he does on p.80.
- Without moving the camera, make four frames. Each one focuses on, leaves out or highlights something different, and each one gets one message.
- Make a two-value abstract of each frame.
- Lay them in order. Shrink them and flip them.
Element: · its job:
Element: · its job:
Element: · its job:
Frame 1 tells: · 2: · 3: · 4:
CheckEach frame delivers one nameable message: tone, thought, weakness, intention (p.80–82). And he checks across frames: the riders read weak because of the size of the cowboy in the frame before (p.82). So look at each neighbouring pair: does the earlier frame make the later one say more? Then compare with his four frames.
Same spot, many messages
List the elements and their jobs. Keep the camera. One message per frame.
Keep asking: what is the one thing this frame tells?
Plan view and the line
Draw the scene from above with the line between its two main elements, number each camera’s view cone, and keep every camera on one side. His cowboys, bikers and ship are demos; any scene with two main elements works.
FI1 p.89 (section divider “The Line”) · p.90–91 (Staying on the same side of “the line”) · p.66–67 (Revealing by rotating the camera). Frames numbered 1 to 7 and 1 to 4.
What he shows
The rule (p.90). The audience is there to follow the story and its emotional ride. They shouldn’t also have to work out where everything is. His comparison is a televised football match. You know the teams, their colours and which goal each attacks. That falls apart if the director cuts between cameras on opposite sides of the pitch.
So unless you want to confuse people on purpose, keep the geography and the characters’ positions clear. His example of wanting confusion is putting us in the shoes of someone just kidnapped and taken somewhere unknown.
Mateu-Mestre · FI1 p.90“one very simple rule: to stay on ‘the same side of the line’”
The line connects the two main elements of the action. Stay on one side and the background behind the characters stays the same, so every action has a fixed reference. He then draws plan views for the Cowboys (frames 1–7, p.80–83) and the Bikers (frames 1–7, p.84–88).
Crossing, if you must (p.91). Do it in one single camera move that starts on one side and ends on the other, so the viewer can still follow.
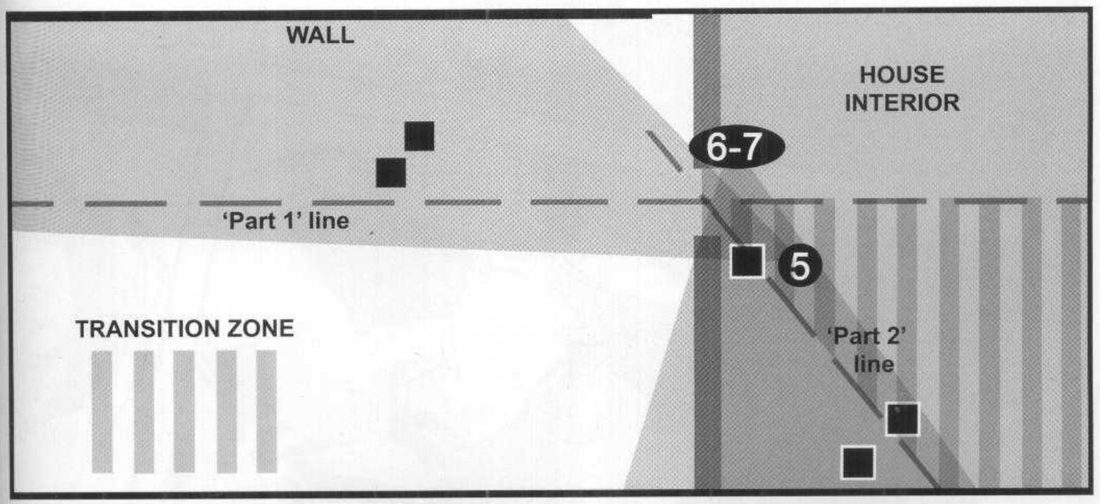
A new action means a new line (p.91). When the Bikers move from outside to the attic, the line changes. The first shot inside stays on the old side, in a “transition zone” between the old line and the new one.
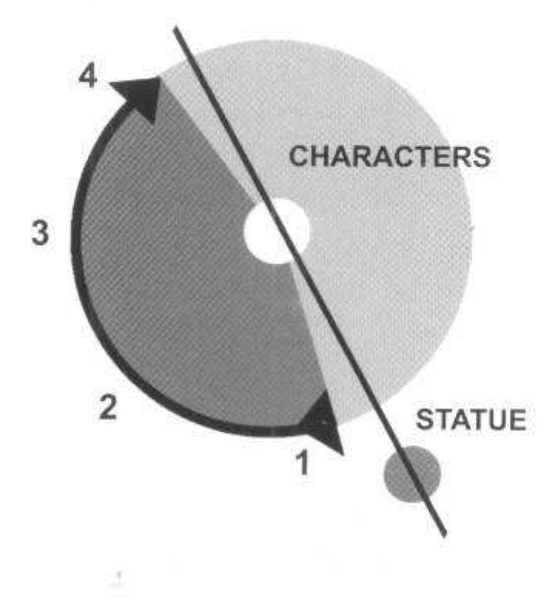
The orbit reveal (p.66–67). On a ship arriving in New York in 1910, he rotates the camera around one character to reveal what she is looking at.
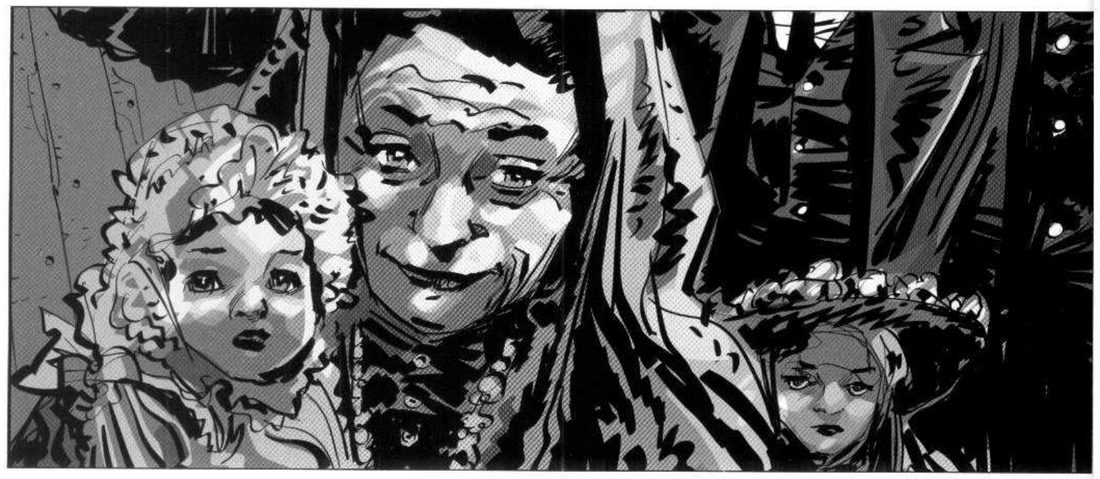
Frame 1 centres on a tired woman holding her baby. She looks up and screen right, and they won’t cross the line between her and what she sees. In frame 2 the camera descends and swings round the right side of her face. She stays on the left, looking right. The other people sit in darker areas and look ahead or away, never at camera, which might distract. In frame 3 the camera drops below her eye level and clouds and light come in as part of a designed emotional transition.
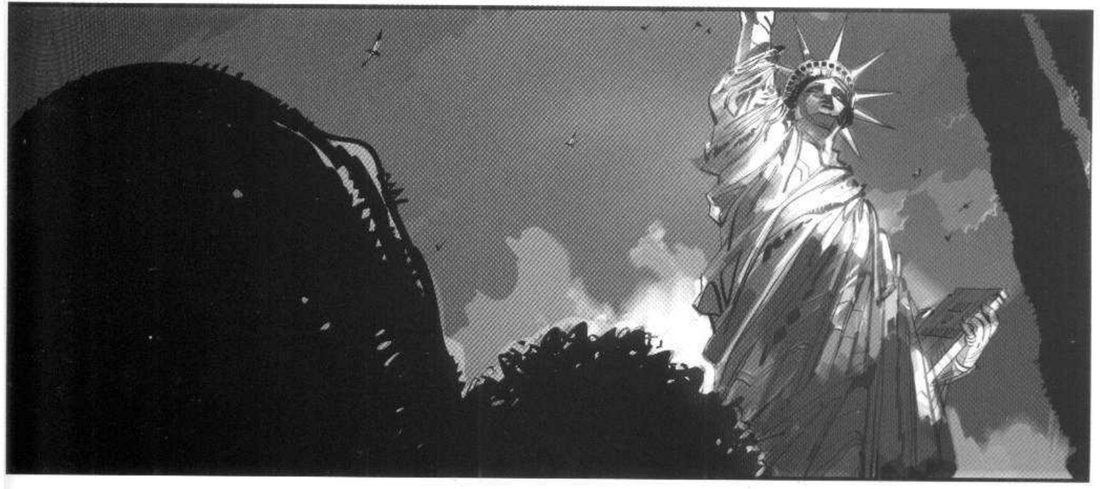
Frame 4 reveals the Statue of Liberty. Going from a downshot on their faces (p.40) to a solemn upshot (p.41) gives a visual crescendo and a turning point.
Mateu-Mestre · FI1 p.67“always keeping the characters screen left and the statue screen right”
His version: open after you've done yours
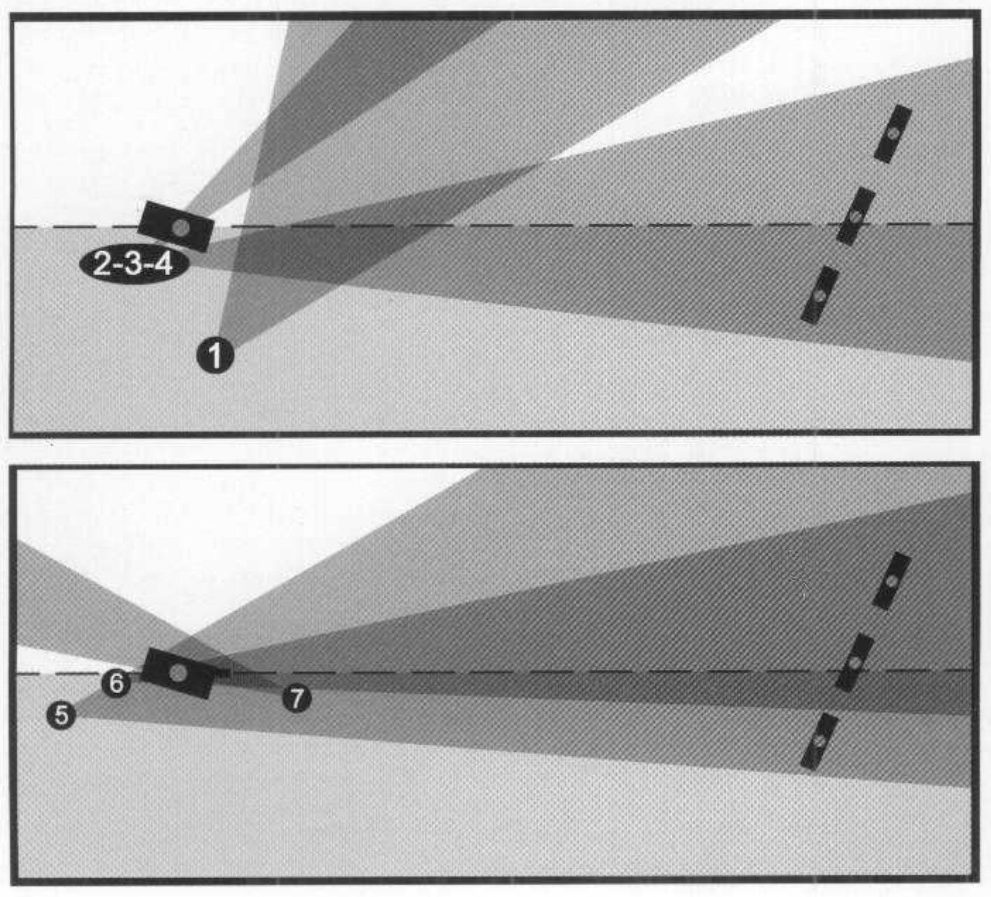
He notes the result: the gunman always favours screen left, and the riders and mountains favour screen right, even if only slightly (p.90).
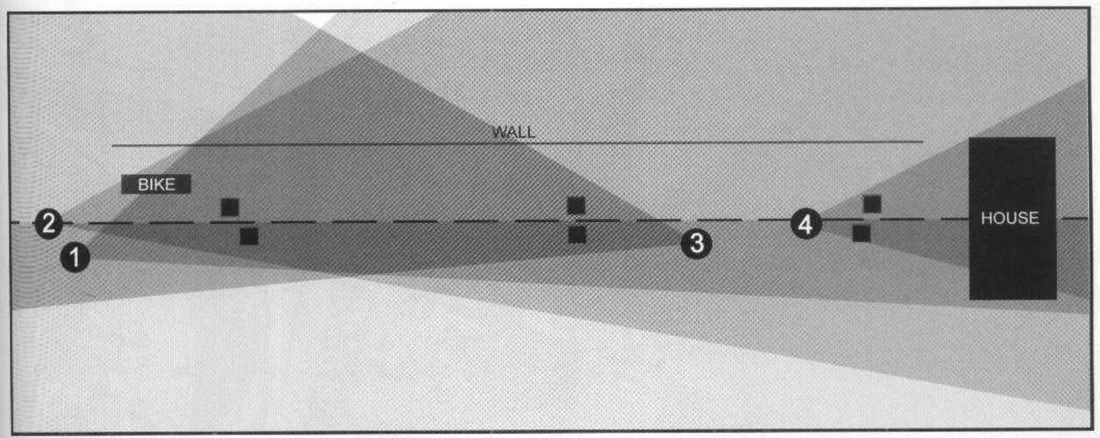
He calls 2 and 4 a neutral position: on the line, still clear about the geography, not across it (p.91).
When you practise
Read once
- Write one line: what should this sequence make you feel?
- Warm-up on his sequence: from the Cowboy frames on p.80–83, sketch a plan view. Put the two main elements as blocks, draw the line, and add a numbered view cone for each frame. Open his version and compare.
- Then pick one for your own scene. Two people across a table, a rider and a gate, a girl and the thing she has just seen: any two main elements work.
- A sequence: plan first. Two blocks, the line, numbered cones all on one side. Then thumbnail each frame from its cone.
- An orbit reveal: a subject, the thing they look at, the line between them, and a curved camera arc on one side of it. Thumbnail frames along the arc, from a downshot to an upshot, as he does.
- Make the two thumbnails for each frame: value masses, then lines of tension.
- Lay the frames in order. Mark which screen side each main element favours in every frame.
- Shrink them and flip them.
A favours screen: · B favours screen:
Cameras on the side of the line.
CheckDoes each main element keep its screen side in every frame, as the gunman stays left and the riders right (p.90)? Is the background behind the characters the same throughout (p.90)? For an orbit: do the characters stay screen left and the target screen right (p.67), and do secondary faces stay out of the way, darker and not looking at camera (p.66)? Then compare with his plans.
Plan view and the line
Two main elements, one line, every camera on one side.
Keep asking: does everyone keep their side of the screen?
Two-value ramp
Reduce three escalating frames to black-and-white abstracts and make sure the abstracts climb on their own, before any detail. His trains are a demo; any beat that builds works.
FI1 p.75 (How one thing affects the next: thinking in continuity) · p.76–77 (Ramping up (1): train flat from the side) · p.78–79 (Ramping up (2): train in perspective). Frames numbered 1 to 3 on each.
What he shows
Contrast and the climax (p.75). Contrast is why we can see anything, and he says it works the same way in the picture and in the story. A pitch-dark room hides every object. Camouflage works by breaking the soldier’s outline. A very pale grey wall looks white until you paint a patch of pure white on it. Contrast works by first setting up a rhythm, so the special element can break it.

We also use contrast to ramp up to a climax. People stay hooked while questions are open and move on once they have the answer.
Mateu-Mestre · FI1 p.75“leaving the wildest and most powerful for the end”
Ramp 1, side on (p.76–77). Three fully rendered frames: the train small in a big sky, the carriage seen through its windows, and a close profile of the reading woman. The camera stays on the same spot the whole time. Then he strips out the detail, the acting and the drawing style, to leave only what you’d see if you walked in at that moment, before knowing the story, the characters or even the period.
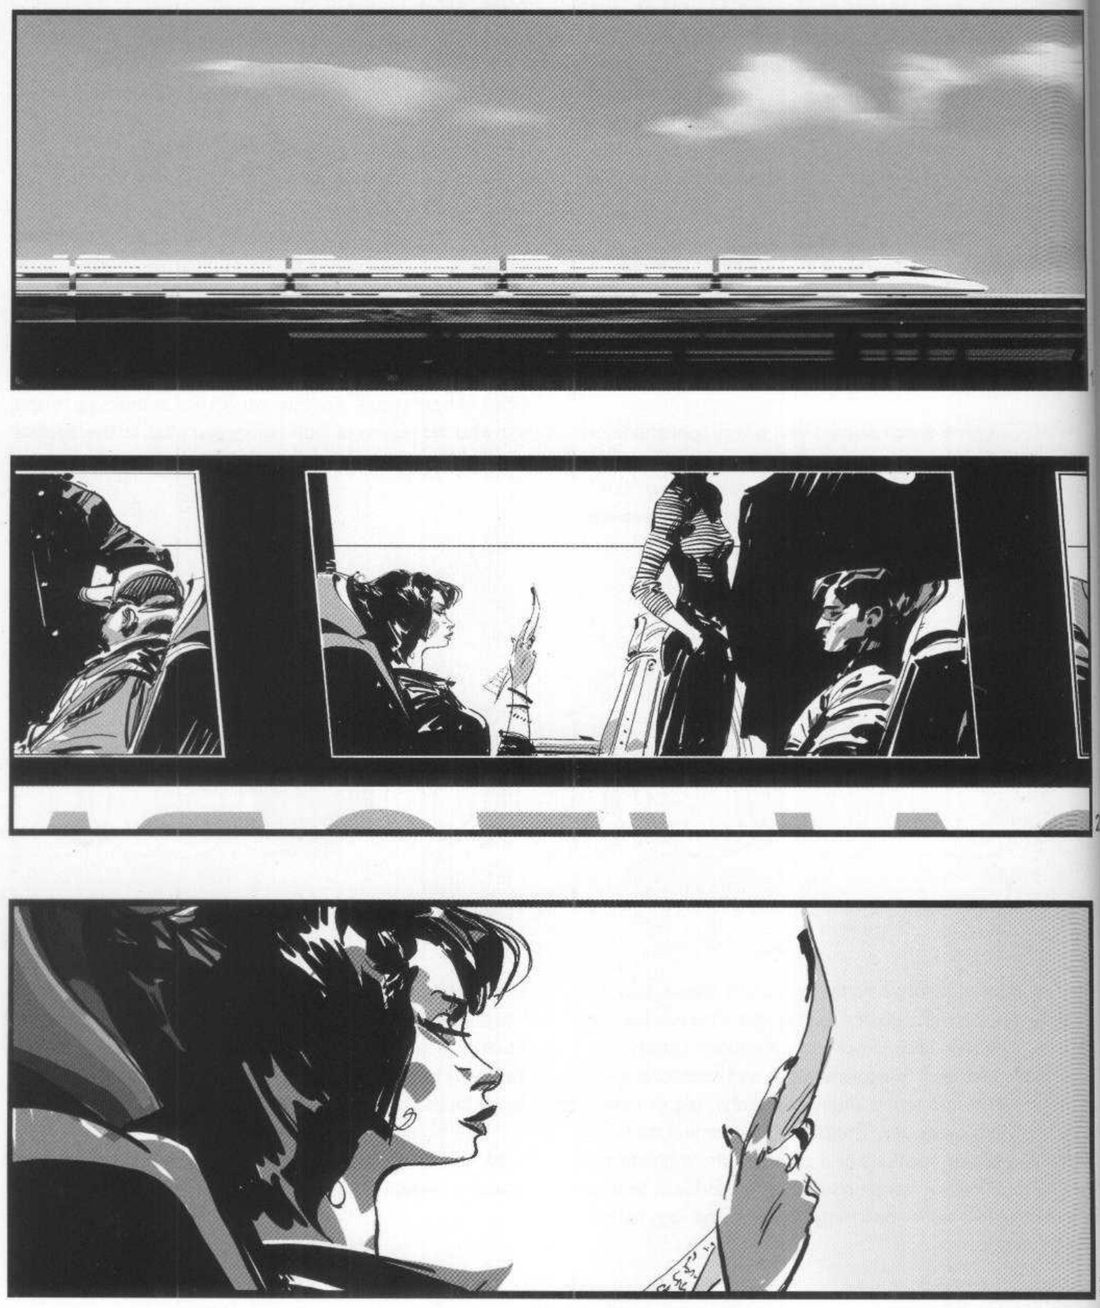
Mateu-Mestre · FI1 p.77“What would this first impact be like then, and what would it be telling us?”
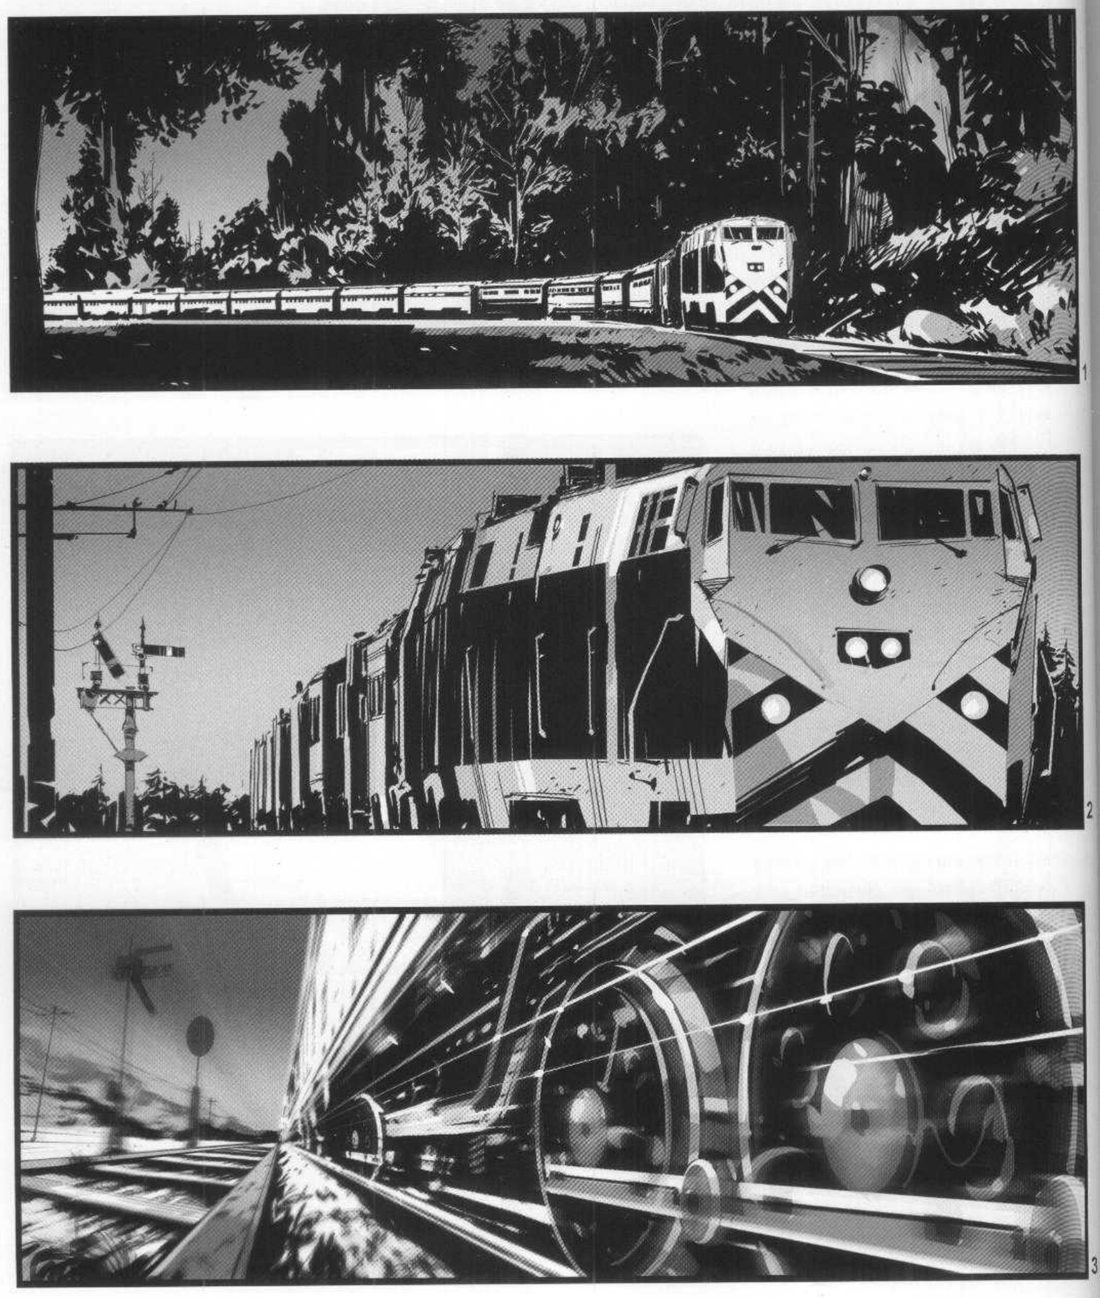
Ramp 2, in perspective (p.78–79). The same subject from a different point of view. The train is now coming at us, so this route starts more dynamic and still has room to build.
His version: open after you've done yours
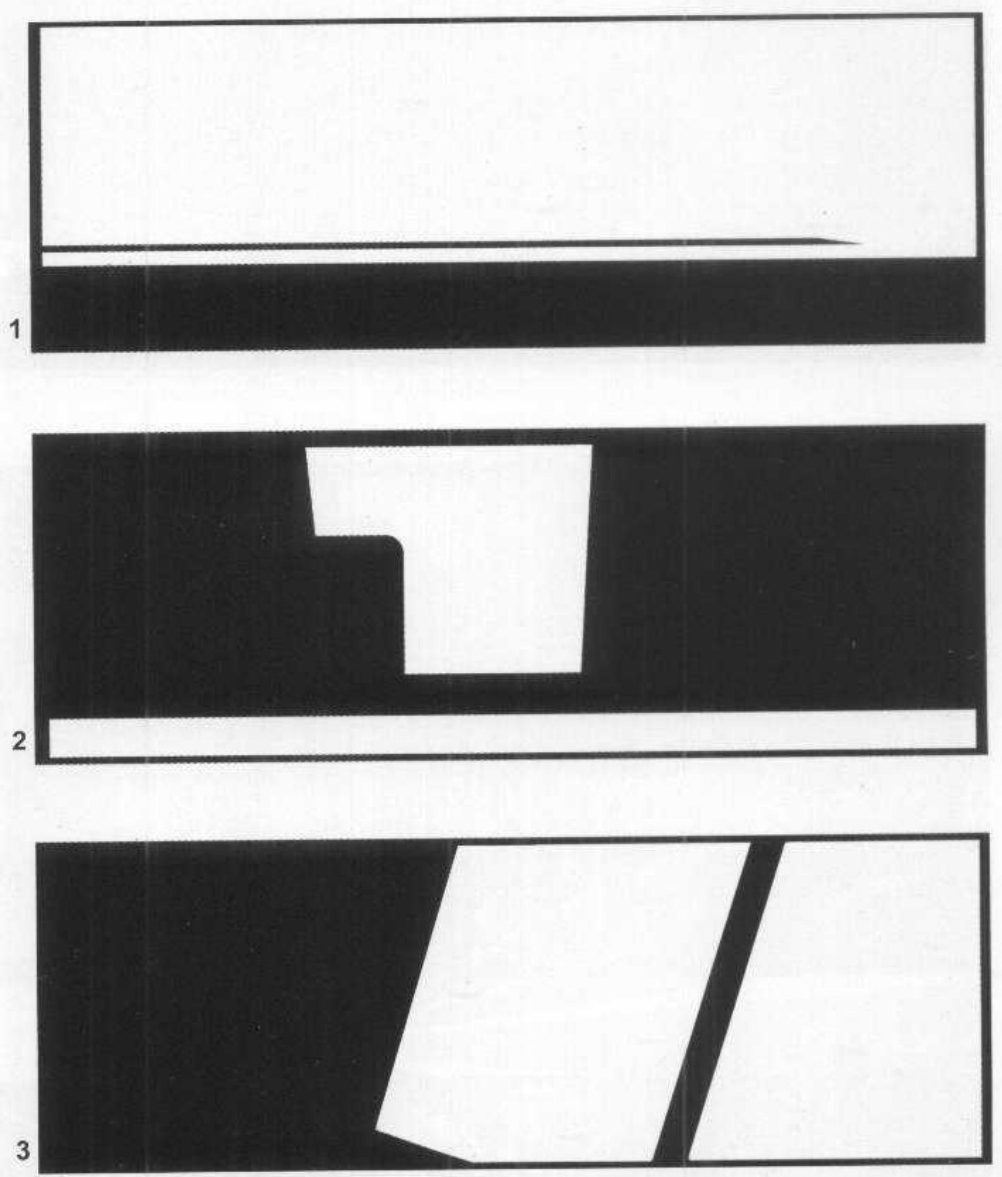
His readings, close paraphrase (p.77). 1: just a flat line, a peaceful, relaxing impression. 2: more uneven shapes, but not yet crazy or dynamic. 3: slight diagonals, but the real lift is how close her face is, which raises our part in the action. He adds that power posts or other rhythmic elements passing behind her would push it further.
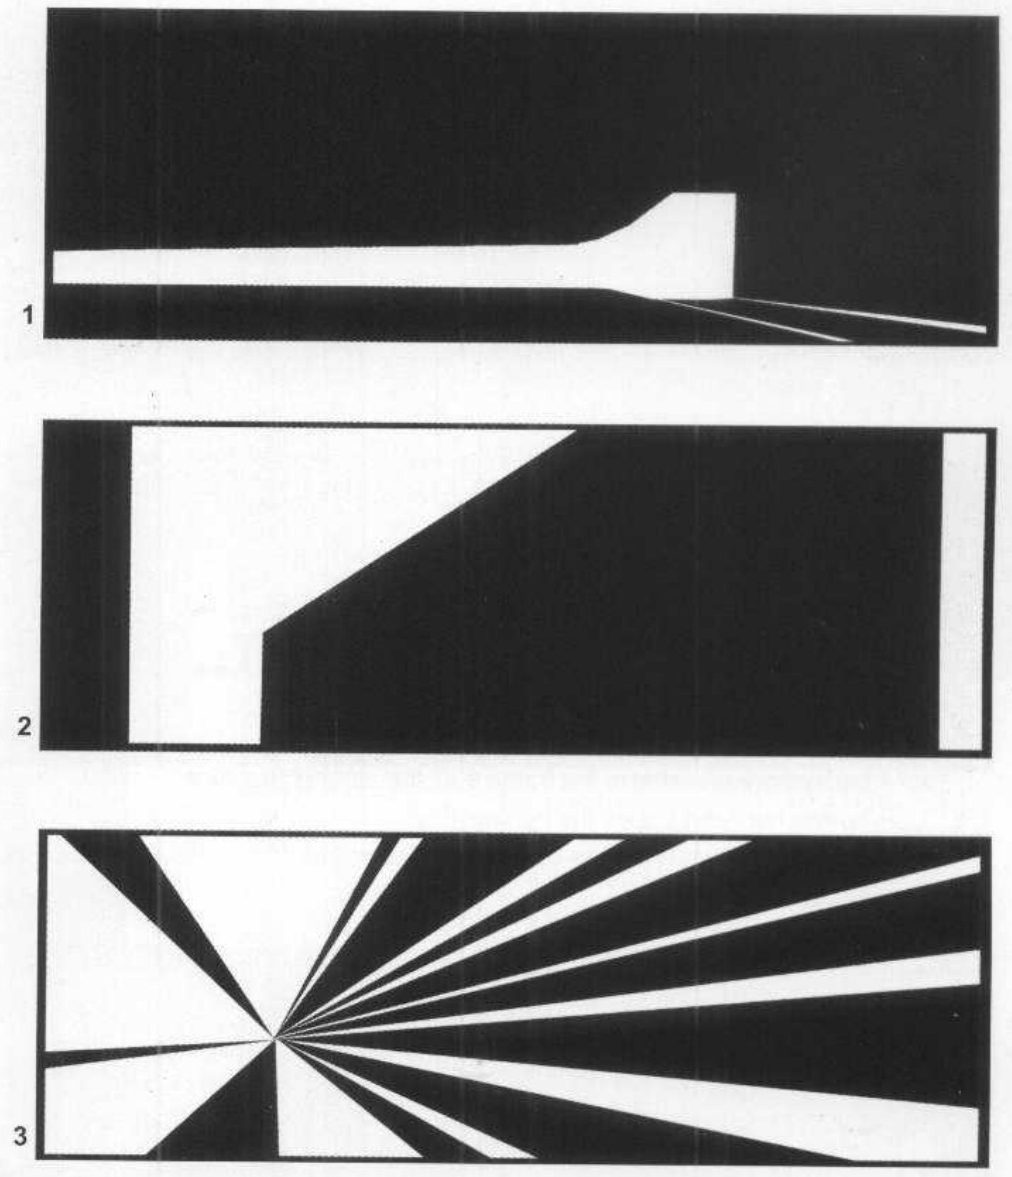
His readings, close paraphrase (p.79). 1: still mostly parallel to the lens, but the engine already heads for camera and the backdrop is a dark uphill forest. 2: more menacing and too big for the frame, but a long lens keeps some sense of distance and eases the stress. 3: the most dramatic of all six. A wide-angle lens makes the nearest wheels huge against ones a few yards back, and the low, tilted camera makes the ground feel unstable and the train gigantic.
When you practise
Read once
- Write one line: what should the last frame make you feel, and where does the first one start?
- Warm-up on his frames: cover his abstracts, then reduce his three p.76 frames to pure black and white at thumbnail size. Open his version and compare.
- Pick a beat of your own that builds. Someone climbing towards a door, a storm arriving over a town, a rival walking up: any approach works.
- Draw three abstracts first: two values only, no detail. Choose a route. His first keeps the camera on one spot and climbs by getting closer and using more interesting shapes. His second uses perspective and changes the lens, from long to wide and low.
- Lay the three abstracts side by side and read them as if you had walked in cold. If they don’t climb, change the shapes and leave the detail alone.
- Dress each abstract as a scene. Keep the abstract under it.
- Shrink the three finished frames and flip them.
CheckHis test is the walk-in-cold read: before you know the story, the characters or the period, what does each frame say (p.77)? His abstracts move from a flat line, to uneven shapes, to diagonals and closeness (p.77). In the perspective route, the peak comes from near/far size contrast, an unstable ground plane and a low, tilted view (p.79). Do your abstracts climb like that without the drawing on top? Then compare with his six.
Two-value ramp
Three abstracts first. They must climb on their own. Then dress them.
Keep asking: what would this first impact be like, and what would it be telling us?